 Understanding Price List Updates
This chapter provides an overview of price list updates, lists prerequisites, and discusses how to update price lists.
Understanding Price List UpdatesYou can update product list prices on price lists individually using the Price Lists page, or apply changes globally using the Price List Maintenance process in Excel.
Mass price list maintenance is performed using Excel. You create the price list updates directly in Excel. You can also use this process to update price lists and to convert an existing price list into another currency. Excel communicates those changes to Enterprise Pricer using a simple request and reply system. No other technologies are required to provide a communication channel with the Enterprise Pricer.
Remember:
You can change prices on the Price List page between the export and import of pricing data.
You can override those changes when new pricing information is imported from Microsoft Excel.
Price list maintenance requires that you use portal navigation and a Windows client running Microsoft Excel.
This diagram illustrates the process for performing mass price list updates:
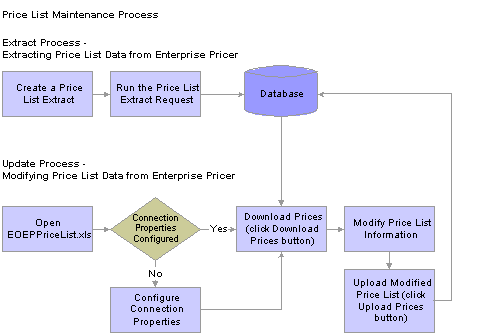
Price List Maintenance process
To update price lists using price list maintenance:
On the Price List Extract page, create a request for data, specifying the exact search criteria and submit the job for processing.
The application extracts the selected data and stores it into a EOEP_LIST_COST record.
Click the Download Prices button and supply logon data.
Excel loads and formats the received data.
Note. If you are working with the EOEPPriceList.XLS file for the first time, click the Connection Properties button to set connection properties. Typically, the system administrator should have already performed this step.
Click the Price Maintenance button or directly modify the spreadsheet to update prices.
You can adjust by amount or percent the price for all items in the price list.
When you choose the rows to modify, you can specify criteria such as current-dated rows, future-dated rows, or all rows. In addition, you can apply the changes to visible, hidden, or all rows, as necessary. You can also specify the rounding decimals for the newly created prices.
You can adjust the start and end dates for the price list.
When choosing which rows to modify, you can specify criteria such as current dated rows, future dated rows, or all rows. In addition, you can apply the changes to visible, hidden, or all rows, as necessary.
You can set the protect flag for all items in the price list.
When choosing which rows to modify, you can specify criteria such as current dated rows, future dated rows, or all rows. In addition, you can apply the changes to visible, hidden, or all rows, as necessary.
Click the Upload Prices button and provide logon data to upload the changes made to the price lists to Enterprise Pricer.
Confirmation of the update is sent back to Excel. For each row that successfully applies, the status column turns green and reads Uploaded. If the a row in the price list does not post properly, the column turns red and reads Failed.
Modify any rows that failed to post and click theUpload Prices button again to resubmit the rows.
Prerequisites
Before using the Excel spreadsheet to maintain price lists:
The system administrator should confirm that the workstation is correctly configured.
Several supporting applications are needed to enable Microsoft Excel and the PeopleSoft system to communicate with one another. Additionally, there are some minimum system requirements for proper functioning of the download and upload of data between Excel and the PeopleSoft system. Ensure that the workstation is an IBM Compatible PC running Windows 2000 Professional operating system and that Microsoft Excel for Office 2000 is installed. You also need the Microsoft XML Parser (MSXML.dll) Version 3.0 SP2 or greater, Visual Basic 6.0 SP5: Run-Time Redistribution Pack, and Microsoft Office 9.0 Object Library or greater.
Enter connection information to the PeopleSoft system.
The information provided is saved to the spreadsheet for further connection attempts. The system administrator should complete this information on a copy of the EOEPPriceList.xls file and distribute the modified spreadsheet all users. These are the settings for the connection properties on the EOEPPriceList.xls file.
|
Property |
Set To |
|
Web Server Machine Name |
Enter the name of the PeopleSoft web server. |
|
Protocol |
Enter the Web server protocol. Either http or https. |
|
HTTP port |
Port the web server is using. |
|
Portal |
Name of the portal that is used. |
|
Site Name |
Enter the site name as defined when setting up PeopleSoft Internet Architecture. |
|
Node Name |
Enter the node name of the PeopleSoft system. |
|
Language Code |
Enter the PeopleSoft language code to specify the data download language. |
|
Chunking Factor |
If data is uploaded and processed by a component interface, enter the number of transactions that are sent at a time for processing by the component interface. |
Obtain security permission.
The ability to perform price extracts using the Price Extract component (EOEP_PRCLST_XTRACT) is controlled by user security. You must have permission to use this object if you are responsible for extracting the price list data for mass maintenance purposes.
The modified price list data is uploaded using the EOEP_PRICE_LIST_CI component interface. You must have permission to use this object if you plan to use the EOEPPriceList.xls file to perform mass Price List Maintenance for Enterprise Pricer.
See Also
Updating Price Lists
This section discusses how to:
Export price list data to Microsoft Excel.
Update price lists.
Update currencies.
Reset price list data.
Customize display options.
Print price list data changes.
Display price list charts.
Upload price list data.
 Page Used to Update Price Lists
|
Page Name |
Object Name |
Navigation |
Usage |
|
EOEP_LIST_RCNTL_PG |
Pricing Configuration, Mass Updates, Price List Extract |
Export price list data to Microsoft Excel for mass adjustments or currency conversion. |
Exporting Price List Data to Microsoft ExcelAccess the Price List Extract page.
|
Select to restrict the download to a specific currency. A single price list ID can encompass price lists in more than one currency. |
|
|
Currency Code To |
Convert an existing price list into another currency. |
|
Cost Business Unit |
Choose the warehouse that the system should use for retrieving cost data because product costs for inventory items are stored per warehouse (PeopleSoft Inventory business unit). |
|
Price List As Of Date |
Enter a price list as of date. The system downloads the price list with the start date that is less than or equal to the date that you enter here and in all detail rows included on the price list. Each product on a price list can have more than one price-each with a unique start date and end date. Additionally, all future price list entries are downloaded. In this example, assume that the Price List As of Date field is set to January 1, 2005. The current price list entry, which has a start date of December 1, 2004 and an end date of December 1, 2005, is downloaded. Any price list entries that fall before this current entry are not downloaded. Any price list entries that have a start date beyond this range are also downloaded. |
|
Product Cost Effective Date |
Determines which cost value to return. |
See Also
Updating Price ListsClick theDownload Prices button to download the information to the spreadsheet.
The Toggle Display button is the only other button that acts directly on the data in the spreadsheet; the other buttons open dialog boxes where you select other options.
Downloaded information appears in Microsoft Excel in three sections on the spreadsheet delineated by different column colors:
The Status field identifies the status of the price list record in the PeopleSoft system.
When you export the price list to Excel from the PeopleSoft system, the status reads New. When you modify a price list record and it successfully posts back to the PeopleSoft system, the status reads Uploaded. If an item fails to post in the PeopleSoft system from Excel, the status column reads Failed.
Key fields that identify the price list and product appear in yellow columns.
Editable fields appear in the light blue columns.
These fields include New Cost, New Price, Diff Abs., New Start Date, New End Date, and New Protected Flag.
Current price and cost information appear in grey columns.
These cells and all of the other cells on the spreadsheet are locked.
Click the Customize Display button to change the colors of these columns.
Note. The header information varies if you are updating price lists within the same currency or using Price List Maintenance to convert a price list to a new currency.
|
|
Click the Download Prices button to populate the spreadsheet with product information. |
|
Prod. IDs (product IDs) |
View product IDs. A product ID might have multiple listings in a single price list if there are multiple prices with unique start and end dates, units of measure, or currencies. |
Editable Columns
The data in these columns updates the PeopleSoft tables. You can edit each cell individually or apply mass maintenance changes.
|
New Cost |
View cost information for inventory products and for non-inventory products. You cannot edit this column. |
|
New Price |
Matches the value in the Price field for the date range represented by that row until you make changes. |
|
New Start Dt. (new start date) |
Matches the start date on the price list. The minimum value for this field is the current date plus one day. |
|
New End Dt. (new end date) |
Matches the end date on the price list. The minimum value for the new end date is the current date plus one day. |
|
New Protected. (new price protected) |
When you establish prices on price lists, selecting the Price Protected option prevents the system from applying adjustments to the price. In addition, the Price Protected option on the sales order is selected. You can alter this option in the column. |
Current Price and Cost Information Columns
The information in these columns is available for comparison, but you cannot change the values. The toggle between the two differences affects both the New Diff. (new difference) column and the Diff % (difference percent) column.
Price List Maintenance Dialog Box
Access the Price Maintenance dialog box to apply changes to multiple products in the editable columns:
|
|
Click the Price Maintenance button to access the Mass Maintenance dialog box. |
|
Type |
Select the type of change: Percent, Amount, Date, or Protected Flag. The label of the first field changes depending on the type of change that you make. Options are unavailable when the selection criteria does not apply. |
|
Select the basis for the change: Price List (New Price column), Differences between the cost and list price (New Diff. column), End Date (New End Date column), or Start Date (New Start Date column). |
|
|
Click this button to see an example of the current change before you apply it to data. Remember that prices are not limited to positive values. |
|
|
When a pricing change is applied, it's possible to alter the number of decimals that the system uses in rounding to the new price by changing the value in the field. Values are 0 to 4. You can round to a different number of decimals without changing any other data. Keep the default of 0 in the first field in the dialog box and alter the number of decimals for rounding. Note. The default value that appears in the number of decimals for rounding is determined by computer settings. To change the default, select Control Page, Regional Settings, Currency. |
Updating CurrenciesAccess the Price List Extract page and select the Single option.
The Currency Code To field on the Price List Extract appears. Enter a currency code to add a new currency within the selected price list ID. If the currency code that is entered field already exists for the price list, the price list is updated.
The fields on the Mass Maintenance dialog box that pertain to currency updates are:
|
Exchange Rate |
Enter the appropriate exchange rate in the Apply this Exchange Rate to Prices field. This value can change daily. Obtain the current exchange rate from the appropriate person in the organization. You cannot base changes on differences in this mode because the cost information appears in the original currency code, and the recalculated pricing reflects the currency to values. Note. You must apply the same exchange rate to all the prices on the spreadsheet. |
Resetting Price List DataAccess the Reset Price List Data dialog box to reset the data to the original data from the download:
|
|
Click the Reset Data button on the Price Maintenance toolbar to reset the columns to the original settings from the download. You can apply resets selectively using the filtering function. |
|
New Prices to Active Prices |
Select to reset values in the New Price column to those that appeared at download. These are the same values as those in the Active Price column. |
|
New Prices to New Cost |
Select to reset values in the New Price column to match the values in the New Cost column. |
|
Start Dates |
Select to reset values in the New Start Dt. column to those that appeared at download. |
|
End Dates |
Select to reset values in the New End Dt. column to those that appeared at download. |
|
Protected Flag |
Select to reset values in the New Protd. column to those that appeared at download. |
Customizing Display OptionsAccess the Customize Sheet dialog box:
|
|
Click the Customize Display toolbar button, and select one of these options: |
|
Color Selection |
Enables you to set the cell color for each of the three data types: key fields, new data, original data. |
|
Current Settings |
Select each column from the drop-down list box, and enter values in either the New Heading or New Width fields, or both, if you prefer different headings or column widths. |
|
Adjust Column Width to Best Fit |
Select this option to set column widths so that the values entered appear. These widths override any manually entered column widths. |
|
Display changed rows only |
Select this option to display only those rows that are changed. To display all rows, clear this option. |
|
Reset all Data Filters |
Select the option to display all the downloaded data (if you have restricted the appearance of spreadsheet rows using the filtering option on one or more columns). |
|
Apply |
Click this button to apply changes to each column one at a time. |
Printing Price List Data ChangesClick the Print Price List button to print the spreadsheet. The system includes auto-filter settings and prints only the rows that are changed.
|
|
Click the Print Price List button to print the spreadsheet data. |
Displaying Price List ChartsUse the Create/Display Charts dialog box to create graphical charts of the list prices.
To change the display properties of the chart, use the standard Microsoft Excel menu Format options.
|
|
Click the View Charts button to create charts based on prices, differences, or both. |
|
Create new Chart |
Select this option to define the type of chart that you want to create. |
|
Display Existing Chart |
Select this option to select a chart that you want to view again. |
|
Return to Price Lists |
Select this option to exit the chart creation process and return to the price list spreadsheet. |
In the Chart selection dialog box, select:
|
Compare Prices on List |
Select this option to compare the existing downloaded price and the new price entered. |
|
Compare Differences |
Select this option to compare the price differences among the items on the price list. |
|
Both Price Lists and Differences |
Select this option to display a chart with both outputs from the Compare Prices on List and Compare Differences fields. |
|
Keep previous chart |
Select this option to keep the previous chart. If you do not select this option, the previous chart is replaced. |
|
OK |
Click, and the chart that you have selected appears. |
|
Return to Product Prices |
Click the Chart button on the price maintenance toolbar and select the Return to Product Prices option to return to the spreadsheet. |
Uploading Price List DataThe system uploads only rows with a change in the New Price, New Start Dt. (new start date), New End. Dt. (new end date), or New Protd. (new protected) columns.
When you change the new end date, new price, or new protected columns, the row is updated for the price list. When you change the new start date, a new row is inserted. You cannot have overlapping rows. If you make a change that creates an overlapping row, an error message appears, and you cannot upload the change. The message indicates which row you must correct. Position the cursor at the cell that needs changing to correct the overlapping data.
These scenarios describe the effect of changing start and end dates:
|
Row |
New Start Date |
New End Date |
Original Start Date |
Original End Date |
|
1 |
January 1, 2003 |
October 31, 2003 |
January 1, 2003 |
October 31, 2003 |
|
2 |
November 1, 2003 |
December 31, 2003 |
November 1, 2003 |
December 31, 2003 |
If you attempt to change the new start date in row two to December 1, 2003, the original data still exists. The new data becomes a new row because you changed the start date. The new start date of December 1, 2003 overlaps with the original data in row two.
This error message appears when you attempt to upload: “At least one new date range where start date was changed overlaps with the original date range of that same row. First incident on row 2. Processing stopped.”
After you change the new start date to January 1, 2004 and the new end date to January 1, 2099, the upload creates these rows in the database:
Original range of row one (January 1, 2003 – October 31, 2003).
New range of row two (January 1, 2004 – January 1, 2099).
Original range of row two (November 1, 2003 – December 31, 2003).
Scenario B
|
Row |
New Start Date |
New End Date |
Original Start Date |
Original End Date |
|
1 |
January 1, 2003 |
October 31, 2003 |
January 1, 2003 |
October 31, 2003 |
|
2 |
December 1, 2003 |
January 1, 2099 |
December 1, 2003 |
January 1, 2099 |
If you attempt to change the new start date in row one to January 1, 2004 and the new end date to December 31, 2004, the original data still exists. The new data becomes a new row because you changed the start date. The new start date of January 1, 2004 overlaps with the original data in row two.
This error message appears when you attempt to upload: “Row one has a new date range that overlaps with the original date range of row two and they both are for the same list, currency, product, and UOM. Processing stopped.”
When you change the new start date to November 1, 2003 and the new end date to November 30, 2003 in row one, the upload creates these rows in the database:
New range of row one (November 1, 2003 – November 30, 2003).
Original range of row one (January 1, 2003 – October 31, 2003).
Original range of row two (December 1, 2003 – January 1, 2099).
Scenario C
|
Row |
New Start Date |
New End Date |
Original Start Date |
Original End Date |
|
1 |
January 1, 2003 |
December 31, 2003 |
January 1, 2003 |
December 31, 2003 |
|
2 |
January 1, 2004 |
December 31, 2004 |
January 1, 2004 |
December 31, 2004 |
|
3 |
January 1, 2006 |
December 31, 2006 |
January 1, 2006 |
December 31, 2006 |
If you attempt to change the new start date in row two to January 1, 2005 and the new end date to July 1, 2005, the original data still exists. The new data becomes a new row because you changed the start date. If you also attempt to change the new start date in row three to June 1, 2005 and the new end date to December 31, 2005, the original data still exists. The new data becomes a new row because you also changed the start date for row three. The new start date of June 1, 2005 overlaps with the new data in row two.
This error message appears when you attempt to upload: “Row two has a new date range that overlaps with the new date range of row three and they both are for the same list, currency, product, and UOM. Processing stopped.”
After you change the new end date to May 31, 2005 in row two, the upload creates these rows in the database:
Original range of row one (January 1, 2003 – December 31, 2003).
New range of row two (January 1, 2005 – May 31, 2005).
Original range of row two (January 1, 2004 – December 31, 2004).
New range of row three (June 1, 2005 – December 31, 2005).
Original range of row three (January 1, 2006 – December 31, 2006).
Uploading Price List Data
Click the Upload Prices button on the price maintenance toolbar.
|
|
The prices are uploaded into the PeopleSoft system. If the row applies successfully the status in the Status column for row changes to Uploaded. If the row does not apply successfully the status in the Status column changes to Failed. Correct the error(s) for the row and click the Upload Prices button. |