 Understanding ECR and ECO Processing
This chapter provides an overview of ECR and ECO processing and discusses how to:
Approve and convert ECRs.
Promote ECO activities.
Approve ECOs.
View approved, denied, and recycled ECO activities.
Transfer BOMs and routings.
Make mass BOM changes by ECO and automatically create new item revisions by ECO.
Understanding ECR and ECO ProcessingThe complexity of your change processes determines which, if any, of these process steps you need to take. Processing and transferring steps for PeopleSoft Enterprise Engineering include:
Approving ECRs and converting them to ECOs.
Approving and promoting ECOs through their sequence of ECO activities.
Approving ECOs.
Displaying approved, denied, and recycled ECO activity.
Transferring EBOMs to production by way of ECOs.
Auditing EBOM release and copy.
Note. All of these steps are optional, except for approving ECOs, which is required when you release EBOMs back to production.
ECR and ECO approval processing are integrated with the Workflow Virtual Approver. This enables you to define multistep approval processing, including approve, deny, and recycle functionality.
See Also
Delivered Workflows for PeopleSoft Enterprise Engineering
Reviewing an ECR and ECO Workflow Processing ExampleThis diagram illustrates the ECR workflow approval process:

ECR processing workflow
This diagram illustrates the ECO workflow approval process:
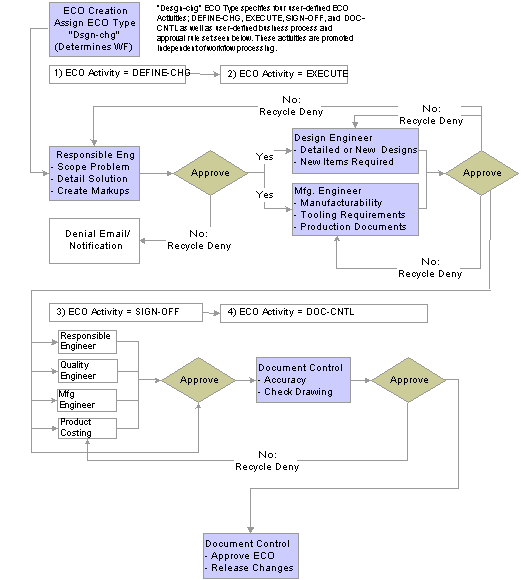
ECO workflow processing
 Prerequisites
If you intend to generate ECO numbers automatically, you must set up automatic numbering for ECOs prior to converting ECRs to ECOs, by using the Automatic Numbering page.
If you plan to use PeopleSoft Enterprise Workflow with ECRs or ECOs, you must define the PeopleSoft Enterprise Workflow business processes and approval rules, as well as ECO activities and ECO approval types, before you process the ECOs.
Approving and Converting ECRs
PeopleSoft Enterprise Engineering enables you to efficiently track and manage engineering change processes.
This section discusses how to approve and convert ECRs.
Page Used to Approve and Convert ECRs
|
Page Name |
Object Name |
Navigation |
Usage |
|
EG_ECR_APPROVAL |
Engineering, Engineering Changes, Approve ECRs/Create ECOs, Approve/Convert ECRs |
Change the status of ECRs, and optionally convert ECRs into ECOs. |
Approving and Converting ECRsAccess the Approve/Convert ECRs page.
|
Status |
Select an ECR status. Values are:
|
To approve an ECR:
Select Approved as the status.
Click the Save button.
Approving an ECR does not convert the ECR to an ECO.
Upon save, if you have PeopleSoft Enterprise Workflow enabled, the ECO is sent to a list of defined roles for approval.
To convert an ECR to an ECO:
Select Approved as the status.
Click the Convert to ECO button.
Enter an ECO number.
If you have set up automatic numbering for ECOs, then the system automatically generates an ECO number when you save the information.
Click the Save button.
The ECO is not created until you click this button.
Additional Information
When you convert an ECR to an ECO, the system:
Enters by default the ECR header information in the ECO header.
Reflects the converted ECR reference number on the ECO, and marks the ECO as converted from an ECR.
Copies by default the ECR reason codes and action codes to the ECO.
Reflects the ECR assemblies affected data in the ECO.
Copies the ECR header and assembly document associations to the ECO.
Sets the status of the new ECO to Pending.
After you convert an ECR to an ECO, the originating ECR remains unaffected except that the system changes its ECR status to Converted. At this point, you can modify the ECO without any effect on the original ECR. Once you convert an ECR, you can no longer change its status.
Note. If ECR workflow is enabled, you can define workflow processing and approval rules to route the ECR to the appropriate role.
See Also
Entering ECR Header Information
Promoting ECO ActivitiesECO activities represent phases or milestones associated with an ECO. You can promote the activities independently or in coordination with workflow approval processing. As an example, if you are not using workflow, you can still set up the static list and promote or demote the ECO. The system ensures that if activities exist, they all must be promoted before the ECO can be approved. If you are using both workflow and activities, the system routes the ECO workflow to the various steps and role users based on workflow-defined rules.
While you probably want to use one method or another, you could also independently continue to promote the ECO through the static list of activities.
This section discusses how to promote ECO activities.
See Also
Delivered Workflows for PeopleSoft Enterprise Engineering
Page Used to Promote ECO Activities
|
Page Name |
Object Name |
Navigation |
Usage |
|
EG_ECO_UP_ACTY |
Engineering, Engineering Changes, Promote ECO Activity, Promote ECO Activity |
Promote or demote ECOs through their lifecycle of ECO activities if you are using ECO approval types that have activities defined. |
Promoting ECO ActivitiesAccess the Promote ECO Activity page.
|
Promote |
Click to change the current status from Pending to Approved and to advance the ECO to the next activity within the sequence of ECO activities listed. Once all ECO activities have been approved and promoted, you can approve the ECO itself. |
|
Demote |
Click to change the current activity to the previous activity listed, thus demoting the ECO. When you demote an ECO, the system automatically resets the status of the activity being demoted to Pending. |
Note. Promoting and demoting ECOs has no bearing on PeopleSoft Enterprise Workflow approval processing.
Approving ECOs
You must approve an ECO prior to transferring EBOM and engineering routing changes to production by using the Engineering Transfer pages.
This section discusses how to approve ECOs.
Page Used to Approve ECOs
|
Page Name |
Object Name |
Navigation |
Usage |
|
EG_ECO_APPROVAL |
Engineering, Engineering Changes, Approve ECOs, Approve ECOs |
Change an ECO’s status, including approving an ECO. |
Approving ECOsAccess the Approve ECO page.
When you enter a new ECO, the system automatically sets the ECO status to Pending. Once you approve the ECO for release, or if the ECO is denied or canceled, you can use this page to change the status accordingly.
Once the ECO is approved, and all BOMs and routings are transferred to production, the system automatically sets the ECO status to Released.
|
Status |
Select a status. Values are: Approved, Canceled, Denied, Pending, and Released. If there are no items on the ECO that require BOMs to be transferred with engineering transfers, you can set the status of the ECO to Released on this page. |
To release ECOs that contain items, including BOM or routing changes in addition to items without BOM or routing changes (such as purchase item changes):
Set the ECO status to Approved on this page.
This is required to release BOM and routing changes to production.
Run the Engineering Transfers process to transfer all BOM and routing changes to production.
If the ECO that you are releasing is for items without BOM or routing changes, you do not need to perform step 3.
Set the ECO status to Released.
This enables you to automatically release in one step all items that have no BOM or routing changes.
Note. Approving an ECO has no bearing on PeopleSoft Enterprise Workflow approval processing.
|
Send Email to Vendors |
Click to send email to vendors. The email contains one or two URLs. One URL sends the recipient to the Maintain ECOs - Header page in PeopleSoft Enterprise Engineering. A second URL sends the recipient to the Change Order Detail page. |
See Also
Viewing Approved, Denied, and Recycled ECO ActivitiesThis section discusses how to view approved, denied, and recycled ECO activities.
Page Used to View Approved, Denied, and Recycled ECO Activities
|
Page Name |
Object Name |
Navigation |
Usage |
|
EG_ECO_OPR_APPR |
Engineering, Engineering Changes, Review ECO Information, ECO Workflow Approval |
If you are using ECO approval types and workflow approval processing, you can use this page to view approved, denied, or recycled ECO activity by user ID. |
Viewing Approved, Denied, and Recycled ECO ActivitiesAccess the ECO Workflow Approval inquiry page.
You can view approved, denied, or recycled ECO activity by user ID. When ECO activities are denied or recycled by using workflow, this page can be triggered by a workflow event. This enables previous role users to view the ECO activity that was denied or recycled, who denied or recycled it, and any associated notes. In addition, you can use this page to view ECO activities that have been approved by users within workflow.
Transferring BOMs and RoutingsWhile the BOM and routing copy functionality enables you to copy a single BOM or routing, you can also transfer multiple BOMs or routings at the same time. You can transfer them by assembly items, either a list or range of items, but it is more powerful to transfer BOMs and routings as part of the workflow approval/ECO release to manufacturing process. In either case, all BOM and routing data, including multiple outputs, is transferred.
This section discusses how to:
Make transfer selections.
Select ECO transfer ranges.
Select item transfer options.
View BOM exceptions.
View routing exceptions.
Pages Used to Transfer BOMs and Routings
|
Page Name |
Object Name |
Navigation |
Usage |
|
EG_ENGTRNS_REQ |
Engineering, Engineering Changes, Engineering Transfers, Transfer Selection |
Define BOM and routing transfer criteria for the Engineering Transfer COBOL SQL process (ENPBTRNS). |
|
|
EG_ENGTRNS_REQ2 |
Engineering, Engineering Changes, Engineering Transfers, ECO Selection |
Define the ranges of ECOs by which you want to transfer BOMs and routings. All BOM and routing data, including all BOM outputs, is transferred. |
|
|
EG_ENGTRNS_REQ3 |
Engineering, Engineering Changes, Engineering Transfers, Assembly Selection |
Make engineering transfers by assembly item. |
|
|
EN_BOM_TRN_STAT |
Engineering, Engineering Changes, Review ECO Information, Transfer Exceptions, BOM Exception |
View BOM exceptions that weren’t valid or transferred, as well as the reason why the BOM wasn’t valid or transferred. |
|
|
EN_RTG_TRN_STAT |
Engineering, Engineering Changes, Review ECO Information, Transfer Exceptions, Routing Exception |
View routing exceptions that weren’t valid or transferred, as well as the reason why the routing was not valid or transferred. |
|
|
EG_BOM_AUDIT |
|
View all items whose EBOMs or MBOMs you have copied or transferred. The system makes a BOM Transfer/Copy Audit page entry for each EBOM transferred or copied to production. |
|
|
EG_RTG_AUDIT |
|
View all items whose manufacturing or engineering routings you have copied or transferred. The system also makes a Routing Transfer/Copy Audit page entry for each engineering routing transferred or copied to production. You can view all items whose engineering routings or manufacturing routings you have copied or transferred. |
Making Transfer SelectionsAccess the Engineering Transfer - Transfer Selection page.
|
From/To |
Select the direction of the transfer: Engineering to Manufacturing or Manufacturing to Engineering. |
|
Transfer |
Select what you want to transfer: BOMs, Routings, or BOMs and Routings. If you are transferring BOMs and routings by ECOs, then this transfer option is used in conjunction with the BOM and Rtg check boxes on the ECO to determine whether the BOM, routing, or both are transferred. |
|
Transfer Options |
Select the transfer option. Values are:
Note. Validate, in this context, means that all BOMs and routings are valid for transfer (no placeholders, all items are approved in PeopleSoft Enterprise Inventory, items aren’t staged date-controlled); it doesn’t mean that the system checks for loops. It is recommended that you run the BOM Verification process after you have transferred an EBOM to manufacturing. |
|
Only if all BOMs/Rtgs valid |
Select to enable the system to transfer all BOMs and routings, but only if they are all valid; in other words, they have no exceptions. When transferring BOMs, if even one BOM has an error, the system won’t transfer any BOMs. When transferring routings, if even one routing has an error, the system won’t transfer any routings. Finally, if you are transferring both BOMs and routings, if either one BOM or routing has an error, the system won’t transfer any BOMs or routings. |
|
Any valid BOMs/Routings |
Select to enable the system to transfer any valid BOMs and routings; in other words, those with errors won’t be transferred. In either case, you can view the nonvalid BOMs and routings by using the Transfer Exceptions pages. |
|
Overwrite Existing BOMs |
Select to enable the system to completely replace the existing BOMs. If you don’t select this option, and the system finds an existing BOM for an item, the system won’t transfer the BOM, and will display a message in the Transfer Exceptions pages and treat it as an error. |
|
Overwrite Existing Routings |
Select to enable the system to completely replace the existing routings. If you don’t select this option, and the system finds an existing routing for an item, the system won’t transfer the routing, and will display a message in the Transfer Exceptions pages and treat it as an error. |
|
Item Selection |
Select one of these options:
|
|
Source BOM does not exist |
If you are transferring BOMs by ECOs, select if you want an exception to appear on the BOM Exceptions pages. If you don’t select this option, the system displays a warning if the source BOM doesn’t exist. By selecting this option, you can prevent the transfer of all BOMs on an ECO if, for example, an item on the ECO has been flagged as requiring a BOM change when no BOM exists for the item. |
|
Source routing does not exist |
If you are transferring routings by ECOs, select if you want an exception to appear on the Routing Exceptions pages. If you don’t select this option, the system displays a warning if the source routing doesn’t exist. |
Note. The Source BOM does not exist and Source routing does not exist check boxes apply only to transfers by ECO. If you choose assembly Item as your item selection, these check boxes are unavailable for selection.
Selecting ECO Transfer RangesAccess the Engineering Transfer - ECO Selection page.
You can enter an ECO number range with or without the ECO schedule date range.
Transferring from PeopleSoft Enterprise Engineering to PeopleSoft Enterprise Manufacturing
If you are transferring from PeopleSoft Enterprise Engineering to PeopleSoft Enterprise Manufacturing, only approved ECOs appear as possible choices in the ECO Number Range From and To fields.
Note. The BOMs and routings for items are validated and transferred on approved ECOs if they have the appropriate BOM Chg (BOM change) or Rtg Chg (routing change) check boxes selected on the Maintain ECOs - Header: BOM/Rtg Information page or on the Maintain ECOs - Items Affected - Detail: BOM/Rtg Information page; these BOMs and routings must also have an item release status of Pending. When you are transferring BOMs, BOM validations occur only for items that have the BOM Chg check box selected; when you are transferring routings, the routing validations occur only for items that have the Rtg Chg check box selected. Transfers are also based on the BOM type/BOM code and routing type/routing code selected. If you leave the BOM code blank, then all BOMs for the item are transferred. Similarly, if you leave the routing code blank, all routings for the item are transferred. After the transfer is successfully made, the system updates the assembly item status to Released. If all BOM codes or all routing codes for the item are being transferred, all BOMs and routings must be transferred successfully before the item status can be updated to Released.
After you transfer BOMs from PeopleSoft Enterprise Engineering to PeopleSoft Enterprise Manufacturing by ECO, the system automatically updates the related ECO’s header status to Released, if all the BOMs and routings related to the ECO are released. The system also updates the individual ECO assembly items to Released, if it was transferred successfully. This status is reflected on the Maintain ECOs- Items Affected: Status page.
This table illustrates what check boxes you need to select in the Items Affected group box on the ECO Header page or the Items Affected page, for individual ECO assembly items to be released on approved ECOs when you successfully transfer BOMs and routings:
|
When Transferring |
Use These Check Boxes |
Sets Release Status To |
|
Only BOMs |
BOM Chg check box must be selected; Rtg Chg check box must be cleared. |
Released |
|
Only routings |
Rtg Chg check box must be selected; BOM Chg check box must be cleared. |
Released |
|
Both BOMs and routings |
Both BOM Chg and Rtg Chg check boxes must be selected if both BOM codes and routing codes are being transferred. The BOM Chg check box must be selected if only BOM codes are being transferred. The Rtg Chg check box must be selected if only routing codes are being transferred. |
Released |
Note. If, for an individual ECO assembly item, you are transferring only BOMs or only routings, but you selected both the BOM Chg and Rtg Chg check boxes on the Maintain ECOs - Header: BOM/Rtg Information page or on the Maintain ECOs - Items Affected - Detail: BOM/Rtg pages, then that item won’t be set to Released on the Maintain ECOs - Items Affected: Status page. If you only have the BOM Chg check box selected or the Rtg Chg check box selected, and you transfer both BOMs and routing, then the ECO assembly item is released after a successful transfer of the BOM or routing.
BOM Transfer Errors
These BOM transfer errors prevent the release of an ECO:
Assembly/Component/Output/Substitute item does not exist in target business unit.
Assembly/Component/Output/Substitute item has a status other than Active, Hold, or Discontinue prior to transferring to manufacturing.
You have not selected Existing BOMs as an overwrite option, and the BOM exists in the target.
The quantity per value contains a decimal value when the quantity code is per order and the component/output item is serial-controlled.
PeopleSoft Enterprise Inventory items can have decimal and whole number quantity precisions for each unit of measure (UOM). This validation applies not only to serial-controlled items, which are a subset of whole number items, but also to all items whose standard UOM has a quantity precision of whole number.
The calculated QPA for a component is less than the allowed precision as specified in the manufacturing installation page (Qty per assembly / BOM qty).
If, for example, the allowed precision is 4, then the calculated QPA can’t be less than .0001 for the component/operation sequence.
Component ID or Output ID is a configured item.
The source BOM doesn’t exist, and you have selected the Source BOM does not exist check box (error option), when transferring by ECOs, on the Transfer Selection page.
There are five BOM transfer warnings:
An operation sequence doesn’t exist on the to be transferred item’s primary routing (routing code 1).
The source BOM doesn’t exist and you have not selected the Source BOM does not exist check box, when transferring by ECOs, on the Transfer Selection page.
Assembly/Component/Output/Substitute items have a status of Hold or Discontinue prior to copying to manufacturing.
The quantity per value contains a decimal value when the quantity code is per assembly, and the component/output item is serial-controlled or its standard UOM has a quantity precision of Whole Number.
These routing transfer errors prevent the release of an ECO:
The source routing doesn’t exist and you have selected the Source routing does not exist check box, when transferring by ECOs, on the Transfer Selection page.
You have not selected Overwrite Existing Routings, and the routing exists in the target.
Routing’s assembly item isn’t approved.
There are two routing transfer warnings:
An operation sequence doesn’t exist on the to be transferred primary item routing (routing code 1).
The source routing doesn’t exist, and you have not selected the Source routing does not exist check box, when transferring by ECOs, on the Transfer Selection page.
Note. The existence of BOM and routing transfer warning messages doesn’t prevent the release of an ECO.
Transferring from PeopleSoft Enterprise Manufacturing to PeopleSoft Enterprise Engineering
If you are transferring from PeopleSoft Enterprise Manufacturing to PeopleSoft Enterprise Engineering, only pending ECOs appear as possible choices in the ECO Range From and To fields.
Note. The BOMs and routings for items are validated and transferred on pending ECOs if they have the appropriate BOM Chg or Rtg Chg check boxes selected on the Maintain ECOs - Header: BOM/Rtg Information page or on the Maintain ECOs - Items Affected - Detail: BOM/Rtg page; these BOMs and routings must have an item release status of Pending.
Selecting Item Transfer OptionsAccess the Engineering Transfer - Assembly Selection page.
Item Options
You can select a range of items, and then select the from and to range of items, as well as the BOM type, BOM code, routing type, and routing code. If you enter a specific value in the BOM Code or Routing Code fields, then you are indicating that those specific codes associated with the range of items are to be transferred. If either of these fields is left blank, then you are indicating that all BOM and routing codes are to be transferred. In either case, all BOM outputs are transferred.
You can also select a list of assembly items, which enables you to select individual items.
|
|
If you select List of Assembly Items, and click the Search button, the system displays the Select Assemblies by Items Where Used page. |
Note. If you are transferring by list of assembly items, the items should have BOMs or routings associated with them.
For both item options:
If you are transferring from PeopleSoft Enterprise Engineering to PeopleSoft Enterprise Manufacturing, the system displays EBOMs if you’re transferring BOMs and engineering routings (ERTGs), if you’re transferring routings.
If you are transferring from PeopleSoft Enterprise Manufacturing to PeopleSoft Enterprise Engineering, the system displays MBOMs if you’re transferring BOMs and manufacturing routings if you’re transferring routings.
If, however, you are transferring both BOMs and routings, the system displays all approved or pending inventory items that aren’t staged-dated.
|
|
Click the Item Search/Mst Rtg Where Used button to access either of these links:
|
|
Mst Rtg (master routing) |
If the item’s routing is a master (or reference) routing that is currently used by another item, then this check box is selected. This is a display-only field. |
Note. When you transfer a BOM, it fully replaces the target BOM and all associated reference designators, text, document associations, and attachments. Similarly, when you transfer a routing, it fully replaces the target routing.
If you have selected the Delete EBOMs upon Transfer option on the Engineering Options page, the system automatically deletes the EBOM from PeopleSoft Enterprise Engineering after making the transfer to PeopleSoft Enterprise Manufacturing. This option doesn’t apply when transferring from PeopleSoft Enterprise Manufacturing to PeopleSoft Enterprise Engineering. A similar process occurs for routings if you selected the Delete ERTGs upon Transfer option on the Engineering Options page.
When you run the engineering transfer process, the system logs the number of BOMs and routings processed and transferred, as well as the number of exceptions and warnings. You can view this information by using the message log from the Maintain EBOMs and Revs or Process Change Orders navigation. To create a Background Process report, use the Background Process page on the Maintain EBOMs and Revs or Process Change Orders navigation.
See Also
Making Mass Engineering Bill of Material Changes
Viewing BOM ExceptionsAccess the Transfer Exceptions - BOM Exception page.
|
Count |
If you’re not sure how many messages you have, click this button before you populate the page. When you click this button, the system displays the number of BOM exceptions and routing exceptions that will be displayed, given the entered search criteria. |
Viewing Routing ExceptionsAccess the Transfer Exceptions - Routing Exception page.
|
Count |
If you’re not sure how many messages you have, click this button before you populate the page. When you click this button, the system displays the number of BOM exceptions and routing exceptions that will be displayed, given the entered search criteria. |
Making Mass BOM Changes by ECO and Automatically Creating New Item Revisions by ECOYou can make mass BOM changes and automatically create new item revisions.
See Making Mass Engineering Bill of Material Changes.