 Understanding Physical Inventories
This chapter provides an overview of asset physical inventories and discusses how to:
Set up a physical inventory.
Define the extract scope, the scan scope, and the physical inventory controls.
Process a physical inventory.
View physical inventory history.
Understanding Physical InventoriesThis section lists prerequisites and discusses:
Physical inventory processing steps.
Physical inventory terminology.
Hardware and software for physical inventory processing.
 Prerequisites
Before you can perform a physical inventory in Asset Management, all assets must have tag numbers. They must also belong to a particular department or location, or you must have some other way to track their whereabouts.
Note. Assets with no cost records (such as expensed assets) are not included in a physical inventory.
Physical Inventory Processing StepsThese are the steps of physical inventory processing:
(Optional) Extract physical inventory asset data from Asset Management.
Asset Management provides a physical inventory system that enables you to extract asset data from the Asset Management database into a sequential file and then load it into a bar code scanning device. You can also extract data from third-party information technology (IT) asset discovery tools. Such discovery tools belong to a class of software that you can use instead of bar coding for laptops, computers, and other IT equipment. These discovery tools poll the assets over a network and update a central database.
(Optional) Use the extracted physical inventory data to generate a sequential file that a bar code scanner or inventory device can use, and enter the file into the scanner.
Steps 1 and 2 are necessary only if you want to display data from your Asset Management database as you scan each asset. The displayed information can include asset IDs, tag numbers, serial numbers, manufacturers, models, descriptions, departments, locations, and so forth. This asset data can provide instant information about an asset's history.
After you scan assets, load the scanned data into Asset Management and resolve any duplicate tag numbers and serial numbers.
After you match the physical inventory scan scope to the scanned data, generate physical inventory results for review.
Generate transactions based on the results.
You then load the transactions to reconcile the data in Asset Management with the physical inventory results.
Delete the physical inventory transactions when you no longer need them.
Delete the physical inventory results when you no longer need them.
Delete the physical inventory scanned asset data when you no longer need it.
(Optional) If you created an extract file, delete that file when you no longer need it.
As an example of how physical inventory is processed, suppose that you are inventorying computer equipment. An IT discovery tool obtains the physical attributes of a workstation, along with the amount of installed memory, the type of monitor, the amount of free hard disk space, and the installed software on the computer. You then load physical inventory data and the physical information gathered by the discovery tool software into Asset Management. The physical inventory processing determines the assets that have been added, transferred, or retired. Using these results, you perform matching and generate transactions to reconcile the data in Asset Management with the results of the physical inventory.
This diagram shows the process flow of a physical inventory:
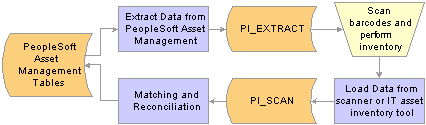
Physical inventory process
Physical Inventory TerminologySome of the terms that relate to physical inventories may not be familiar to you. The following terms are integral to physical inventory processing and reconciliation.
|
Physical Inventory ID |
A physical inventory control ID you assign within Asset Management for each physical inventory that you perform. |
|
Extract scope |
Set of all assets that you might scan during a physical inventory. This set of assets is broader than the scan scope. It should include all possible locations or departments for the assets to be inventoried. |
|
Extract data |
Data extracted from Asset Management before you perform the physical inventory scan. This data should include all assets that you might scan during the physical inventory scan. |
|
Extract file |
Asset Management creates a sequential file of the physical inventory data collected for each asset. The files are created as random access files when the user enters a tag or serial number. One is sorted by tag number and one that is sorted by serial number. |
|
Physical inventory scan |
Process of scanning assets with a bar code scanning device, such as a handheld Palm device that uses solutions from HighJump Software, Inc. |
|
Physical inventory scan scope |
Set of all assets that are defined in Asset Management as belonging to a particular location or department to be scanned. |
|
Physical inventory scan data |
Data collected by the bar code scanning device during the physical inventory. |
|
Mass Change Definition |
Asset Management Mass Change functionality is used to define the extract scope and the scan scope. The mass change definition is a user-defined extract scope and scan scope. The extract scope includes all assets that might be scanned during the inventory. The scan scope include the area of the actualscan. |
Hardware and Software for Physical Inventory Processing
To use the full range of the physical inventory functionality, you need additional hardware and software beyond the standard PeopleSoft system setup. These requirements are listed here.
Here are the additional hardware requirements for physical inventory processing:
|
Portable bar code reader |
A handheld unit that you can use to collect asset data. |
|
Bar code scanning wand |
A device that you use to physically scan bar codes. The wand is usually purchased along with the bar code reader. |
|
Thermal transfer label printer |
A printer for printing labels. If you have a relatively large number of assets (more than 10,000), you should purchase a label printer. |
Note. You can integrate the Physical Inventory feature of Asset Management with virtually any bar coding hardware. The Physical Inventory feature has been fully integrated, certified, and tested using a solution from HighJump Software, formerly called Data Collections Systems, Inc. (http://www.highjumpsoftware.com). Contact HighJump Software for information about integrated solutions that work with the Physical Inventory feature of Asset Management.
If you plan to print your own labels, you can use a Windows-based label-printing software package.
To view Asset Management data on a scanning device while you scan assets, you need to develop your own application for the scanner or use the program that Asset Management provides. This application reads data from the extract file, displays the data to the operator, and records any data that the operator enters. PeopleSoft has developed a sample application to run on a DOS-based bar code scanner. The program is written in Microsoft QuickBasic, and you can configure it easily. This application (which comprises the files PI.BAS and PI.EXE) is packaged with Asset Management and resides in the \PI directory.
You need to transfer files between the computer and the bar code scanner. To do this, you can use any communications application transfers information from a computer to a scanning device.
In addition to (or in lieu of) bar coding, you can use an auto-discovery tool from any that are available on the market.
Asset Management comes with a number of programs (in the \PI directory) for physical inventory processing on DOS-based scanners. This table lists these programs:
|
Program |
Description |
|
PI.BAS |
This is the BASIC source code for the scanner application that you use to perform the physical inventory. |
|
PI.EXE |
This is the compiled version of PI.BAS that runs on the scanner. You need a BASIC compiler to generate an executable file if you change this code. |
|
PISORT.BAS |
This is a BASIC source code program that sorts the sequential extract file that Asset Management creates. This application creates two random access files—one that is sorted by tag number (EXT.TAG) and one that is sorted by serial number (EXT.SER). These files are read by PI.EXE when the user enters a tag or serial number. |
|
PISORT.EXE |
This is the compiled version of PISORT.BAS. It is called from the batch file EXTCOPY.BAT. |
|
EXTCOPY.BAT |
This batch file is used to download extract files to the scanner. Edit this file so that it:
You may need to edit EXTCOPY.BAT if you want to copy files to the appropriate drive on the scanner. This requirement may vary among different scanning devices. |
|
SCANCOPY.BAT |
This batch file is used to upload the SCAN.DAT file from the scanner to \TEMP\SCAN.DAT. You can modify the program to copy the SCAN.DAT file from the appropriate drive on the scanner. |
See Also
Setting Up a Physical Inventory
To set up a physical inventory in Asset Management, use the Physical Inventory System Setup component (PI_SYSTEM_SETUP). This section provides an overview of setting up a physical inventory and discusses how to set up a physical inventory.
Page Used to Set Up a Physical Inventory
|
Page Name |
Object Name |
Navigation |
Usage |
|
PI_SYSTEM_SETUP |
Asset Management, Physical Inventory, Physical Inventory/Mass Change |
Review relationships between physical inventory fields and mass change definitions. Note. Unless you have altered the physical inventory system (for example, by adding fields), do not change information on this page. |
Setting Up a Physical Inventory
Access the Physical Inventory Setup page.
When you perform step 5 of the physical inventory process (generating physical inventory results), the Structured Query Report (SQR) AMPI1000 uses data from this page to compare asset field values and determine the types of transactions that need to be generated. A physical inventory mass change process (AMIF1000) also uses this page to reload transactions into Asset Management after the physical inventory is reconciled.
Note. The information on this page is prepopulated to work with the delivered physical inventory programs. Modify this page only if you have made alterations to the physical inventory system—for example, by creating new fields.
Defining the Extract Scope, the Scan Scope, and the Physical Inventory ControlsTo define the extract and scanning scope, and set up the inventory controls for a physical inventory, use the Physical Inventory component. This section provides an overview of defining the extract scope, the scan scope, and the physical inventory controls and discusses how to:
Define the extract scope and the scan scope.
Define physical inventory control parameters.
Define physical inventory control transaction defaults.
Set up physical inventory schedule information.
Understanding Extract Scopes and Scan Scopes
Physical inventory matching and reconciliations are based on two separate sets of asset data that you define—the extract scope and the scan scope. Each of these sets is based on location, department, or both. The first set is the data that you originally extract from Asset Management and load into a scanning device. The extract scope includes all possible locations and departments for the assets to be inventoried. This enables the bar code scanner to find Asset Management data for most of the assets that it scans.
If you haven’t performed physical inventory in several years, define a broad extract scope. Because many assets may have been redistributed in the interim, the extract scope might even include the entire business unit.
Note. If you are using an IT asset discovery tool only, you do not need to define an extract scope.
The scan scope defines the scope of the actual physical inventory—that is, where the inventory actually occurs. For example, suppose that you plan to take inventory on the second floor of a five-floor building. Because the assets may have been redistributed since the last inventory, the extract scope might include assets on all five floors. However, the scan scope would include only assets on the second floor.
The system compares the scan scope with the actual scanned data when Asset Management generates physical inventory results. Any assets that appear in the scan scope but not in the scanned data are called unders, and they create retirements when you generate transactions. Any assets that appear in the scanned data but not in the scan scope areovers, and they create physical adds when you generate transactions. Other differences between the scan scope and the scanned data create transfers and changes in the assets' nonfinancial information. These assets are assigned the status inventoried.
Pages Used to Define Extract Scopes, Scan Scopes, and Physical Inventory Controls
|
Page Name |
Object Name |
Navigation |
Usage |
|
PI_CNTL_01 |
Asset Management, Physical Inventory, Define Inventory Occurrence |
Before you extract asset data, you must establish a physical inventory control ID within Asset Management for each physical inventory that you perform. Define the physical inventory ID here. |
|
|
PI_CNTL_02 |
Asset Management, Physical Inventory, Define Inventory Occurrence, Transaction Defaults |
Specify the defaults for any transactions and asset retirements that are generated from the physical inventory. |
|
|
PI_SCHEDULE_01 |
Asset Management, Physical Inventory, Create Schedules |
Set up physical inventory schedule information. If several people perform physical inventories simultaneously at different locations, you may need to track the status of each inventory. |
|
|
MC_DEFN_00 |
Asset Management, Mass Change, Define Criteria |
Add or update a mass change definition. |
|
|
MC_DEFN_01 |
Asset Management, Mass Change, Define Criteria, Criteria and Defaults |
Specify the mass change criteria for selecting rows, and identify the columns and values to be changed. |
|
|
MC_DEFN_AM |
Asset Management, Mass Change, Define Criteria, AM Specific Fields |
Complete mass change information that is unique to and required by Asset Management mass changes. |
|
|
MC_DEFN_02 |
Asset Management, Mass Change, Define Criteria, Generate SQL |
Generate and check the SQL text generated by a mass change definition before you run it. |
|
|
MC_DEFN_03 |
Asset Management, Mass Change, Define Criteria, Execution History |
Determine the last time a mass change definition was run and what the specific input parameters were. |
Defining the Extract Scope and the Scan ScopeAccess the Asset Mass Change Definition - Description page.
Use this page to define the extract scope and the scan scope in Asset Management. The extract scope should include all assets that might be scanned during the inventory. The scan scope should include the area of the actual scan.
Note. You must define a scan scope. An extract scope is necessary only if you want the scanning device to display asset data from the Asset Management database as you scan each asset.
Because the Physical Inventory functionality of Asset Management is based on mass changes, you use the Asset Mass Change functionality to define the extract scope and the scan scope, as described here:
Access the Asset Mass Change Definition - Description page, by selecting PI Extract (physical inventory extract) or PI Scan Scope (physical inventory scan scope) as the Mass Change Template ID to specify the template on which to base this extract scope or scan scope.
The archive ID and archive date are optional on this page. The description that appears is derived from the mass change template that you select; you can modify the description.
On the Asset Mass Change Definition - Criteria and Defaults page, select criteria for the inventory scope.
In the Criteria group box, enter the department or location (or both) from which to extract asset data or define a scan scope. Add rows to select additional departments and locations. You can define these values explicitly or by using SQL operators. If you leave either the Department or Location Field blank, you retrieve all possible values for that field.
You do not need to use the Asset Mass Change Definition - AM Specific Fields page.
The additional parameters this page enables you to specify can be specified on the Physical Inventory pages.
On the Asset Mass Change Definition - Generate SQL page, create a SQL statement that is based on the criteria that you set up on the Asset Mass Change Definition - Criteria and Defaults page.
After you complete the page, save the mass change definition, making sure that the Execute SQL Upon Saving check box is cleared. Because the Physical Inventory SQR program uses the physical inventory mass change definitions, they cannot be executed online.
See Also
Defining Physical Inventory Control ParametersAccess the Physical Inventory Control - Definition page.
Note. Each physical inventory occurrence must have a unique ID. Physical inventory IDs cannot contain spaces. Use an underscore instead of a space in a physical inventory ID.
|
Unit |
Enter the business unit for which you want to conduct an inventory. If you are using an IT asset discovery tool, you can process all business units by leaving the Unit field blank, or you can process a single business unit by making a business unit selection. |
|
Start Date and End Date |
Enter dates for information purposes only; these are not used for processing the data. |
|
Extract ID |
Enter the mass change definition that the system uses to extract asset data from Asset Management. |
|
Scan ID |
Enter the mass change definition that the system uses to define the scope of this physical inventory—that is, the set of assets to be scanned. |
Note. This page indicates the last step that you performed in the current physical inventory. Refer to this page to ensure that you perform all steps in the proper sequence.
Defining the Physical Inventory Control Transaction Defaults
Access the Physical Inventory Control - Transaction Defaults page.
|
Approve |
Select this check box to have the system automatically approve the transactions that are generated from the inventory. PeopleSoft strongly recommends that you review and approve all transactions that are generated during the physical inventory process before you load them into Asset Management. |
Use the check boxes in this group box to select the types of transactions that you want to generate. For instance, you may not want the results of the physical inventory to generate any financial transactions. In such cases, you would clear the Transfers and Retirementscheck boxes.
Transaction Defaults
|
Transaction Date, Accounting Date, and Transaction Code |
The current date will display by default in the Transaction Date and Accounting Date fields. You may override these and enter a transaction code as needed. |
|
User ID |
Enter the user ID of the person who performs the physical inventory. |
|
Interface ID and Open Transaction ID |
By default, the system populates the Interface ID and Open Transaction ID fields with the next available values. When you process the generated transactions using the Transaction Loader, (AMIF1000) refer to the interface ID on this page. You can use the open transaction ID to locate depreciation open transactions that are created as a result of the physical inventory. |
|
Disposal Code |
Select the method for retiring assets. |
|
Retirement Convention |
Select to indicate how you want to prorate retired assets. |
|
Voluntary Conversion |
Select to identify whether the retirement takes place for intended or unintended reasons. Options are Voluntary and Involuntary for the retirement default. |
|
Type |
Select Ordinary or Extraordinaryto define the types of retirements that you generate. |
Setting Up Physical Inventory Schedule InformationAccess the Scheduling page.
|
Schedule ID |
Set up one Schedule ID or as many unique IDs as you like. For instance, if you have several branches, you might want a separate schedule for each branch. Enter an informative description for each Schedule ID. |
|
Start Date and End Date |
You can leave the end date field blank until the inventory has actually been completed. |
|
PI ID(physical inventory ID) and PI Leader(physical inventory leader) |
You can enter a code to identify the physical inventory by date, location, or some other identifier. You may also assign a physical inventory leader. |
Note. Scheduling information is not used in any physical inventory processing. It is informational only.
Processing a Physical InventoryThis section discusses how to:
(Optional) Extract asset data (step 1).
(Optional) View the results of the extract.
(Optional) Create an extract file (step 2).
Load asset inventory data (step 3).
Find duplicate tags.
Find duplicate serial numbers.
Generate physical inventory results (step 4).
Review physical inventory results.
Generate physical inventory transactions (step 5).
Delete physical inventory transactions (step 6).
Delete physical inventory results (step 7).
Delete physical inventory scanned data (step 8).
(Optional) Delete an extract file (step 9).
After you define the extract scope, the scan scope, the physical inventory control ID, and the physical inventory schedule, you can extract data from Asset Management tables. When the extract is complete, you can use the extract data in subsequent steps of the physical inventory process.
In order to process physical inventory, you must execute each step in its proper order. For each step, enter the physical inventory ID and select the type of export or import output that you want—for example, comma-separated values (CSV) file, labels, or scanner file. If you are generating an output file, you also need to provide a file name.
Note. Because steps 2 and 3 require writing and reading files, you should run the AMPI1000 SQR process for these steps from the file location. For example, if you are writing and reading files from c:\temp\file.txt or c:\temp\scan.dat, you would run the process on the client. If you are writing and reading files from a directory on the PeopleSoft Internet Architecture server, run the process on that server.
Pages Used to Process Physical Inventory
|
Page Name |
Object Name |
Navigation |
Usage |
|
RUN_AMPI1000 |
Asset Management, Physical Inventory, Load/Match/Reconcile PI Info |
Execute each step of the Physical Inventory process. We recommend that you add a new run control ID for each physical inventory control ID (PI ID). Also use this run control ID for subsequent steps within the same PI ID. |
|
|
PI_EXTRACT_01 |
Asset Management, Physical Inventory, Review Extracted Data |
(Optional) View the results of the extract data one asset at a time. You can also search by PI line number, asset ID, department, tag number, serial ID, and location. The PI line number reflects the number of this asset in the extract sequence. For instance, the third asset that was extracted falls on PI Line Number 3. The system presents you with all the assets that match your criteria. Select the one you want to view. Note. You can run the report AMPI2000 to list all the information that’s been extracted. Run this from the Physical Inventory Reports page. |
|
|
PI_SCAN_DUP_TAG |
Asset Management, Physical Inventory, Verify Duplicate Tags |
Conduct searches for finding and correcting physical inventory data. |
|
|
PI_SCAN_DUP |
Asset Management, Physical Inventory, Verify Duplicate Serial ID |
Conduct searches for finding and correcting physical inventory data. |
|
|
PI_RESULTS_01 |
Asset Management, Physical Inventory, Review Matching Results |
View the results of the matching process. |
|
|
PI_RESULTS_02 |
Asset Management, Physical Inventory, Review Matching Results, Details |
View the original and scanned data. Note. You can run reports that list inventoried assets (AMPI2200), unders (AMPI2210), and overs (AMPI2220). |
Extracting Asset Data (Step 1)
Access the Physical Inventory page.
This step executes the actual data extract from Asset Management. When you extract data, you do not need to enter a file name or file type. The data is saved in a relational table called PI_EXTRACT. Click the Extract button and click the Run button. If you want to view the extract data before using it in subsequent steps, access the Extract Data page.
Viewing the Results of the ExtractAccess the Extract Data page.
View the extract data one asset at a time. You can also search by PI line number, asset ID, department, tag number, serial ID, and location. The PI line number reflects the number of this asset in the extract sequence. For instance, the third asset that was extracted falls on PI Line Number 3. The system presents you with all the assets that match your criteria. Select the one you want to view.
Creating an Extract File (Step 2)Access the Physical Inventory page. This step creates an output file from the extract data.
|
Export/Import |
Select CSV for a comma-separated values (CSV) file. Select Scanner File as the import or export file type, and enter a file name (as well as any additional path information) for the file that you want to generate. The output file is formatted for loading into a bar code scanning device in preparation for performing physical inventory. To create a file for printing labels rather than performing inventory, select Generate Labelsas the export or import file type. A label file is created for the printer in a different format from the one used for a scanning device. To generate files for both a scanning device and a printer, perform step 2 twice with a different output file type each time. |
|
Gen Extr File (generate extract file) |
Click this button and then click the Run button. |
Note. The EXTCOPY.BAT file is configured to copy the extract file to the A:\ drive for demonstration or quick overview purposes. You need to modify EXTCOPY.BAT if you want to copy the extract file to the appropriate drive on a scanner.
Copy the scanner program (PI.EXE) and scanner file to the MS-DOS based scanning device. You can easily do this using a communications software package. You may wish to use the certified integration solution provided by HighJump Software. Consult the bar code scanning device manual and HighJump Software for more information.
Once you have loaded the extract file and scanner program into the inventory-scanning device, you can perform the physical inventory. Each time that you scan an asset that is included in the extract file, the scanner displays the asset’s information, such as tag number, description, serial ID, asset ID, and custodian. For the asset that you scan, you can retain or modify the values displayed on the scanner.
While you are performing the physical inventory scan, the scanning device creates a sequential file that contains information on all the scanned assets. The next step is to load the scanned file into Asset Management for review.
Note. The files EXTCOPY.BAT and PI.EXE reside in the \PI directory. EXTCOPY.BAT is no longer supported, but it may be useful for a quick overview of the process.
Review the section on hardware requirements for further information about bar code scanners and methods of moving data to and from scanning devices.
If you are using an IT asset discovery tool from a vendor such as MainControl, you need to run a gateway extract so that you have a file to load into Asset Management.
Loading Asset Inventory Data (Step 3)Access the Physical Inventory page.
After completing the physical inventory with the scanning system, download the scanner data into a workstation or network server so that it can be converted back into a Asset Management table called PI_SCAN. You do this using a communications software package or by using the certified integration solution provided by HighJump Software. Consult the bar code scanning device manual or HighJump Software for more information.
Note. Asset Management provides an unsupported file called SCANCOPY.BAT (found in the \PI directory) that can be edited to copy the SCAN.DAT file from the scanner to the computer. You may need to modify the copy statement in SCANCOPY.BAT so that it copies from the drive letter corresponding to the scanner’s drive. This is similar to the modification that you may need to make to EXTCOPY.BAT.
Once the scanner files are available to load into Asset Management, you can run step 3 of the physical inventory process.
Enter the directory and file name of the inventory file. This is most likely \TEMP\SCAN.DAT. If located on the PeopleSoft Internet Architecture server, you can run the next process on the server.
Click the Load Scan File button and click the Run button to load the scan data into Asset Management. You can load as many files as you need by renaming SCAN.DAT (during the bar code scanning process) with unique file names and loading each file separately.
Note. If you’ve written your own scanning program or modified PI.BAS to configure fields or field lengths, you need to update the file formats in AMPI1000.SQC to match.
Finding Duplicate TagsAccess the Duplicate Tags page.
It is very common for an asset to be scanned multiple times during physical inventory, thus creating more than one entry with the same tag or serial number. In order for Asset Management to perform inventory reconciliation, each tag or serial number must be unique. Therefore, it is extremely important that you identify and resolve any duplicate entries. If any duplicate entries exist when results are generated, these entries are marked as errors and are not processed any further.
You can search on a tag and a physical inventory line number. The physical inventory line number reflects the number of this asset in the scanning sequence. For instance, the third asset that was scanned falls on physical inventory line number 3.
If duplicates exist, the system displays a page on which you can correct or delete assets that have duplicate numbers.
The IP Alias and IP Address fields describe the internet protocol attributes of IT assets that are extracted from the IT discovery tools database.
Finding Duplicate Serial NumbersAccess the Duplicate Serials page.
The Duplicate Serial Number page is similar to the Duplicate Tags page except that you are reviewing created records that have a duplicate Serial ID number.
Generating Physical Inventory Results (Step 4)Access the Physical Inventory page.
After the inventory data is loaded into Asset Management, you clean up the data. Then you can run step 4, which performs matching between a physical inventory scan scope and scanned data and creates physical inventory results for review.
Note. Before you generate results, you should use the Duplicate Tag page and Duplicate Serial Number page to clean up any possible errors in the scanned data.
|
File Name |
You can leave this field blank for this step. |
|
Gen Results (generate results) and Run |
Click the Gen Results button and click the Run button to initiate processing. Note that this step may take some time to complete due to the amount of information that must be processed. Because this step involves some complex processing, you may want to have your database administrator optimize the database before you execute the step. |
Reviewing Physical Inventory Results
The PI Match Status (physical inventory match status) field displays an asset’s physical inventory status when results are generated and matching is performed. An asset can have one of the following statuses:
|
Status |
Reason |
Transactions Generated |
|
Accel |
NA |
NA |
|
All I, O, U |
|
|
|
Discard |
|
|
|
Initial |
|
|
|
Inventory |
Asset was scanned during inventory as expected. |
Transfers and physical changes (description, location, department, custodian, and so on). |
|
None |
|
|
|
Over |
Asset was scanned but not expected. |
Physical adds. |
|
Special |
|
|
|
Under |
Asset was expected but not scanned. |
Retirements. |
If you use Workflow, this section contains fields that are used in workflow processing to generate automatic physical inventory results notifications. These can be sent to a worklist, an email address, or both.
Generating Physical Inventory Transactions (Step 5)Access the Physical Inventory page.
After matching is performed, you create physical inventory transactions that reconcile the data in Asset Management with the results of the physical inventory.
Enter the PI ID (physical inventory ID), click the Gen Trans (generate transactions) button, and click the Run button to begin generating the transactions.
Because this step involves some complex processing, you may want to have the database administrator optimize the database before you run it.
Note. This step takes the longest time to process, so be sure that you are satisfied with the generated results before you load the transactions. You can see the results of the matching process by reviewing the Results page and the Results Detail page.
After you’ve created, reviewed, and approved the reconciliation transactions, you load them by using the Interface Asset Information component and the Transaction Loader.
Deleting Physical Inventory Transactions (Step 6)Access the Physical Inventory page.
When you no longer need your physical inventory transactions, click the Del Trans (delete transactions) button and click the Run button.
Deleting Physical Inventory Results (Step 7)Access the Physical Inventory page.
When you no longer need your physical inventory results, click the Delete Res (delete results) button and click the Run button.
Deleting Physical Inventory Scanned Data (Step 8)Access the Physical Inventory page.
When you no longer need your physical inventory scanned data, click the Delete Scan button and click the Run button.
Deleting an Extract File (Step 9)Access the Physical Inventory page.
When you no longer need your physical inventory extract file, click the Delete Ext (delete extract) button and click the Run button.
Viewing Physical Inventory HistoryThis section lists the pages used to view physical inventory history.
Pages Used to View Physical Inventory History
|
Page Name |
Object Name |
Navigation |
Usage |
|
PI_ASSET_HIST1 |
Asset Management, Physical Inventory, Review Inventory History |
View a history of all the instances that an asset has been inventoried. |
|
|
RUN_AMPI2000 |
Asset Management, Physical Inventory, Run Physical Inventory Reports |
Generate physical inventory reports. |