 Understanding the Conversion
This chapter provides an overview of converting to Asset Management and discusses how to:
Customize SQR Conversion.
Run the Transaction Edit program.
Preview and approve results.
Populate Asset Management tables with data.
Depreciate converted assets.
Close the conversion process.
Load retired assets.
Convert lease information.
Understanding the ConversionYou may convert data by whatever methods are available to you. You may want to generate a custom program after mapping records and fields from the existing database to the new PeopleSoft database. Or, you may perform the steps outlined in this chapter, using the application engine processes available from PeopleSoft, to convert the data.
The general tasks are:
Set up the database tables that will store accounting structure and asset information.
Transfer data from the existing system to Asset Management.
There are no strict rules for performing these tasks. The pace and flow of your implementation will be guided by the particular requirements of your business environment, available personnel resources, and the unexpected events you may encounter during the process.
If you use the PeopleSoft application engine processes described in this chapter to convert your data , Asset Management business units and books must be established before you transfer data into loader tables. The sequence of other table setups are more flexible. It may be logical for you to proceed part way through conversion before doing some table setup. For example, as you set up the Location table, you can refer to the record layout from your conversion file to see how many different locations you need to establish and what they should be called. In general, however, you should complete the table setup that provides your system structure to begin building your asset management database. Your table setup must be complete before you can finish converting your asset data. The final conversion step, depreciating converted assets, cannot be carried out until all Asset Management tables are set up. Setting up the database tables that provide your accounting structure and store asset information is discussed in previous chapters. Please refer to these for more details of the tasks involved.
Data validation is an important step not to be overlooked as you plan and implement the conversion. Before you begin converting asset data from the current system, it is essential to look closely at the existing data. Depending on the integrity of the source data, your first step should be to validate the existing data before you begin converting. Using the data conversion process described here is achieved incrementally. At various intervals, you will have the opportunity to examine the data. Create checks and balances as part of your conversion plan to test data that is being loaded into the PeopleSoft database.
Note. The PeopleTools spreadsheet utility called Excel to CI enables you to use an Asset Management template designed to upload asset data from another source to the PeopleSoft database. You should not, however, plan to use this utility to convert your initial database. This utility is designed to assist with data merges where manual data entry would be tedious, but with the ability to monitor the upload process, using the utility would be more efficient overall. Excel to CI is limited to importing 65K rows of data at a time, so that large volumes of data cannot be uploaded. The error checking is manual and you must carefully review all rows of data being uploaded and correct problems as you go. And finally, the Asset Management template used for Excel to CI does not populate the INTFC_PHY_B tables. Data uploaded by this method will possibly require additional manual data entry. Given these constraints, using Excel to CI to convert legacy data to new PeopleSoft records is not recommended.
See Also
Understanding the Loader Table Data Dictionary
PrerequisitesBefore proceeding with the data conversion, you must set up your business units and tables.
PeopleSoft strongly recommends that you add and depreciate some assets online before beginning the conversion process.
Performing these actions are a good test of your table setup; they enable you to test your Asset Profiles to ensure they are working the way you intended; and you can see how the depreciation program works and how it is affected by different variables and conventions. Knowing what to expect from the Asset Management applications before you begin the conversion will assist you in making decisions for planning and executing the conversion.
Converting with a Customized SQRTo transfer data from an existing system into Asset Management loader tables, you may write a custom SQR and use the delivered Asset Management application engines as follows:
Write and run a program that will transfer data from the existing system into Asset Management loader tables.
Note. The sample conversion program, AMCV1000.SQR, and its SQC links are no longer supported.
Run the Transaction Edit program (AMIFEDIT) to validate field values such as ChartFields, business units, books, and so on.
Preview and approve data in the loader tables.
Use the Transaction Loader (AMIF1000) to transfer information from the loader tables into your Asset Management tables.
Convert and depreciate the assets.
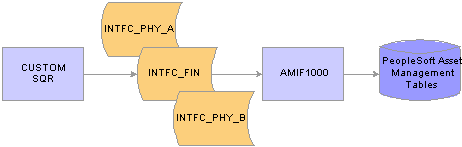
Asset conversion process
The first step is to write and run an SQR to transfer data from the old system into three interim tables in Asset Management:
|
Table |
Description |
|
INTFC_FIN |
Contains financial asset data. |
|
INTFC_PHY_A |
Contains physical asset data. |
|
INTFC_PHY_B |
Contains physical asset data. |
Note. When writing this SQR, note that for load types of CN1 that use NEXT in the ASSET_ID field, each load line should have a unique INTFC_ID. This ensures that Asset IDs are generated correctly. In all other cases, you should use one INTFC_ID per set of transactions with the same load type.
Next, run the Transaction Edit (AMIFEDIT) program: this process performs edit checks on the data fields (ChartFields, business units, books, and so on) you specify to help ensure that the information you load into Asset Management is correct.
Next, run the Transaction Loader process (AMIF1000): this application engine reads INTFC_FIN, INTFC_PHY_A and INTFC_PHY_B, and then populates the Asset Management tables with the asset data. This data appears in Asset Management as open transactions.
Note that AMIF1000 has two options regarding the population of open transaction accounting and transaction dates with respect to how costs and accumulated depreciation are loaded. Search for RJS2-34 in AMIF1000 and choose the option that suits your needs before running the program. For more information, review the Transaction Loader Conversion Dates Options section below.
Once the data is in the system as open transactions, all that remains is to run depreciation and check the results.
Note. When converting data from your current system to Asset Management, you should convert data as of the period before you want the system effective. You should calculate depreciation as of the first period the system is effective.
For example, if you want the system to be effective on 01/01/06, you should convert all your data as of 12/31/05. The fiscal
year, START_PD, and END_PD on the depreciation table should be 2005, 12, 12. The TRANS_DT and DTTM_STAMP should be 12/31/05.
However, you should calculate depreciation with OPEN_TRANS accounting and transaction dates of 01/01/06.
See Also
Understanding the Loader Table Data Dictionary
Running the Transaction Loader Edit ProgramBefore running the Transaction Loader (AMIF1000), you must run the Transaction Loader Edit (AMIFEDIT) program to check for valid values. The Transaction Loader Edit program edits the fields you specify, validates values, and marks those values that are in error. Using one or both of two available queries, you can check the results and view mess ages for those fields that are in error. This process helps ensure that the data is correct when it is entered by the Transaction Loader into Asset Management tables.
To run the Transaction Loader Edit program:
Populate the Transaction Loader Edit page.
View the results.
 Page Used to Run the Transaction Edit Program
|
Page Name |
Object Name |
Navigation |
Usage |
|
Transaction Loader Edit |
RUN_AMIFEDIT1 |
Asset Management, Send/Receive Information, Load Transactions, Edit Transactions, Transaction Loader Edit |
Run the Transaction Edit program. |
|
BU Book Chartfields Summarize |
AMIFEDIT_CF_SEC |
Click the Chartfields link from the Transaction Loader Edit page. |
Select ChartField summary options for the transaction loader edit process. |
Using the Transaction Loader Edit Page
Access the Transaction Loader Edit page.
Interface Edit Options
Select all the fields on which you want to perform the edit valuation. Cancel the selection of those that will have nil values because you do not use the field, (that is, optional fields Categoryor Tax Class).
Note. The default condition is to run edit checks on all of these fields. They are all selected when you first display the page. To prevent an edit check on a particular field, clear that check box.
Find Trans Load ID (transaction load ID)
|
System Source |
Generates the transactions you want to edit. |
|
Load Type |
A more detailed version of Trans Type. One Trans Type can generate several different Load Types. |
Note. Whenever you rerun the Transaction Edit program, old message files from the previous run are deleted.
Viewing the Results of the Transaction Edit ProgramTo view results from the Transaction Edit program, run the following two queries:
AM_INTFC_PHY_A_MSG (Interface Physical A Edit Messages) to see physical records.
AM_INTFC_FIN_MSG (Interface Financial Edit Messages) to see financial records.
Previewing and Approving Results
After the asset data is in the loader tables, you will need to verify that the information in the loader tables is correct and approve all the load lines that you want to load into Asset Management. This review and approval process is designed to prevent you from inadvertently loading massive amounts of invalid data into the system.
Use the Financials Transactions page, Physical Transactions A page, and Physical Transactions B page to see which data was loaded into INTFC_FIN, INTFC_PHY_A and INTFC_PHY_B. If you find errors, you can either correct them online using the SQL query tool or modify your custom SQR and run the program again.
See Also
Previewing Data in the Loader Tables
Page Used to Preview and Approve Results
|
Page Name |
Object Name |
Navigation |
Usage |
|
Conversion Summary |
CNV_SUM_01 |
Asset Management, Send/Receive Information, Load Interface, Conversion Summary, Conversion Summary |
Verify the total row count, cost, and accumulated depreciation for this conversion. |
Using the Conversion Summary Page
Access the Conversion Summary page.
Select Summarize to refresh Row Count, Cost, and Accumulated Depreciation. If you find any discrepancies when you compare these fields, you may want to take a closer look at the appropriate preview page to verify and approve the data row by row.
Populating Asset Management Tables with Asset DataThis data conversion step populates Asset Management database tables with the data you just loaded into INTFC_FIN, INTFC_PHY_A and INTFC_PHY_B by running the Transaction Loader Application Engine, AMIF1000.
The Transaction Loader is also used for mass transactions. After performing a mass change, run this Application Engine to create entries in Asset Management tables.
Note. You must run the Transaction Edit program (AMIFEDIT) before running the Transaction Loader, especially at conversion time. The Transaction Edit program performs edit checks on the data fields you specify to help ensure that the information you load into Asset Management is correct. Review the data loaded into INTFC_FIN, INTFC_PHY_A and INTFC_PHY_B and look carefully at the Transaction Loader Application Engine (AMIF1000) before you run it. You may need to change some of the data defaults it contains.
See Also
Running the Transaction Loader
Transaction Loader Conversion Dates OptionsAt conversion, you have two options when you use the Transaction Loader to populate open transaction accounting and transaction dates:
Make the open transaction accounting and transaction dates the first day of the following period of the specified accounting date.
Make the open transaction accounting and transaction date the same as the date that is specified in the Financial Interface table (INTFC_FIN).
First Day of the Following Accounting Period
To populate the open transaction accounting and transaction dates with the first day of the following accounting period, perform these steps.
Sign on to the Application Design.
Open Application Engine AMIF_FIN_PHY.
Scroll down to section 200120 and click the plus sign to expand the section.
Make sure that steps Step100 and Step120 are Inactive and step Step130 is Active.
Populate Dates as Specified in INTFC_FIN
To populate the open transaction accounting and transaction dates with the date specified in the INTFC_FIN table, perform these steps:
Sign on to the Application Design.
Open Application Engine AMIF_FIN_PHY.
Scroll down to section 200120 and click the plus sign to expand the section.
Make sure that steps Step 100 and Step 120 are Active and Step 130 is Inactive.
Depreciating Converted AssetsThe final step in converting to Asset Management is to process all the open transactions that were created by the Transaction Loader. You will run the programs to:
Calculate depreciation (AM_DEPR_CALC).
Create accounting entries (AM_AMAEDIST).
Close depreciation (AM_DPCLOSE).
Note. When converting data from the current system to Asset Management, you should convert data as of the period before you want the system effective. You should calculate depreciation as of the first period the system is effective.
For example, if you want the system to be effective on 01/01/06, you should convert all of the data as of 12/31/05. The fiscal
year, START_PD and END_PD on the depreciation table, should be 2005, 12, 12, respectively. The TRANS_DT and DTTM_STAMP should be 12/31/05. However, you should calculate depreciation with OPEN_TRANS accounting and transaction dates of 01/01/06.
For converted assets and assets loaded through the Transaction Loader, the default is to book accumulated depreciation to the previous period. However, any accumulated depreciation is booked to the current period:
If you populate the START_PD, END_PD, and FISCAL_YEAR fields in the Financial Loader table (INTFC_FIN) with values for the current period.
If the amount in the DEPR field is not 0.
Closing the Conversion Process
At this point, the conversion has created all the data in the system, and all assets are depreciated. Before you can move into full production, you must now close the conversion process:
Verify the conversion to approve conversion results.
Restore disk space by removing unnecessary tables from the system.
Update security to restrict access to the conversion SQRs now that they are no longer needed.
Page Used to Close the Conversion Process
|
Page Name |
Object Name |
Navigation |
Usage |
|
RUN_AMCV2000 |
Asset Management, Send/Receive Information, Load Interface, Receive Conversion Data, Run Interface Loader |
Run the Interface Loader program that can be used to delete data from the loader tables. |
Verifying the ConversionIt is essential that you run implementation checks to make sure that all the calculations used the correct values, followed the methods you intended, and so forth. By balancing the conversion, you verify that the currency amounts in the system are those that you expect to see. If they are not, you need to verify your source system data and check the SQRs to see where you might have inadvertently used the wrong depreciation method, an invalid date, or some other variable that affects calculations.
Restoring Disk SpaceAccess the Run Interface Loader page.
When the conversion is complete, you will want to release the disk space occupied by all the interim tables you used in the process. Working backwards, you can delete data from the tables populated by using the Interface Loader.
Load/Delete Process Buttons
Select Delete Fin/Phy and run this request. Process Scheduler runs the AMCV2000 process at user-defined intervals.
Updating SecurityYou may want to restrict access to the Interface Loader and Transaction Loader after the conversion is completed and approved. Review the system security page settings and make changes as warranted.
See Also
Enterprise PeopleTools 8.46 PeopleBook, “Security Administration”.
Loading Retired AssetsYou may add retired assets and asset history to the database. The load type ARA is used specifically for loading historical information for assets that are already retired.
For this Load Type, the Transaction Loader inserts records into Asset and, if applicable, Asset Custodian, Asset Location, Warranty, Attribute, License, Comments, PI Asset History, Parent Asset, and Acquisition Detail. It creates Book and Cost rows, as well as one row of accumulated depreciation for each book, all using the Transaction Type ADD. After modifying some of the values in INTFC_FIN and changing the Transaction Type to RET, the Transaction Loader inserts Cost and Retirement rows. The status of the assets is set to D (Disposed) for retired assets.
To load retired assets:
Consider prerequisites for retiring assets.
Populate loader tables.
Review the retired asset data.
Considerations for Retiring Assets
Before loading retired assets, note these considerations:
Assets should be fully depreciated and retired.
You can add partially retired assets, but the remaining cost basis will not be depreciated or processed in any way.
The depreciation process (AM_DEPR_CALC) need not be run after the retired assets are loaded.
After you add retired assets, you can reinstate them.
Note. The ARA interface type was designed to load fully depreciated, retired, or historical assets in cases for which AM_DEPR_CALC would never run and the assets would never be reinstated. To accommodate reinstatement of historical assets in this case, change the ARA interface type as needed.
Populating Loader Tables
To load retired assets using the ARA Load Type, follow these instructions to populate the loader tables:
If you have a valid Asset Profile that is effective dated correctly for your assets and your assets have the same amounts for cost, depreciation, gain/loss, and so on for each book (use the same depreciation conventions), you can load the retired assets with the DEFAULT_PROFILE_SW set to Y.
In this case, you should set DEFAULT_PROFILE_SW to Yon INTFC_FIN and INTFC_PHY_A, enter the valid Profile ID in INTFC_PHY_A, and make only one entry in INTFC_FIN for each asset. Leave the BOOK field blank.
If this is not the case, set the DEFAULT_PROFILE_SW to N and load one record for each book for each asset into INTFC_FIN. Consequently, if one asset reports to two books, you will load two records for the asset into INTFC_FIN.
Enter the accumulated depreciation into INTFC_FIN.DEPR, one entry for every ChartField combination. Each entry in INTFC_FIN corresponds to a row in PS_DEPRECIATION.
To simplify populating the load tables, one entry in INTFC_FIN is used to create both an ADD and a RET cost row for each book.
The key difference between the ADD and the RET rows is the DTTM_STAMP. The Transaction Loader loads the ADD row first, and then it increments the DTTM_STAMP by one day, sets the RETIRE_SW to 1, and multiplies COST and QUANTITY by negative one (−1). It then loads this as the RET row.
Note that once the Transaction Loader completes successfully, values in all the INTFC_FIN rows for ARA INTFC_TYPE and INTFC_ID will have changed. If you want to rerun the transaction using the same INTFC_ID entries:
Subtract one day from DTTM_STAMP.
Set RETIRE_SW back to 0.
Set the LOAD_STATUS to New (pending).
Multiply the COST and QUANTITY by negative one (−1).
These actions restore the rows to their original values.
Reviewing Retired Asset DataAfter you load retired assets, pay close attention to these INTFC_FIN fields:
|
INTFC_FIN Field Name |
Value |
|
DEPR |
Accumulated depreciation. |
|
INTFC_TYPE |
ARA. |
|
RETIREMENT_DT |
The asset historical retirement date. |
|
DTTM_STAMP |
Although you can set this to any value, we recommend that you set it to the earliest date/time stamp used for any of the assets that you are loading. This setting will ensure that it is earlier than all the retirement dates. |
|
RETIRE_QUANTITY |
Make sure it is a negative number. |
|
RETIREMENT_AMT |
Make sure it is a negative number. |
|
FISCAL_YEAR |
Represents the fiscal year (FY) of the accumulated depreciation. |
|
START_PD |
Starting period. |
|
END_PD |
Ending period. |
|
GAIN_LOSS |
Gain or loss. |
|
END_DEPR_DT |
Ending depreciation date. |
|
BEGIN_DEPR_DT |
Beginning depreciation date. |
|
ACTIVITY_SW |
0 |
|
RETIRE_SW |
0 (AMIF1000 handles the switch to 1 for the RET cost row). |
|
RETIREMENT_RSV |
Accumulated depreciation. |
Also pay close attention to these INTFC_PHY_A fields:
|
INTFC_PHY_A Field Name |
Value |
|
CAPITALIZATION_SW |
2 |
|
PROFILE_ID |
Must be valid in PROFILE_DET_TBL if you set DEFAULT_PROFILE_SW = Y in INTFC_FIN and INTFC_PHY_A. |
When using the Transaction Loader, you need not populate those fields that contain data in the PROFILE_DET_TBL if you provide a valid PROFILE_ID and set DEFAULT_PROFILE_SW to Y on both INTFC_FIN and INTFC_PHY_A.
Converting Lease InformationThe interface load table INTFC_LEASE contains leased asset information for lease schedules that were already calculated. This lease interface table is used to add leases to Asset Management tables using the Transaction Loader interface type LAD (Leased Asset Addition). The lease payment schedule information should be populated in the INTFC_LEASE table; it is not calculated by the Transaction Loader.
Before running the Transaction Loader, the INTFC_LEASE, INTFC_FIN and INTFC_PHY_A tables must be loaded with leased asset information. The new ASSET_IDs are calculated if the interface table ASSET_ID fields are set to NEXT. If NEXT ASSET_ID is used, each INTFC_LINE_NUM should represent one ASSET_ID, and the same INTFC_LINE_NUM should be used for all three interface tables.
These fields are required in INTFC_LEASE:
PYMNT_DT
PYMNT_SCHED_ID (do not populate this field with NEXT, it will not be assigned automatically)
LEASE_TERM
LEASE_TYPE
IMPLICIT_RATE
PV_MLP
CAP_LEASE_AMT
LEASE_DT
MRP
INTEREST_EXPENSE
OBLIGATION_REDUCE
EST_LIFE
These fields can have values of zero or N, or the default value from the profile (if using default profile switch = "Yes"):
FMV
BPO
BPO_PAYMENT
BORROW_RATE
ACTUAL_RESIDUAL
GUAR_RESIDUAL
TSFR_OWNERSHIP_FLAG
RENEWAL_OPTION
ITC_AMT
EXECUTORY_COSTS
If LEASE_TYPE = O (Operating Lease), then DEFAULT_PROFILE_SW must equal N. If it is an operating lease asset, then the BOOK field in LEASE_OPER record will be populated with the DEFAULT_BOOK in BUS_UNIT_TBL_AM record.
All of the above fields affect the LEASE_BOOK. The INTFC_FIN.LIFE on the LEASE_BOOK should be calculated as FREQUENCY × LEASE_TERM. For example, if the PYMNT_SCHED_ID is monthly and LEASE_TERM = 24, then LIFE = 24 and ESTIMATED LIFE = 24. The above data are needed for lease adjustments in Asset Management.
When the INTFC_LEASE table is populated, you can use the Load Preview-Lease page to review and correct lease data before uploading to Asset Management tables.
Pages Used to Convert Lease Information
|
Page Name |
Object Name |
Navigation |
Usage |
|
INTFC_LEASE |
Asset Management, Send/Receive Information, Approve Lease Information, Review |
Review and, if necessary, correct lease data before uploading it to Asset Management tables. |
|
|
INTFC_LEASE_APPR |
Asset Management, Send/Receive Information, Approve Lease Information, Approve |
Approve lease data before uploading to Asset Management tables. |