 Building Policies
This chapter discusses how to:
Build policies.
Manage Trigger Points.
Building Policies
You build and manage policies with a wizard-like interface called a policy builder. During the creation of policies, you associate them to trigger points. At runtime, policies are evaluated by specific trigger points in application components, resulting in defined actions being taken.
The policy builder allows business analysts to change conditions or actions or both in policies to enable a business process change in an application component, without having to modify application code, or needing the help of IT personnel.
Note. Policies cannot be shared among different setIDs.
 Prerequisites to Building Policies
Before building a policy, you should have already:
Defined trigger points.
Defined data library terms.
Defined action types, categories, and action objectives.
See Registering Trigger Types and Trigger Points.
See Creating Terms.
See Setting Up the Action Framework.
Pages Used in This Section
|
Page Name |
Object Name |
Navigation |
Usage |
|
Manage Policies |
EOCF_RULE_CFGSRCH |
Enterprise Components, Active Analytics Framework, Policies, Manage Policies. |
Used to build and manage policies. |
|
Manage Trigger Point |
EOCF_MANAGE_TP |
Enterprise Components, Active Analytics Framework, Policies, Manage Trigger Point |
Used to manage trigger points. |
Building, Editing and Activating PoliciesTo build a new policy or edit an existing policy, access the Manage Policy page. If you want to edit an existing policy, use the search criteria to find the desired policy, then click the policy name on the results grid to open the policy definition.
Note. If you select a trigger point name as a search criterion, only policies directly associated to the trigger point are retrieved. To retrieve policies associated to policy groups of a trigger point, specify search criteria other than the trigger point name.
To create a new policy, click Build Policy.
|
Policy Name |
Unique and descriptive name of a policy. |
|
Trigger Point Name |
Descriptive name of a trigger point. A policy is always associated to at least one trigger point. |
|
Category Name |
Descriptive name of a policy category, used to functionally classify policies and aid in searching for policies. |
|
SetID |
Defined within the PeopleSoft system. Specify a setID and a trigger point for every policy. This value is used to select the valid set of policies associated to a trigger point at runtime; it also constrains the prompt list for the right-hand side values entered in conditions by performing a setID to setID indirection. |
|
Status |
This value defaults to In Design when the policy is new. Activation of a policy changes the status to Active. |
|
Start Date, End Date |
Dates defining the validity of a policy at runtime. |
Enter the appropriate fields and click Add Conditions.
Click Add Condition on the Build Policy page.
There are two modes of specifying conditions:
Basic.
This is the default mode; the logical operator defaults to AND.
Advanced.
You can group condition rows using parenthesis, specify logical operators (AND, OR), and specify terms as values in the right-hand side.
To add a condition row:
Select a term and, if it is hyperlinked, configure it.
Select an operator.
Enter or select one or more values on the right hand side.
Selecting Available Terms
Click Select Term on the Add Condition page to display the Term Selection page.
The Term Selection page has two modes in which to search and select terms for a condition: browsing by subject area or searching by entering search criteria. Terms that appear are limited to those that can be resolved by the trigger point. Therefore, all terms having contextual implementations for the context pertaining to this trigger point, and all terms having generic implementations in which binds can be supplied by the context will be available.
Terms returning multiple rows are not available for use in conditions. Terms that retrieve data from detail rows in the component buffer cause the decision engine to evaluate the condition once for each row. The decision engine generates actions for every row for which the condition is true.
If you select a term that is configurable; that is, it has design time binds, it must be configured when you build the condition. Configurable terms are displayed as hyperlinks. Subsequently, while building the condition, click this hyperlink to configure the term.
The prompt of valid values displayed for configurable terms relies on the prompt configuration specified in the Manage Terms component.
See Creating Terms.
The list of operators available when you select a term is dependent on the return data type defined for that term and the context of the selected trigger point.
Each operator defined in the Register Operators page supports certain data types; this determines which operators are available when you select a term in the condition builder. Furthermore, the selection of an operator determines how many fields are required on the right-hand side for entering values.
For example, if you select the is between operator, two right-hand side fields appear for entering values.
See Registering Operators and Operator Sets.
Entering Right-Hand Side Values of a Condition
Prompt options that you specify when defining a term determine the right-hand side field type. The field may be a prompt, dropdown list, or multi-select prompt. SetID-based prompt tables specified in the term definition use the setID value specified on the policy definition page to perform a setID to setID indirection, thus constraining the prompt list.
Note. Use a semi-colon as a separator in multi-select prompts.
In advanced mode, you can specify a term on the right-hand side of a condition—this term is resolved at runtime and the resolved value used as the right-hand side value.
After you enter the condition, click Done to save the condition. Before a successful save, the system validates that right-hand side values are present and are of the appropriate data types; that parenthesis match; and that configurable terms have been configured.
Adding, Editing and Configuring Actions
Click Add Actions or Edit Actions to display the Add or Edit Actions page.
If the action type is configurable, the Configure button is enabled on the page. Individual action types have specific configuration pages.
Note. PeopleSoft Active Analytics Framework delivers a display alert action type. Other action types may be delivered by individual product lines. Please refer to the appropriate product line PeopleBooks to get more information on delivered action types.
See Registering Action Types and Action Type Bundles.
Configuring the Display Alert Action
Access the Display Alert page by selecting Display Alert action type.
Click Configure.
The Display Alert Configuration page appears.
Enter text in the Display Alert Text field and include any term aliases in braces.
Term aliases are placeholders for dynamic content to be merged in the alert text at runtime.
Click Extract Aliases to extract term aliases to populate the grid, thus enabling you to map each alias to a term.
Click Get Term to map a term for each term alias in the grid.
Only terms that return a single value can be used within the display text. Return data types of record or rowset, or terms with Many rows specified are not allowed.
Click OK or Apply to save the display alert configuration.
This configuration is retrieved at runtime to generate the alert text and display it in a popup box.
Click Activate. The system sets the status to active after executing validations. Activating a policy disables field editing, however, the policy may still be copied and associated to another trigger point.
Note. On activation of the policy, any modifications made are in effect only in new user sessions. Therefore, you must sign off and sign on to see any changes made to the policy.
Associating a Policy to Another Trigger Point
A policy can be associated to more than one trigger point within the same setID. Do this by:
Adding a new row to the Associated Trigger Points grid.
Selecting a valid trigger point from the dropdown list
Note. The trigger points available for selection in the drop-down list are constrained by the terms used in the policy condition and the actions configured in the policy. Also, a policy cannot be associated with multiple trigger points spanning multiple setIDs.
Saving the policy associates the policy to the new trigger point.
Create a new policy by copying an existing one, provided you can use the same condition and actions. While copying a policy, you'll be prompted for a trigger point and setID. Selecting from the list of valid trigger points results in creating a new policy, which appears on the screen.
Note. When you copy a policy, the condition and actions, but not the action configurations, are copied to the new policy. Therefore, you need to reconfigure the actions by clicking Edit Actions. A reminder message appears when you're transferred to the new policy.
Managing Trigger PointsThe Manage Trigger Point component provides a comprehensive view of policies that are associated to a specific trigger point. It displays policies and policy groups in a hierarchy, with the trigger point as the root and policy groups (if any) as parents of policies.
In addition, this component enables you to assign execution options at the trigger point level and at the policy group level, facilitating policy arbitration and better policy management.
Access the Manage Trigger Point page.
The trigger point hierarchy on the left-hand side of the page displays all the policies and policy groups associated to the selected trigger point. The trigger point appears as the highest level item in the hierarchy while policy actions appear as the lowest level items.
|
Filter |
This field applies only to policies displayed in the hierarchy and the Existing Policies/ Policy Groups grid. It either displays active policies, in-design policies, or all policies depending on the selection. |
|
SetID |
Toggle the value in this field to view policies for this setID. |
Removing a Policy or Policy GroupsYou can remove a policy or policy group from a trigger point by selecting the policy or policy group to be deleted, and then by clicking the Delete icon. Removing a policy or policy group from the trigger point disassociates it from the trigger point, but does not delete it from the database.
A policy group is not reusable—once the policy group is disassociated from a trigger point, it can not be referenced.
Any changes made to a trigger point by adding or removing policies or policy groups or by modifying execution options, take effect at runtime and only for new user sessions. Therefore, you must sign off and sign on to see any changes made.
Note. A policy that is associated to a single trigger point (either directly or within policy groups) cannot be removed from the trigger point. To disable such a policy, you must edit it and set the status to In Design.
Reordering Policy or Policy GroupsTo set priorities to policies, you may need to reorder policies or policy groups within a trigger point or a parent policy group. Reorder policies and policy groups by using the reorder icon. a parent group, which may be a Trigger Point or a parent Policy group.
Adding a Policy or Policy GroupClick Add Policy to create a new policy and associate it to the trigger point. The Build Policy component appears.
Click Add Policy Group to create a new policy group and to associate it with this trigger point.
A policy group may be used to set policy priority within a group, to de-activate policies, to nest child policy groups and to assign preconditions.
Reusing PoliciesReuse a policy in multiple trigger points and policy groups if the contexts are compatible.
Click the Reuse Policy hyperlink to reuse an existing policy. Select one of the policies listed in the grid by selecting the appropriate radio button. Click OK. The selected policy is associated to the trigger point or policy group.
Note. If a policy is reused within a single trigger point through direct association to the trigger point, or by association to a policy group within the trigger point, you cannot remove this policy from either the trigger point or the policy group within the trigger point. If you want to remove such a policy, you must deactivate the policy by setting its status to In Design.
Adding a PreconditionPreconditions are combinations of one or more conditions. They are optional and only policy groups can have preconditions.
At runtime, the policies within a policy group are not evaluated unless the precondition evaluates to true.
For example, you could have a precondition defined for a self-service policy group, as “Is this user on the internet?” Consequently, all policies within that policy group would not be executed unless the precondition of being on the internet evaluates to true.
Click Add Precondition to display the Add Precondition page.
Select terms and operators; specify values on the right-hand side.
Setting Execution OptionsThe following execution options may be specified for a trigger point or a policy group:
|
Default, if specified for a trigger point. Enables execution of all policies within a trigger point or policy group. During runtime, when executing policies within a policy group, the system adheres to the execution option specified for the policy group. |
|
|
Enables execution of a maximum (of the number specified) policies that evaluate to true. |
|
|
(Policy groups only). Default for policy groups. At runtime, this uses the execution options of either the trigger point or the parent policy group. |
Understanding Execution Options
This section describes the execution options and various scenarios of how they can be used.
Execute All
Execute All tests all policies in a trigger point; that is, all policies in the trigger point can cause actions to occur if their conditions prove true.
For example if a trigger point has three policies and the execution option is set to Execute All, all three policies are evaluated.
Execute Limited Number
Execute Limited Number evaluates all policies in the trigger point until one of the policies' conditions evaluates to true. Therefore, say you set Execute Limited Number to 1 for a trigger point that has three policies where Policy 1 evaluates to false and Policy 2 evaluates to true; Policy 3 will not be considered and Policy 2 is executed.
Various Scenarios of Execution Options
Policy groups may have their own execution options that could affect the option setting, however. For example, consider the following diagram:
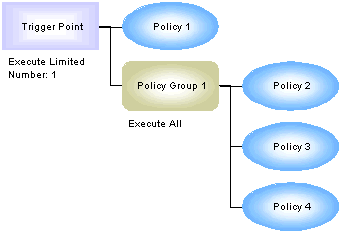
Execution Options: Scenario 1
In Scenario 1, if Policy 1 proves false, then all policies in Policy Group 1 are evaluated because its execution option overrides the trigger point's execution option. Therefore, even though the trigger point is set to execute one policy, if Policy 2, 3, and 4 evaluate to true those three policies' actions will execute.
Consider Scenario 2:
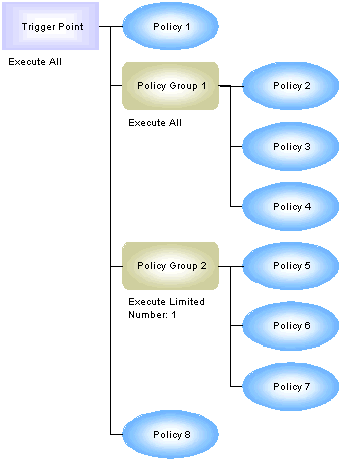
Execution Options: Scenario 2
In this scenario, assume that all policy conditions are true, actions from Policy 1, 2, 3, 4, 5, and 8 will execute.
Consider Scenario 3:
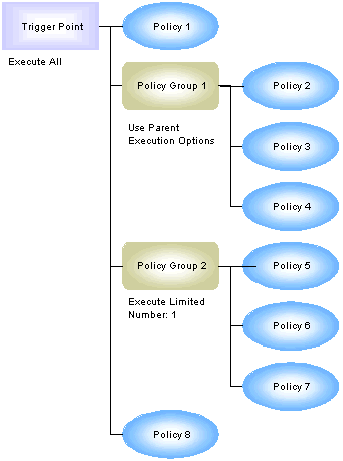
Execution Options: Scenario 3
In this scenario, the trigger point's execution option is the default (as is Policy Group 1). Assuming that all policy conditions are true, this trigger point executes exactly as in Scenario 2; that is, actions from Policy 1, 2, 3, 4, 5, and 8 will execute.
Consider Scenario 4:
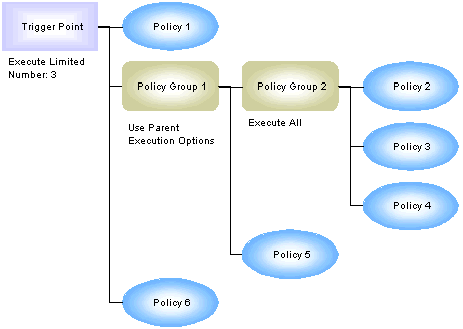
Execution Options: Scenario 4
In this scenario, assume that all policy conditions are true. Policy Group 2's execution option overrides Policy Group 1's; therefore, all of Policy Group 2's policy actions execute. However, Policy 5 is not considered, nor is Policy 6 because three policy actions have already executed (Policy 2, 3, and 4).
Guidelines for Setting Execution Options
Unless you have a specific reason to set options, PeopleSoft recommends using the default execution options. If there are only a few conditions that could be true for a trigger point, and these conditions are logically exclusive (only one could be true at a time), set the number of policies considered to one (Execute Limited Number =1) to improve performance.
If for whatever reason, only a few policy options should be considered, and there are no policy groups, setting a limitation for the trigger point is a good idea.
If you have a trigger point containing unrelated policies and a category of possible conditions that may be true, for which only one set of consequent actions should be taken, it's best to separate the unrelated policies into a separate policy group with a limitation on the number of policies allowed to fire.