Running the ELM Full Sync Integration Guided Process
After configuring the HCM and ELM environments for Integration Broker, activating sync integrations, assigning user security to users in HCM and ELM, and the defining your remote system, you are now ready to run the ELM Full Sync Integration Guided Process.
For more information on guided processes, see the product documentation for PeopleSoft HCM: Application Fundamentals.
|
Page Name |
Definition Name |
Usage |
|---|---|---|
|
GDP_SELECT_PRCS |
Select the guided process you want to run and answer the guided process questionnaire. |
|
|
GDP_INFO |
Review information about the full sync integration process that you want to initiate |
|
|
IPR_CREATE_REQUEST |
Submit a request for a full sync integration process. |
|
|
IPR_REVIEW_REQUEST |
Monitor the progress of a full sync integration process. |
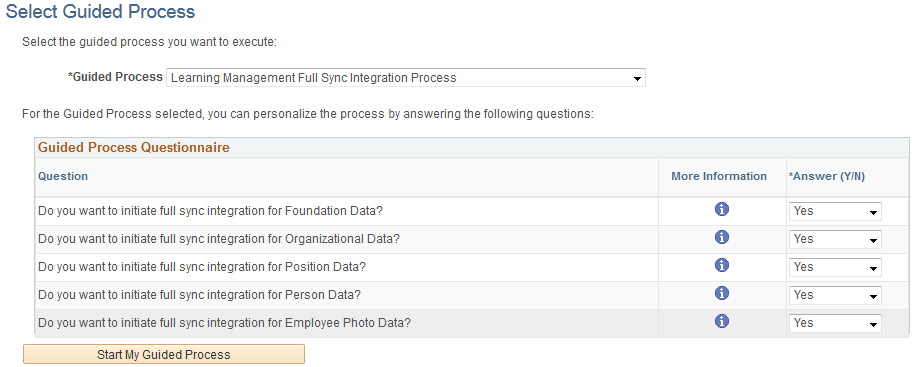
Use the Select Guided Process page (GDP_SELECT_PRCS) to select the guided process you want to run and answer the guided process questionnaire.
Navigation:
This example illustrates the fields and controls on the Select Guided Process page.
Field or Control |
Description |
|---|---|
Guided Process |
Select Learning Management Full Sync Integration Process. |
Guided Process Questionnaire
The guided process questionnaire enables you to personalize the process of running full sync integration by allowing you to select the full sync integrations that you want to process. Select Yes in the Answer column for each full sync integration that you want to include in the steps of the guided process.
Field or Control |
Description |
|---|---|
|
Click for more details if you are unsure about the effect of selecting Yes for a question. |
Start My Guided Process |
Click to access the Guided Process Workcenter where you can view and process the steps of the guided process. |
Continue My Guided Process |
If you have already started your guided process, this button appears in place of the Start My Guided Process button. Click it to continue your guided process where you left off. |
Delete Guided Process |
This button appears only if you have already started a guided process. Click it to delete the current guided process. |
The Guided Process Workcenter has three areas:
Navigation subpage
Pagelet
Target content
Navigation Subpage Area
In the navigation subpage area, you can access navigational buttons that will take you through the steps of the guided process.
This is an example of the navigation subpage area of the Guided Process Workcenter.

Term |
Definition |
|---|---|
Previous |
Click to move to the previous step in the guided process. |
Next |
Click to move to the next step in the guided process. |
Mark Complete |
Click to mark a step as manually completed. It is necessary only for pages that contain nothing to save, such as the Overview page. Once you finish reading the text on pages that require no input or saving, you can click the Mark Complete button to proceed. |
Cancel |
Click to delete the current instance of the Learning Management Full Sync Integration Process and return to the Select Guided Process page. Deleting the current instance of the Learning Management Full Sync Integration Process does not affect any of the full sync integration processes that have completed or are in progress. It is not recommended, however, that you delete the current instance while full sync integration is processing. This is because once the current instance is deleted, you cannot review the status of the full sync integration that is processing. |
Exit |
Click to exit the current instance of the Learning Management Full Sync Integration Process and return to the Select Guided Process page. You can return to the current instance of the Learning Management Full Sync Integration by selecting the guided process again. |
Pagelet Area
This is an example of the pagelet area of the Guided Process Workcenter.
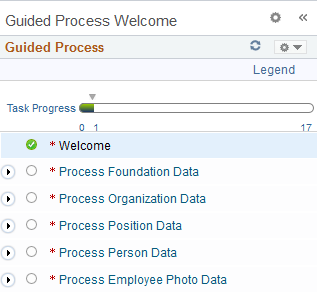
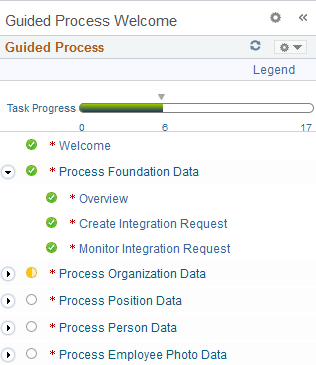
The pagelet area displays a high-level section for each guided process question to which you answered Yes on the Select Guided Process page. You can expand each section to view the individual steps of each process.
Each section has three steps:
Overview
Create Integration Request
This initiates a request to process a full sync integration.
Monitor Integration Request
This step enables you to monitor the progress of a full sync integration process.
Note: The Process Employee Photo Data section also includes an extra informational step that reminds you to verify the installation settings in your ELM environment.
Target Content Area
This is an example of the target content area of the Guided Process Workcenter.

The target content area is the primary area where you review information and initiate and monitor the full sync integrations.
When you first access the Guided Process Workcenter, you start at the Welcome page, which provides an overview of the guided process. From here you can navigate in multiple ways within the Guided Process Workcenter. You can interact directly with the steps in the pagelet area by expanding sections and clicking directly on the steps or you can use the Next and Previous buttons that appear in the navigation subpage area.
The Guided Process Workcenter has three areas:
Navigation subpage
Pagelet
Target content
Navigation Subpage Area
In the navigation subpage area, you can access navigational buttons that will take you through the steps of the guided process.
This is an example of the navigation subpage area of the Guided Process Workcenter.

Term |
Definition |
|---|---|
Previous |
Click to move to the previous step in the guided process. |
Next |
Click to move to the next step in the guided process. |
Mark Complete |
Click to mark a step as manually completed. It is necessary only for pages that contain nothing to save, such as the Overview page. Once you finish reading the text on pages that require no input or saving, you can click the Mark Complete button to proceed. |
Cancel |
Click to delete the current instance of the Learning Management Full Sync Integration Process and return to the Select Guided Process page. Deleting the current instance of the Learning Management Full Sync Integration Process does not affect any of the full sync integration processes that have completed or are in progress. It is not recommended, however, that you delete the current instance while full sync integration is processing. This is because once the current instance is deleted, you cannot review the status of the full sync integration that is processing. |
Exit |
Click to exit the current instance of the Learning Management Full Sync Integration Process and return to the Select Guided Process page. You can return to the current instance of the Learning Management Full Sync Integration by selecting the guided process again. |
Pagelet Area
This is an example of the pagelet area of the Guided Process Workcenter.

The pagelet area displays a high-level section for each guided process question to which you answered Yes on the Select Guided Process page. You can expand each section to view the individual steps of each process.
Each section has three steps:
Overview
Create Integration Request
This initiates a request to process a full sync integration.
Monitor Integration Request
This step enables you to monitor the progress of a full sync integration process.
Note: The Process Employee Photo Data section also includes an extra informational step that reminds you to verify the installation settings in your ELM environment.
Target Content Area
This is an example of the target content area of the Guided Process Workcenter.

The target content area is the primary area where you review information and initiate and monitor the full sync integrations.
When you first access the Guided Process Workcenter, you start at the Welcome page, which provides an overview of the guided process. From here you can navigate in multiple ways within the Guided Process Workcenter. You can interact directly with the steps in the pagelet area by expanding sections and clicking directly on the steps or you can use the Next and Previous buttons that appear in the navigation subpage.
Use the Overview page (GDP_INFO) to review information about the full sync integration process that you want to initiate.
Navigation:
Click the Next or Previous button in the navigation subpage, or select an Overview step of a full sync integration in the pagelet area of the Guided Process Workcenter.
This example illustrates an Overview page for a full sync integration process.
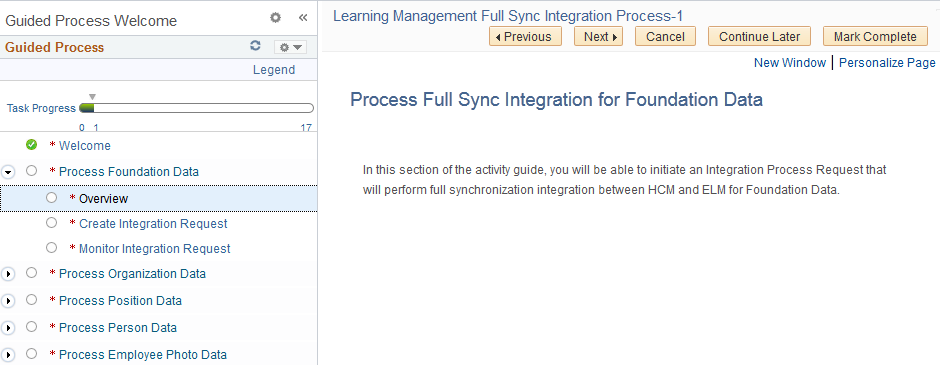
Because there is nothing to be saved on this page, you can click the Mark Complete button to update the status of this step. This action updates the status of the section to In Progress, and the number of tasks completed is reflected in the Task Progress bar.
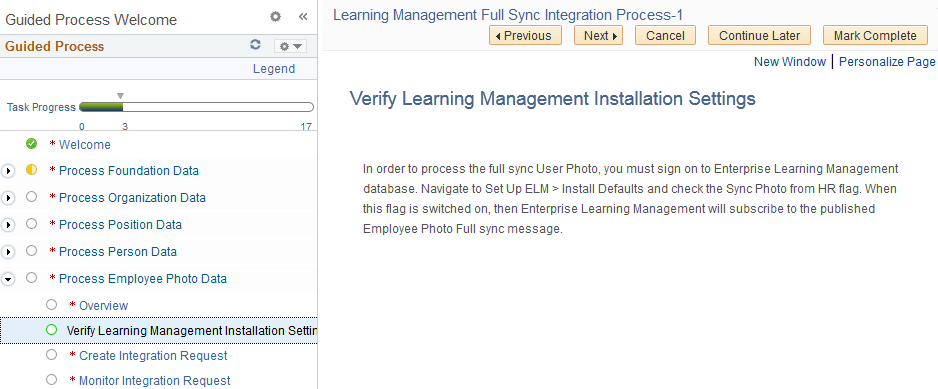
Verify Learning Management Installation Settings
The Process Employee Photo Data full sync integration has an additional informational step following the Overview: Verify Learning Management Installation Settings. Once you have read the information for this step and verified the installation settings in your ELM environment as instructed, you can mark this step as complete just as you would with the Overview steps.
This example illustrates the Verify Learning Management Installation Settings step of the Process Employee Photo Data full sync integration.
Use the Create Integration Process Request page (IPR_CREATE_REQUEST) to submit a request for a full sync integration process.
Navigation:
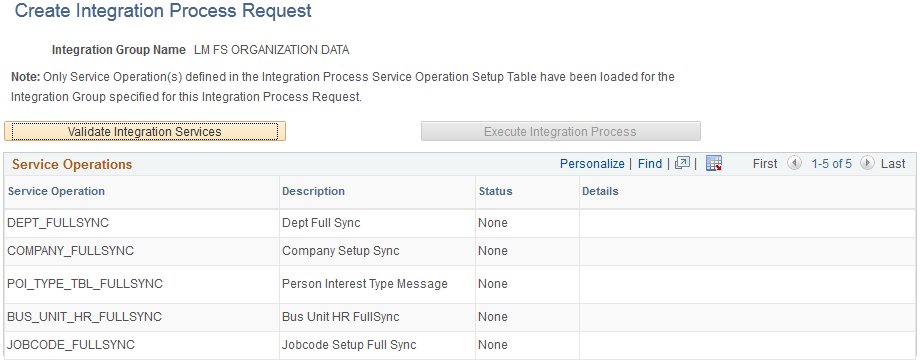
Click the Next or Previous button in the navigation subpage, or select a Create Integration Request step of a full sync integration in the pagelet area of the Guided Process Workcenter.
This example illustrates the fields and controls on the Create Integration Process Request page.
Field or Control |
Description |
|---|---|
Integration Group Name |
Displays the group name of the full sync integration for which you are creating a process request. |
Validate Integration Services |
Click to validate that all the service operations associated with this full sync integration are active and configured. This should update the Status of each service operation to Valid. If any of the service operations are not valid, you must contact a system administrator to review the integration configuration before you can proceed. |
Execute Integration Process |
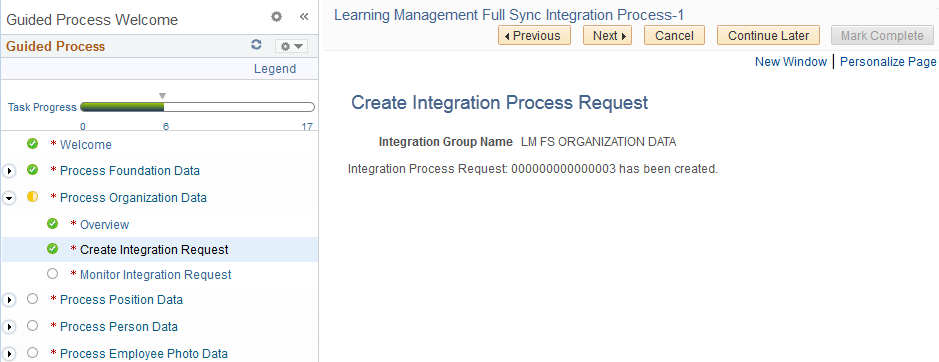
This button is available only after you successfully validate all the service operations associated with the full sync integration. Click it to create the integration process request, which initiates the full sync integration. When you click this button, the page displays the process request ID. |
This is an example of the Create Integration Process Request page after the process request has been executed.
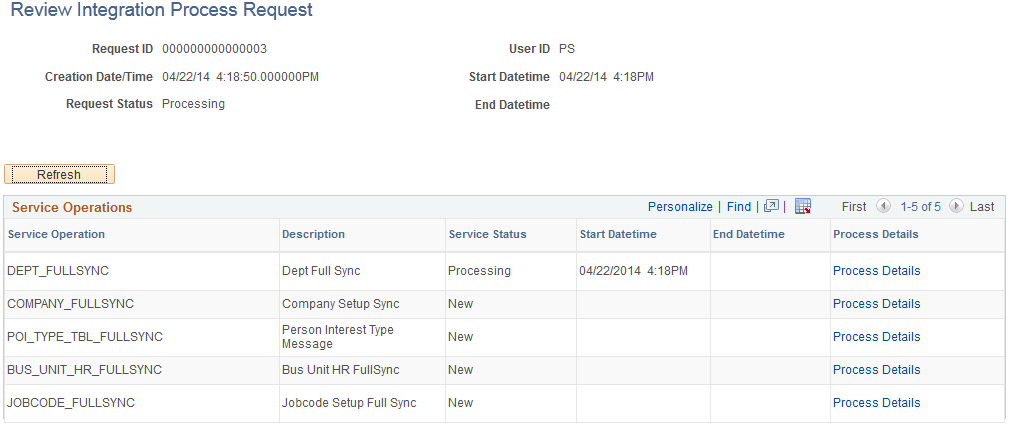
Use the Review Integration Process Request page to monitor the progress of a full sync integration process.
Navigation:
Click the Next or Previous button in the navigation subpage, or select a Monitor Integration Request step of a full sync integration in the pagelet area of the Guided Process Workcenter.
This example illustrates the fields and controls on the Review Integration Process Request page.
Field or Control |
Description |
|---|---|
Refresh |
Click to update the page with the current status of the integration process. |
Service Status |
Displays the status of each service operation associated with the integration. Values are:
|
Process Details |
Click to access the Process Details page, where you can view more information about the processing of each integration step for a service operation. |
This page displays information for one or more integration steps, depending on the service operation.
Field or Control |
Description |
|---|---|
Step Status |
Displays the current status for each integration step. Values are:
|
Message Log Detail |
Click to access the Message Log Details page where you can review any messages generated for an integration step. |
Process Details Page
This example illustrates the fields and controls on the Process Details page.

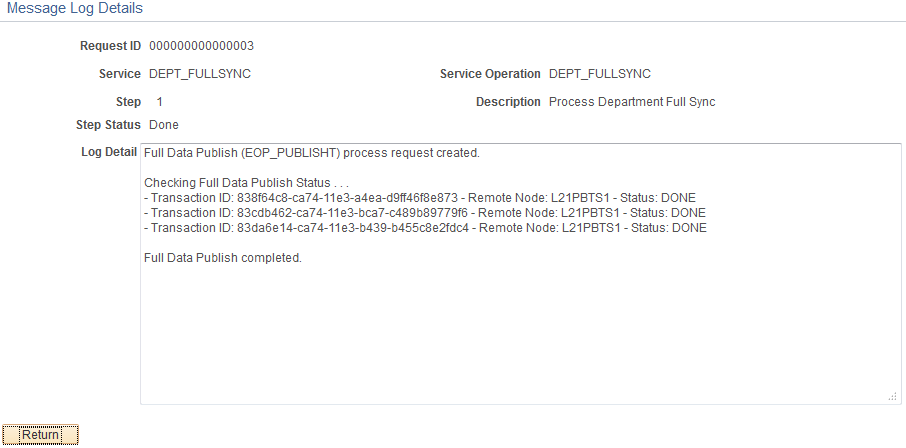
Message Log Details Page
This is an example of the Message Log Details page for an integration step.
Completing an Integration Request
Once all the service operations for an integration have a status of Done, you can click the Mark Complete button in the navigation subpage area. This sets the Monitor Integration Request step and the entire section of the guided process to Complete in the pagelet area of the Guided Process Workcenter.
This is an example of the pagelet area showing a full sync integration that has been marked as complete.
