Managing Compliant Content
To manage compliant content, use the Maintain Classes (LM_ACT) component.
|
Page Name |
Definition Name |
Usage |
|---|---|---|
|
LM_EL_IMPORT |
Upload and configure compliant content files. |
|
|
LM_LEL_SCO_WEIGHT |
Select the lessons from compliant content that you want to have count toward passing the learning component. |
Use the Manage Online Class Content page (LM_EL_IMPORT) to upload and configure compliant content files.
Navigation:
Click the Manage Content button from the Survey Component, Test Component, or Web-based Component pages.
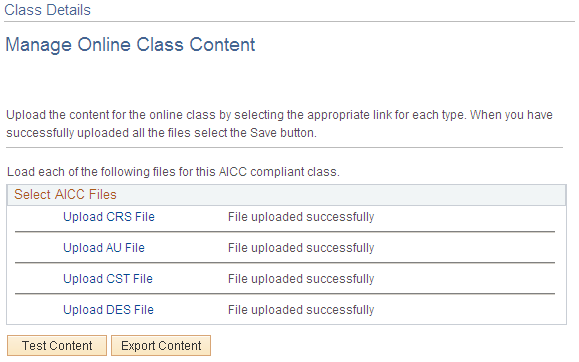
This example illustrates the fields and controls on the Manage Online Class Content page.
Use this page to:
Upload structure files.
Test the launching of the content.
Export structure files.
Select the lessons within the course content that you want to count toward completion of the learning component.
Uploading Structure Files
To upload structure files:
Click each of the file type links to browse, locate, and upload each structure file.
SCORM compliant vendors structure files in XML format. SCORM 1.1 provides the following file: Content.CSF. SCORM 1.2 and 2004 require that a zip file Content.ZIP be uploaded that contains the content structure file. During the upload the system will automatically unzip the file.
Note: The system uses the java class java.util.zip to unzip the Content.ZIP file. Due to a bug with java's zip dll (dynamic link library), this process sometimes fails. If this should happen, unzip the file using PKZip or WinZip and then rezip it using WinZip. Then, upload the structure file again.
AICC compliant vendors structure files in AICC format. They provide the following files:
Content.CRS
Content.DES
Content.CST
Content.AU
Click the Save button after you upload all structure files.
If the save operation is successful, the Test Content, Export Content, and Select Lessons buttons appear.
Note: If there are any errors in the structure files, the system displays an appropriate error message. You must correct the errors and reload the corrected structure file. When you click the Save button the system first saves the new files associated with the class into the database (permanently deleting the previous set of data), and then runs validation on new structure data and checks for consistency and correctness.
Uploading the SCORM Content Files
As an administrator, you can upload SCORM (Sharable Content Object Reference Model) compliant content files using the Manage Online Class Content page leveraging HTTP file upload ability. Here, the secured Storage Group serves as the HTTP repository for the content.
Note: For uploading large files (more than 20 to 50MB), Oracle recommends traditional file upload.
To upload the SCORM content:
Create a Root Folder and HTTP Repository Path: Create a storage group root folder to securely store your file/content under PS_CFG_HOME/peoplesoft/applications/peoplesoft/PORTAL.war/WEB-INF/. The required name for the storage group root folder is stogroup/site_name. And create group parent folders under this storage group root folder. Use the Storage Group Management page to create an alias to the storage group parent folder on the web server and associate your PeopleCode implementation to the parent folder.
Modify URL Definition: Use the URL Maintenance page and modify the URL definition LM_SCORM_UPLOAD for file upload.
Enter URL/File Path: Use the Compliance and Technical Data section on the Web-based Component page (LM_LC_WEB) to enter the URL or file path used to access the compliant content. Provide users with URLs to the files that they can access on the web server using the psp servlet. For example, the URL to CS101_syllabus.pdf in the subfldr1 folder would be: http://webserver.example.com:8000/psp/site_name/PORTAL/NODE/p/ELM1/subflder1/CS101_syllabus.pdf
Upload the Content: Use the Manage Online Class Content page (LM_EL_IMPORT) to upload and test content files.
This example illustrates the Manage Online Class Content page to upload SCORM compliant content as ZIP file.
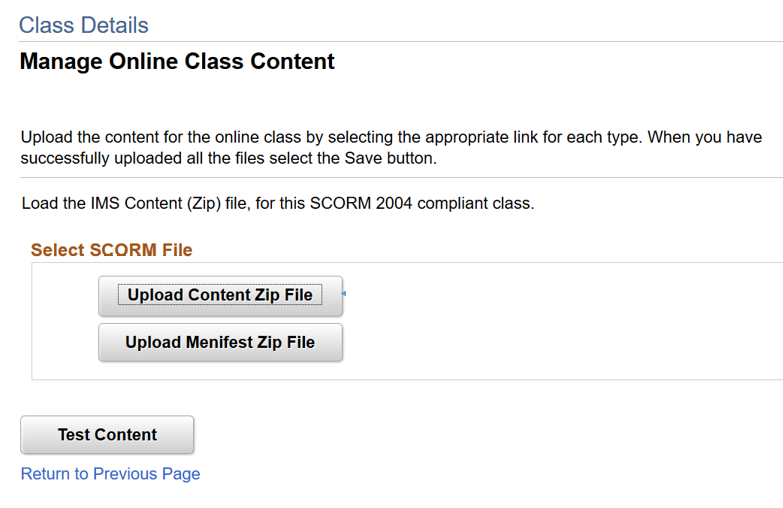
Use the ‘Upload Content Zip File’ button to upload the content zip file for the class. The uploaded file will be unzipped and saved on the location defined under URL/Filepath.
Note: Any files/contents placed inside a Storage Group are secure and cannot be accessed directly. It is only accessible through PeopleTools Servlets. The SCORM contents are placed within a private folder inside the storage group and accessed through the storage group servlet.
Testing the Learning Component
After you have successfully saved the structure files, the Test Content button appears.
To test the class:
Click the Test Content button to launch the content and access the Table of Contents page, which lists the lessons in the class.
Click one of the lesson links on the Table of Contents page and verify that the class content launches successfully.
If the test launch fails, the system raises the appropriate error message. You might need to modify the launch URL of one or more of the structure files. If you make any corrections, you must upload and save all of the files again.
Exporting Content Structure Files (for Both SCORM and AICC Content)
As part of compliance with AICC standards, the system enables you to export course structure files. You can export the structure files if you need to make changes to the content structure or if you need to import the structure into any content management system.
To export content structure files, click the Export Content button on the Manage Online Class Content page. This exports the content structure files from the database in a flat file format. The system generates new file names by appending an internal class ID (a number) to the original name of the imported structure files. The system places the files in the directory specified by the Export Content Directory setup option.
Selecting Course Content Lessons
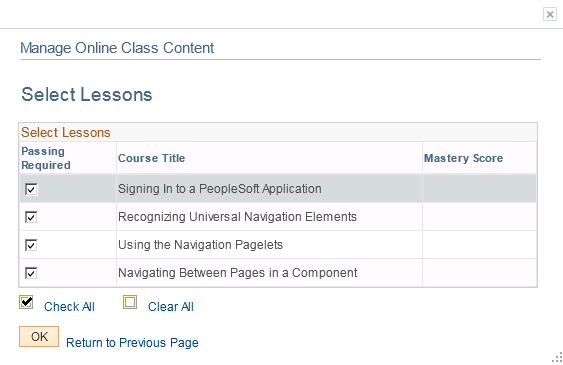
Click Select Lessons to select the lessons within the course content that you want to count toward completion of the learning component.
Use the Select Lessons page (LM_LEL_SCO_WEIGHT) to select the lessons from compliant content that you want to have count toward passing the learning component.
Navigation:
Click the Select Lessons button from the Manage Online Class Content page.
This example illustrates the fields and controls on the Select Lessons page.
Field or Control |
Description |
|---|---|
Passing Required |
Select if you want this lesson to count toward the learner's overall score for this learning component. If you deselect this check box, the learner can take the lesson but the outcome will not figure into the calculation of the learner's score. You cannot edit this check box after a learner has launched any lesson in the course. |
Course Title |
The title of the lesson. |
Mastery Score |
The numerical value the content provider has established as the minimum passing score for this lesson. The Auto Mark Class Completion process retrieves the learner's scores for each required lesson from the content and the completion engine compares the learner's scores with the mastery score to determine the learner's overall learning component score. |