Administering Enrollment-Related Tasks
|
Page Name |
Definition Name |
Usage |
|---|---|---|
|
LM_ROSTER_SRCH |
Find and select class rosters for managing enrollment details, or for marking grades and attendance. |
|
|
LM_ACT_ROSTER |
View the class roster, update enrollment statuses for learners, and manage waitlists. This page shows all learners regardless of enrollment status. |
|
|
Class Notifications Page |
LM_ACT_NOTIF |
Send ad hoc email notifications to the learners on a class roster. |
|
LM_LRNR_ROSTER |
Update a learner's enrollment status, and update grades, scores, and attendance information. Update DIF information for French users. |
|
|
LM_LRNR_ROSTER |
Enter a learner's actual training hours for a component and quantify DIF and non-DIF hours, and hours during and outside of the learner's normal schedule. |
|
|
LM_PYMT_DTLS_ENR |
Edit payment information for a learner. |
Administrators can use the Administer Class Roster component to search for and access any class roster within their learning environments. Using the rosters, they can approve enrollment requests, manage waitlists, drop learners, and update payment details on a learner's enrollment record. Tasks that are performed by changing a learner's enrollment status, such as dropping a learner or approving enrollment, depend on the learner's current enrollment status and the permission lists that are assigned to the user. Administrators can update the registration status of an individual learner or use a group action to update multiple learners simultaneously. They can also use the group action feature to send ad hoc email notifications to learners.
The Administer Class Roster component can also be used to view and update learners' grades, attendance, and scores. These tasks are discussed elsewhere in this book.
Use the Administer Class Roster page (LM_ROSTER_SRCH) to find and select class rosters for managing enrollment details, or for marking grades and attendance.
Navigation:
This example illustrates the fields and controls on the Administer Class Roster page.
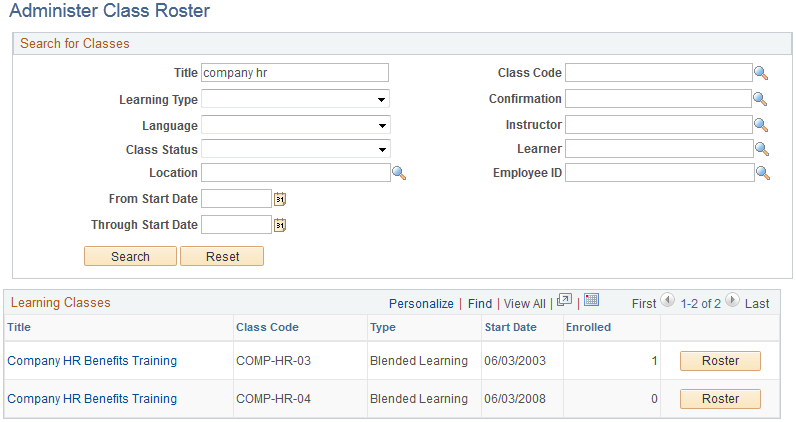
Search for Classes
Enter search criteria to search for a class roster. Click the Search button to display the search results and Reset to clear the search criteria fields.
Learning Classes
Select a class roster from the list of search results. The system displays only classes that are in the learning environment of the administrator and sorts the list by class codes. Click a link in the Class column to view the Class Details page for that class. Click the Roster button for the class to display the Class Roster page.
Use the Class Roster page (LM_ACT_ROSTER) to view the class roster, update enrollment statuses for learners, and manage waitlists.
This page shows all learners regardless of enrollment status.
Navigation:
Click the Roster button for a class on the Administer Class Roster page.
This example illustrates the fields and controls on the Class Roster page (1 of 2).

This example illustrates the fields and controls on the Class Roster page (2 of 2).
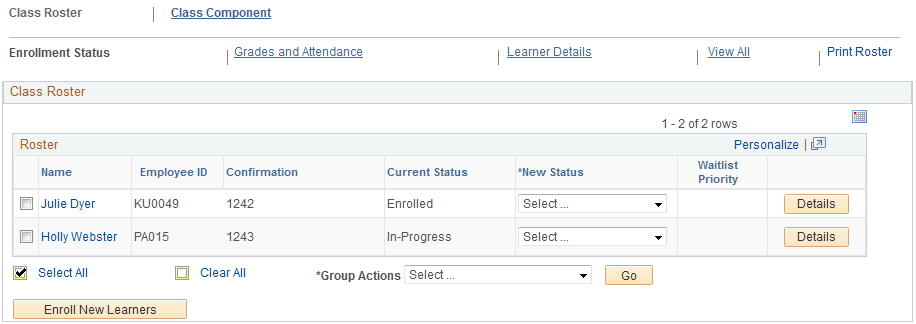
You can narrow the list of learners to display on the roster by entering selection criteria. To display the search fields, click the Search Options link that appears when you first access the page.
Search Option Fields
Enter the learner selection criteria and click the Search button to display learners.
Class Status
Select the corresponding check box to display all learners whose records match that enrollment status. You can select multiple check boxes to refine the search. Filtering by enrollment status is helpful when you want to perform the same task for multiple learners—for example, approve all enrollments that are pending approval.
Enrollment Date
You can search for all learners who enrolled in the class within the date range that you specify in the From Date and To Date fields and who meet the other search criteria.
Class Roster
The system displays the search results in this grid. The Enrollment Status view displays each learner's name, confirmation number, current enrollment status, and waitlist priority.
Field or Control |
Description |
|---|---|
Grades and Attendance |
Click to view and update grades, attendance, and scores. |
Learner Details |
Click to view a learner's ID, job title, and status. |
View All |
Click to view all columns from the Enrollment Status, Grades and Attendance, and Learner Details views. |
Print Roster |
Click to open a printable class roster in a separate browser window, in PDF format. The printable class roster includes only the learners displayed in the Roster grid. You can therefore use the same search filtering for the grid to filter the learners on the roster. Note: The roster prints for all learning components. |
Name |
Click the learner's name link to access the Learner Information page, which displays high-level job and contact information about the user. |
Conf # (confirmation number) |
Displays the enrollment confirmation number for the learner. The system assigns this number during enrollment. |
Current Status |
Displays a learner's current enrollment status. |
New Status |
Select a new enrollment status for the learner. The current status and your assigned permission lists determine which options are available.
The system generates an email that gets queued to be sent to the learner informing the learner of the updated enrollment status. |
Waitlist Priority |
Displays a learner's waitlist priority number, if any. The system automatically enrolls the learner with the lowest waitlist priority number first before the class start date. After the class start date, you must enroll a waitlisted learner manually on the roster. You can change a learner's position in the queue by changing the number in this field. If more than one person is given the same number in the waitlist, the system enrolls the learner with the lowest confirmation number first. To enroll a learner who is on the waitlist (with a status of waitlisted):
When you enroll a waitlisted learner, the system generates an email that gets queued to be sent to the learner informing the learner of the updated enrollment status. |
Details |
Click to access the Learner Roster page, where you can enter learner attendance statuses, completion statuses, grades, and scores, for all learning components that are within the class. This page is identical to the page that instructors use to enter attendance statuses, passing statuses, completion statuses, grades, and scores for a learner for all learning components within the class. See Learner Roster Page. |
Group Actions |
You can apply the same action (status change) to multiple learners at the same time. Click the check box next to the learners' names and select the action here. You can select from the list of actions that are permitted for your security profile, including Drop, Enroll, Move to Learning Request, Move to New Class, and Send Notification. When you click Go, the Review Information page appears. Click to access the Send Notification page, where you can select a set of learners from the roster and send an improvised email to them and other interested parties. This is useful if you want to notify all learners at the same time of a class change, or send them class reminders. |
Enroll New Learners |
Click to access the Enroll Learners - Find Learners page where you can enroll new learners in the class. |
Use the Learner Roster page (LM_LRNR_ROSTER) to Update a learner's enrollment status, and update grades, scores, and attendance information.
Update DIF information for French users.
Navigation:
Click the Details button for a learner on the Class Roster page.
This example illustrates the fields and controls on the Learner Roster page (1 of 2).

This example illustrates the fields and controls on the Learner Roster page (2 of 2).
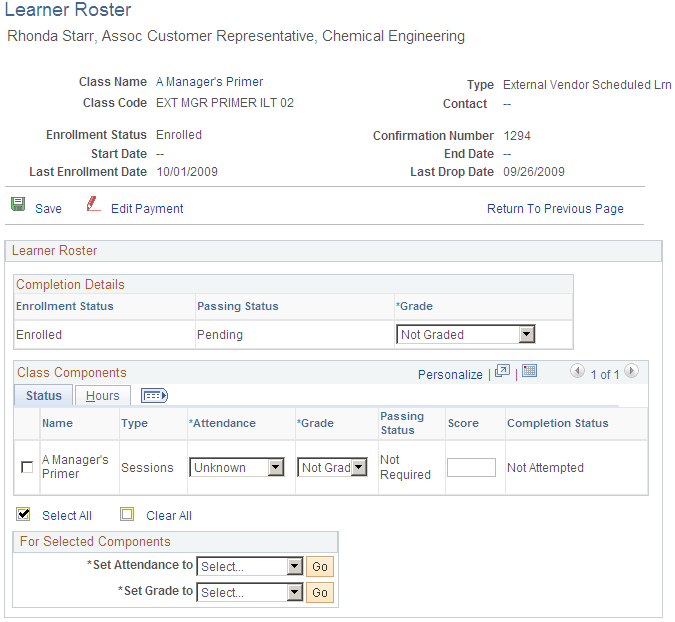
Completion Details
This group box displays the learner's enrollment status in the class, the passing status, and enables you to enter a grade for the class.
Class Components: Status
The Status tabs provides fields for updating a learner's attendance, grade, passing status, and score for each learning component. These fields are the same as those on the Component Roster group box on the Component Roster page.
For Selected Components
These fields are the same as those on the Component Roster page.
(FRA) DIF
This group box appears only when the current administrator's learning environment is enabled for French features and the course is defined as eligible for DIF.
Field or Control |
Description |
|---|---|
Apply Class Toward DIF |
This check box is selected by default, if the Apply Class Toward DIF option was selected during enrollment. When selected, the learning component hours (as defined on the Recommended Duration page when creating the class) are treated as DIF training hours outside the working schedule. You can use the Component Duration page to indicate that only part of the class was taken with DIF hours. For example, say that a component is 15 hours, but only 10 hours are taken as DIF outside the normal working schedule. In this case, you can use the Component Duration page to indicate that only 10 hours were taken as DIF hours outside the normal working schedule. The system does not prevent learners from exceeding their DIF balances. |
(FRA) Learning Class
This group box appears only when French features are enabled for the administrator's learning environment. Define classifications on the Learning Classifications page.
Field or Control |
Description |
|---|---|
Learning Class |
The system displays the default learning classification that is assigned to the course for this class. You can override the classification shown here. |
Training Plan Category |
Enter the training plan category that applies to this enrollment. Like learning classifications, training plan categories appear on training reports and can affect a learner's compensation for training time. |
(FRA) DIF Balance
This grid appears only when the current administrator's learning environment is enabled for French features and the course is defined as eligible for DIF.
When you import DIF balances from a Payroll application such as PeopleSoft Enterprise Global Payroll for France, this grid can display the learner's calculated DIF balance and DIF in advance. The As of Date represents the date on which balances were last calculated by the payroll application. Balances are shown for the last five months. Only one row appears at a time; use the buttons on the grid to display previous balances. The duration unit is always hours.
(FRA) Class Components: Hours
Click the Hours tab.
This example illustrates the fields and controls on the Learner Roster: Hours tab.
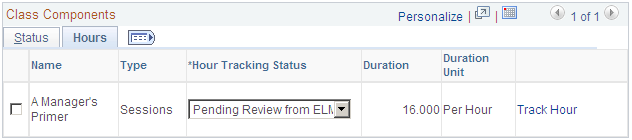
The Hours tab appears only when the current administrator's learning environment is enabled for French features.
Field or Control |
Description |
|---|---|
Hour Tracking Status |
If you send training hours to a payroll application through the Administer Training business process, this field shows the current validation status for the hours. The initial status is Pending Review from ELM. You can use this field to validate the hours or cancel their transmission. Valid selections depend on the current status. Administrators can also use the Validate Training Hours page to view and update the hour tracking status. |
Duration |
The system displays the component duration that is defined on the Recommended Duration page. (Complete the Recommended Duration page when defining the class.) |
Duration Unit |
Component duration is always expressed in hours here. |
Track Hour |
Click to access the Component Duration page so that you can update the duration and associated hour types. |
Use the Component Duration page (LM_LRNR_ROSTER) to enter a learner's actual training hours for a component and quantify DIF and non-DIF hours, and hours during and outside of the learner's normal schedule.
Navigation:
Click the Hours tab on the Learner Roster page. Click Track Hour.
(The Hours tab only appears on the Learner Roster page when the current administrator's environment is enabled for French functionality.)
This example illustrates the fields and controls on the Component Duration page.
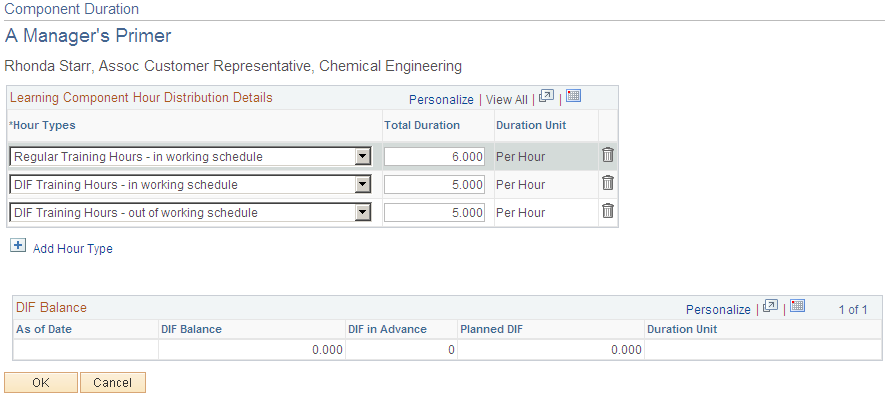
Use this page to identify, by hour type, the number of hours of training the learner completed for this component.
For example, you can specify the number of DIF hours that occurred outside of the learner's normal work schedule. Duration and hour type information is sent to the Administer Training business process when you publish training hours.
Field or Control |
Description |
|---|---|
Hours Types |
Use hour types to identify the number of DIF and non-DIF hours of training that occurred during and outside of the learner's normal work schedule. If the Apply Class Toward DIF check box is selected on the Learner Roster page, the options are: DIF Training Hours - out of working schedule (the default), DIF Training Hours - in working schedule, Regular Training Hours - in working schedule, and Regular Training Hours - out of working schedule. If the Apply Class Toward DIF check box is not selected, the options are: Regular Training Hours - in working schedule (the default) and Regular Training Hours - out of working schedule. |
Total Duration |
Enter the duration. By default, the system displays the duration entered on the component's Recommended Duration page. If the sum of the duration values entered here exceed the duration stated on the Hours tab of the Learner roster, the system displays a warning. |
Use the Enrollment Details - Payment Details page (LM_PYMT_DTLS_ENR ) to edit payment information for a learner.
Navigation:
Click the Edit Payment link on the Learner Roster page.
This example illustrates the fields and controls on the Enrollment Details - Payment Details page.
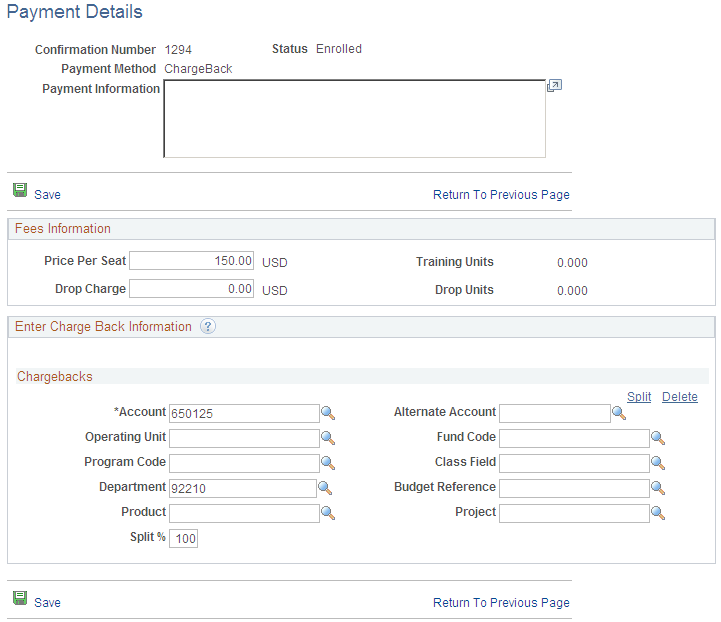
Fees Information
Use this group box to edit payment information. You can increase or decrease prices after enrollment. You can also change drop charges at any time. However, the exception to this rule is that you can only decrease class prices for payments done using training units and purchase orders; you cannot increase them. In addition, you cannot make drop charges for enrollments where training units or purchase orders were used higher than the class price. Changes to drop charges take affect only if you make the changes before you drop the learner. The system does not allow changes to drop charges for a learner after you drop the learner.
Any changes to class prices or drop charges result in a new transaction row in the Transaction table for the enrollment record. This enables you to keep track of all payment changes to an enrollment record.
Note: There is a process that exports payment information from the Transaction table to the Enterprise Learning Management subledger, and then from the subledger to the general ledger in the financials system. If the transaction is already exported to the general ledger in the financials system, you must manually update the general ledger with any changes that you make to payment details.
Changing Payment Information
The payment method group box the system displays on this page varies depending on the payment method that you select during enrollment. You cannot change the payment method, but you can update the payment information. Any changes that you make to the payment information result in a new transaction row in the Transaction table for the enrollment record. This enables you to keep track of all payment changes to an enrollment record.
See Understanding Enrollment and Registration.
Note: For security reasons, the system shows only the last four digits of credit card numbers on this page.
Important! The Enrollment Details - Payment Details page always uses the current ChartField configuration, not the ChartField configuration that was used to enroll the learner in the class. When you add a new split entry, the system displays the default ChartField values for the new split entry, which the administrator can change.