Setting Global Options
This topic describes how to set global options for Online Marketing.
To set global options, use the Global Options (RY_DIALOG_OPTIONS) and Schedule JobSet Definitions (SCHDLDEFN) components.
|
Page Name |
Definition Name |
Usage |
|---|---|---|
|
RY_OPTIONS |
Use to set up options that span all of Online Marketing. |
|
|
RY_MATCHING_RULES |
Use to set up matching rules for adding new individual and company information to the database. |
|
|
Matching Attributes Page |
RY_MATCHING_TREE |
Use to define matching attributes for adding new data to the database. |
|
Required Attributes Page |
RY_MATCHING_TREE |
Use to define attributes that must be entered in order to add new data to the database. |
|
RY_CHARSET_SETUP |
Use to specify which character sets will be used in Online Marketing. |
Use the Global Options page (RY_OPTIONS) to use to set up options that span all of Online Marketing.
Navigation:
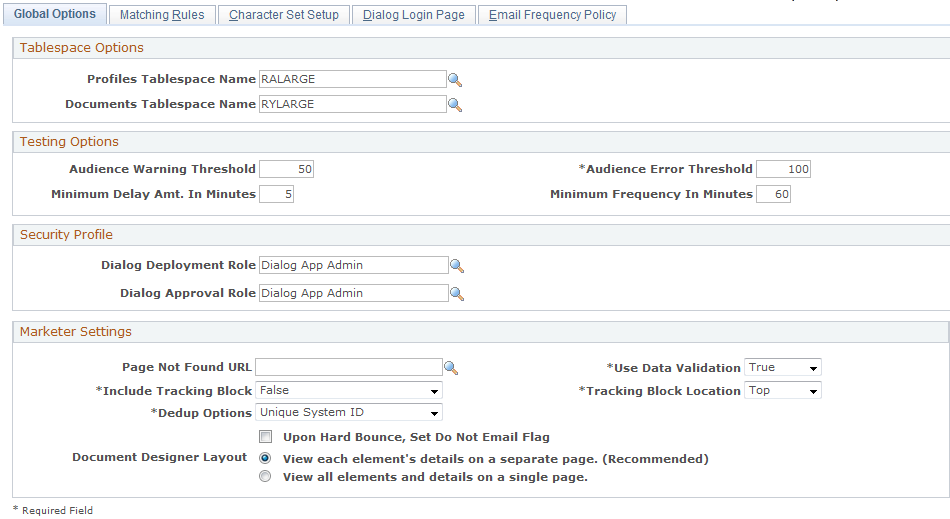
This example illustrates the fields and controls on the Global Options page.
Field or Control |
Description |
|---|---|
Profiles Tablespace Name |
Specifies the default tablespace used to create custom profile data storage tables. |
Documents Tablespace Name |
Specifies the default tablespace used to create document data storage tables. |
Audience Warning Threshold |
Specifies the warning threshold size for dynamic test audiences. If you select an audience with a count greater than the warning threshold, a warning displays when testing online dialogs. |
Audience Error Threshold |
Specifies the error threshold size for dynamic test audiences. The count is generated at the time the audience is selected, and if it exceeds the error threshold an error message is generated when testing online dialogs. |
Minimum Delay Amt. In Minutes (Minimum Delay Amount In Minutes) |
Specifies the minimum delay amount for activities and triggers to kick off when testing online dialogs. |
Minimum Frequency In Minutes |
Specifies the minimum frequency for executing repeating triggers when testing online dialogs. |
Dialog Deployment Role |
The role a user must be a member of in order to deploy online dialogs. |
Dialog Approval Role |
The role a user must be a member of in order to approve online dialogs. |
Page Not Found URL |
The web address of the page that will be displayed when the indicated Landing, Intermediate, or Final page is not available. |
Use Data Validation |
Specifies whether data validation Javascript is embedded into the web pages generated by Online Marketing. The default is true. |
Include Tracking Block |
Specifies whether the email tracking block message will appear in the email. The default is true (the message will appear). |
Tracking Block Location |
Specifies the position in the email message for the email tracking block message. It may be top or bottom. If it is “top” the message appears at the beginning of the email message. The default is “top”. |
Upon Hard Bounce, Set Do Not Email Flag |
Specifies whether to set the Do Not Email flag for a recipient if email sent to that recipient is returned with a hard bounce. If you select this option, you must also activate the batch job in the Process Scheduler. To activate the batch job:
See the product documentation for PeopleTools: Process Scheduler. |
Document Designer Layout |
Specifies which Document Designer mode to use for the current system:
|
Delivered Permissions and Roles
PeopleSoft CRM Online Marketing user permissions are based on roles. Online Marketing delivers the following roles:
Dialog Administrator.
Dialog App Admin.
Dialog Designer.
Document Designer.
The following table shows the permissions for each role.
|
Role Name |
Permissions |
|---|---|
|
Dialog Administrator |
|
|
Dialog App Admin |
|
|
Dialog Designer |
|
|
Document Designer |
Edit dialog documents. |
In order to have all permissions for Online Marketing dialog activities, a user will need to be a member of all of the following additional roles:
PAPP_USER.
PeopleSoft User.
Security Administrator.
See the product documentation forPeopleTools: Security Administration
When a respondent accesses a dialog from a Web Links reach action, Online Marketing does not immediately know the identity of the respondent, whereas when a person accesses a dialog by using the URL included in a broadcast email, Online Marketing can immediately identify the respondent.
Online Marketing needs to know the identity of the respondent in order to properly maintain the information in the system. The Matching Rules feature determines whether the respondent is an individual already in the system, or whether a new individual is to be created.
The Matching Rules page allows you to view and edit the conditions used by Online Marketing to identify respondents. These conditions specify the matching fields that are used to determine whether a respondent that came via a Web Link reach action is already in the system.
You can specify multiple matching rules, and each rule can contain multiple fields. Online Marketing determines matches as follows:
When you specify one or more rules, the information submitted by the respondent must match any one of the rules for Online Marketing to consider the respondent “matched”.
When you specify multiple fields in a matching rule, the information submitted by the respondent must match all of the fields in the rule in order for Online Marketing to consider the respondent “matched”.
To match a field, Online Marketing compares the value provided by the respondent on a web page to the values for that field in the system. For example, if the matching rule lists the email address, first name, and last name from the Individuals profile, then the respondent must submit an email address, first name, and last name that match the entries for an individual in the system. If they do, then Online Marketing considers the respondent to be matched, and can use other information provided by the respondent or already known in the system.
Note: A field is only matched if there is an exact match; for example, if Organization Name was a matching rule and a respondent entered “Oracle” as their company name, but the name in the Organizations.Companies.Organization Name profile is “Oracle Inc.,” there would be no match. Likewise, there would be no match if the respondent entered “Oracle Corp.” or “Oracle inc.”
When a respondent does not match any individuals in the system, Online Marketing can insert the respondent as a new individual in the system, as long as the respondent has provided values for all the fields specified in one of the matching rules along with any Additional required attributes specified for that rule. The additional fields are any fields you want to require a respondent to provide before being added to the system.
These rules help you maintain the integrity of your system.
Warning! To insert individuals into the system, the last name should be a required field on the dialog web form where respondents’ information is requested. If this field is not filled in by the respondent, the new individual will not be inserted into the system. Other fields required for matching rules (such as email address) should be required as well. Likewise, organization name is required in order to insert any new organizations into the system.
Note: Individuals.People.Email and Individuals.People.Email Alternative are automatically inserted into the system in all lowercase.
Use the Matching Rules page (RY_MATCHING_RULES) to use to set up matching rules for adding new individual and company information to the database.
Navigation:
This example illustrates the fields and controls on the Matching Rules page.

Field or Control |
Description |
|---|---|
Priority |
The order in which matching rules are applied. The first rule to match stops the matching process. |
Matching Type |
Specify whether the matching type is the Individuals profile or the Organizations profile. |
Matching Attributes |
The profile attributes in this column determine whether the inserted responses match an individual or organization in the system. You can enter multiple rows of fields. Each row is a rule, listing the fields that each response will be checked against. If you specify multiple rules, each rule is individually compared against the entered data to determine a match. Rules are evaluated from top to bottom. You can also enter multiple profile attributes in each rule. |
Required Attributes |
This column is only used when a response does not match any of the rules specified for the matching fields. The profile attributes in this column provide additional fields that are required in order to insert a new individual or organization to the system. You can enter multiple rows of fields. If you specify multiple rows, each entire row is compared against the entered data to determine whether a value has been provided for each field specified. If so, then a new individual or organization can be created. Rows are evaluated according to priority. You can also enter multiple profile attributes in each row. |
Is Expanded Rule |
This column indicates whether this matching rule is an expanded rule. Expanded rules are enabled only if the Use Expanded Matching Rules check box is selected. If so, then the value for a respondent's Email Address will instead be compared to the system's values for Email Alternative, Email Alt 2, or Email Alt 3 if one of those fields is in the expanded rule. Users cannot create new expanded rules, and these rules should only be enabled if merges are enabled. |
Use Expanded Matching Rules |
This option enables the expanded matching rules, and should only be selected if merges are enabled. |
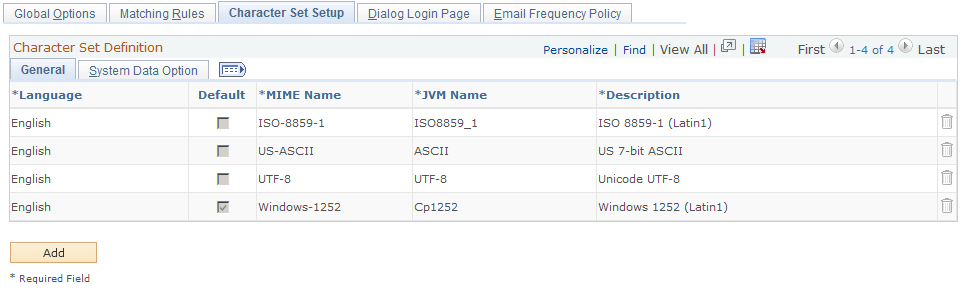
The Character Set Setup page is used to map the available MIME types for each language. In the Character Set list of email elements in the dialog flow, the appropriate list of MIME types are displayed based on the language of the email document. The MIME type is used to determine the encoding for the email document attached to the element. The setup page pre-populates the MIME types for 16 languages by default. You can add new or modify existing types as appropriate.
Use the Character Set Setup page (RY_CHARSET_SETUP) to use to specify which character sets will be used in Online Marketing.
Navigation:
This example illustrates the fields and controls on the Character Set Setup page.
Field or Control |
Description |
|---|---|
Language |
Specify the language. |
Default |
When multiple character sets are available for a language, selecting this check box for one of the specifies that it will be the default character set used for that language. |
MIME Name |
The character set to use for the language in MIME documents. |
JVM Name |
Character set encoding name - this is fixed for each MIME type. |
Description |
Displays the description of the character set. |