Creating and Working with Web Documents
This section describes how to create and work with web documents.
|
Page Name |
Definition Name |
Usage |
|---|---|---|
|
Document Designer |
RY_DOC_SRCH |
Use to specify the type of document you want to create for your online dialog. |
|
RY_DOC |
Use to create a new web document for your online dialog. |
|
|
RY_DOC_DESIGNER |
Use to design a web document for your online dialog. |
|
|
Web Document Profile Insert Page |
RY_VC_MAIN |
Insert a profile field into a web document. |
|
Element Format Properties Page |
RY_DOC_ELEM_FMT |
Click to change the formatting for an individual element. |
|
Import/Export Page |
RY_DOC_IE |
Use to export web documents and to import HTML files into web documents. |
|
Document Designer - Marketing Center Page |
RY_DOC_MKTCTR |
Specify Marketing Center security for the document. |
Before you can add elements to a web document, you must specify its general information.
Use the Document Designer - Document page (RY_DOC) to use to create a new web document for your online dialog.
Navigation:
Marketing, Document Designer, click the Add Web Document button
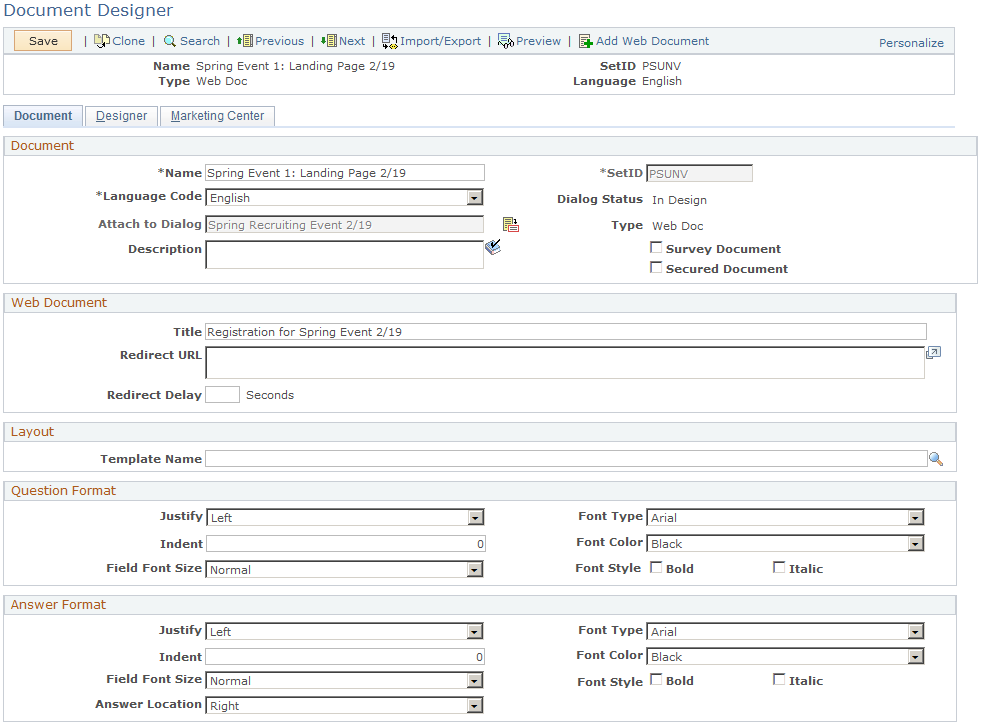
This example illustrates the fields and controls on the Document Designer - Document page.
Field or Control |
Description |
|---|---|
Name |
Enter a unique name for the document. Note: The double quote (“) and period (.) characters are not allowed in the document name. |
Language Code |
Select a language for the document from the available options. If you change a document's language, the system will try to translate any profile fields in the document. |
Attach to Dialog |
Select a dialog to which to attach the document. You can attach a document to any dialog in the same SetID. After a document has been attached to a dialog, you can:
Attaching a document to a dialog allows the document to inherit rules from the dialog. The following list shows the rules:
Note: You can only attach a document to a single dialog. If you want to use the document with more than one dialog, you must clone the document. You cannot detach a document from a dialog if the document has ever been Live, if it is used in a dialog flow, or if it has been imported or exported. |
Type |
This read-only field shows the document's type: Web Doc or Email Doc. |
Dialog Status |
This read-only field displays the current status of the dialog. The options are Design and Live. |
SetID |
Choose the SetID with which the document will be associated. When creating a new document, the SetID is set by default to the value that was specified in User Preferences. |
Description |
Enter a brief description of the document. |
Survey Document |
Select this check box if the document will contain survey questions that will be weighted for scoring purposes. |
Title |
Enter a title for the document. This is not the same as the document's name; the title will appear in the web browser's title bar. |
Redirect URL |
If you want to redirect the user to another page from this one (sometimes called a “forced” redirect), specify the URL of that page. (You can redirect a user to a dialog standalone or landing page or to an external URL, but not to an intermediate page.) Redirecting means that when users view the original page, the system automatically sends them to another specified page after a predefined period. A common reason to use a redirect page is to jump a person from the final page in a dialog back to an e-commerce or corporate site. It is also used to jump them from a blank dialog page to an external URL as a means of tracking the clickthrough—however, this latter method is no longer used in versions 4.0 and later where external link tracking is provided. Note: A document that includes a redirect URL and delay does not need to contain other elements. Adding elements to such a document is allowed, but they will not be used when the document is rendered. |
Redirect Delay |
Enter a value which defines how long in seconds to wait before displaying the new page. The default value is 0. Note: Specifying 0 for the delay means that the user might not see the page on which the redirect was set. Whether the redirect page is visible depends on many factors, including the speed of the webserver(s) involved. |
Template Name |
If the document will use a web template, enter its name in this field. You can choose only templates that were created with the same SetID as the document. |
Question Format |
Select the formatting for your document's questions by specifying font and justification information. The formatting you specify in these fields applies only to questions, not to answers. |
Answer Format |
Select the formatting for your document's answers by specifying font and justification information. You can also specify where the answer will appear relative to the question: below it, to the left, or to the right. The formatting you specify in these fields applies only to answers, not to questions. Once they are set, question and answer format settings apply to all new document elements created thereafter. Any formats that were previously set at the element level retain their previous formatting and aren't changed by the document-level formatting. |
Although web documents can contain a variety of items, all items are added in the same manner.
Use the Document Designer - Designer page (RY_DOC_DESIGNER) to use to design a web document for your online dialog.
Navigation:
Marketing, Document Designer, click the Designer tab.
To add an item to a web document, click the button corresponding to the item you want to add to the document.
The following table shows the elements and their buttons.
Field or Control |
Description |
|---|---|
|
Paragraph |
|
Custom HTML |
|
Horizontal line |
|
Blank line |
|
Profile |
|
Choose One |
|
Choose One with Rating |
|
Choose Many |
|
Yes/No |
|
Text Entry |
|
Text Block Entry |
|
Number Entry |
|
Decimal Entry |
|
Date Entry |
|
Time Entry |
|
Upload File |
|
Button |


The item is added to the Document Designer. If other items already exist in the document, the new item appears below the selected element in element list.
The Document Designer is available in two modes, depending on the number of elements you plan to include in your document. If you only want to include a few elements, you can choose to display a summary of the elements along with their details on the same page, which makes viewing of your entire document design more convenient. However, if your document will contain more than 20 elements, it is usually more convenient (and better for performance purposes) to separate the summary of elements from the details about each element. You can change the Document Designer mode on the Global Options page.
Note: In both modes, a document can contain a maximum of 400 elements, including profile elements (profile questions). If you attempt to add more than 400, an error message will display.
Viewing Element Details on a Separate Page
This mode is recommended, and is selected by default on the Global Options page.
This example illustrates the fields and controls on the Viewing element details on a separate page.
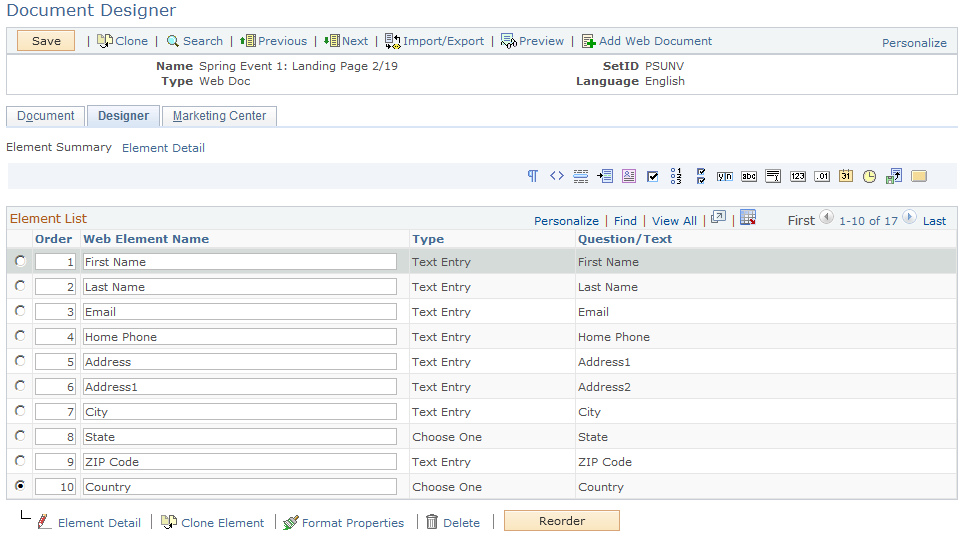
In this mode, the Document Designer tab includes two links: Element Summary and Element Detail. The Element Summary page displays a brief list of all the elements on the page. You can select an item and click the Edit button or Element Detail link to display and edit the detail for that item.
To add a new element to the document in this mode, you select the existing element that you want the new one to follow, and then click the appropriate element button. The new element is added to the list directly following the existing one.
In this mode, you order the items in the list using the numbers in the Order column in conjunction with the Reorder button. Each element in the list has a number corresponding to its current order in the document. To move elements, you enter numbers corresponding to each element's desired order in the Order column, then click the Reorder button to make the change. You should consider the following rules and guidelines when reordering elements:
The reordering operation does not take place until you click one of the following buttons: Reorder, Save, Clone, Delete, or New Element. Only clicking Save will actually change the order in the database, so you must save for your changes to take effect.
You can only enter 3 digits in the Order field, and the maximum order number is 400.
Invalid values (such as negative numbers, decimals, or characters) display an error message when you attempt to reorder, and any Order fields that are empty or contain zeroes are ignored.
If you move an element down by giving it the same number as an existing element, the new element will be placed directly below the original element following reorder. The following tables provide an example. The first table shows the initial values:
Order
Element
1
Coffee
2
Tea
3
Cola
The next table shows the order change prior to clicking the Reorder button:
Order
Element
3
Coffee
2
Tea
3
Cola
Finally, the last table shows the resulting order after the reorder operation is complete. Note that the element that was formerly at position 1 has moved to position 3—after the element that was originally in position 3 (and currently in position 2).
Order
Element
1
Tea
2
Cola
3
Coffee
If you move an element up in the same way, the new element is moved directly above the original element. The following tables provide an example. The first table shows the initial values:
Order
Element
1
Coffee
2
Tea
3
Cola
The next table shows the order change prior to clicking the Reorder button:
Order
Element
1
Coffee
2
Tea
1
Cola
Finally, the last table shows the resulting order after the reorder operation is complete. Note that the element that was formerly at position 3 has moved to position 1—before the element that was originally in position 1 (and currently in position 2).
Order
Element
1
Cola
2
Coffee
3
Tea
If you want to move a group of elements together, you should specify the same target value for each element in the group. After the reorder operation completes, they will end up in the new location, ordered in the same way as before. The following tables provide an example. The first table shows the initial values:
Order
Element
1
Paragraph
2
Number Entry
3
Text Entry
4
Decimal Entry
5
Blank Line
6
Button
The next table shows the order change prior to clicking the Reorder button:
Order
Element
6
Paragraph
6
Number Entry
3
Text Entry
4
Decimal Entry
2
Blank Line
2
Button
Finally, the last table shows the resulting order after the reorder operation is complete. Note that the grouped elements have been moved (in the same relative order) to their new locations.
Order
Element
1
Blank Line
2
Button
3
Text Entry
4
Decimal Entry
5
Paragraph
6
Number Entry
If an element is given an Order number that exceeds the maximum number of elements within the document, that element will be placed at the bottom of the list. (For example, in a list that currently contains 10 elements, if a new element is added and given the order number 99, it will be placed at position 11 in the list.)
Viewing All Elements and Details on One Page
In this mode, all document elements and their details are shown on a single page. You work with items on the page by using the Collapse All and Expand All buttons, which allow you to display all the details or to collapse the items so only the summary of each is shown. Each element also includes an individual expand/collapse arrow so you can view details on specific elements while leaving the rest collapsed.
To arrange document elements in this mode, you select them and modify the order number to move them into position. New elements are added after the selected element in the element list.
The Reorder feature in this mode works as described previously in the section on viewing elements and details on a separate page.
Note: If you have used previous versions of Online Marketing, only this mode was available in those versions.
Occasionally you may find it easier to clone an item and edit its text, rather than start from scratch. When you clone an item, all of the text and formatting is copied to the new item. Because each item must have a unique name within the document, Online Marketing makes the name unique automatically by appending a number to it. You can change this name.
To clone an item, select its Select radio button and click the Clone button. A new copy of the item appears below the selected element.
All items in a document must have unique names within the document. Since you may often have many items in a document, it will be helpful to use descriptive names for each item.
To rename an item, simply change the name in the item's Web Element Name field and save the document.
Note: The double quote (“) and period (.) characters are not allowed in a document name.
You can delete any item in a web document prior to activating your dialog or if the dialog is put back into Design status.
To delete an item from a web document, select its Select radio button and click the Delete button.