Managing Tasks
This topic lists common elements and discusses how to manage tasks.
|
Page Name |
Definition Name |
Usage |
|---|---|---|
|
RB_TSK_MY_TASKS |
View the list of tasks that are assigned to you. You can select a task and view its details or add a task. |
|
|
RB_TSK_PREF_SEC |
Set defaults for tasks that you create and for how the My Tasks list appears. |
|
|
RB_TSK |
Create a task or update task details. |
|
|
Task Repeating Options Page |
RB_TSK_REPEAT_SEC |
Specify the frequency with which a task repeats. This page is accessible only if you select the Show Repeating Options check box for the task type on the Task Type page. |
|
RB_TSK_NOTE |
View or add notes to a task. |
|
|
RB_TSK_TXNS |
Link related transactions to a task. |
Field or Control |
Description |
|---|---|
History |
The History drop-down list box displays a list of the task management pages that you accessed during the current session. Select a listed page to transfer to that page. |
Use the My Tasks page (RB_TSK_MY_TASKS) to view the list of tasks that are assigned to you.
You can select a task and view its details or add a task.
Navigation:
This example illustrates the fields and controls on the My Tasks page.
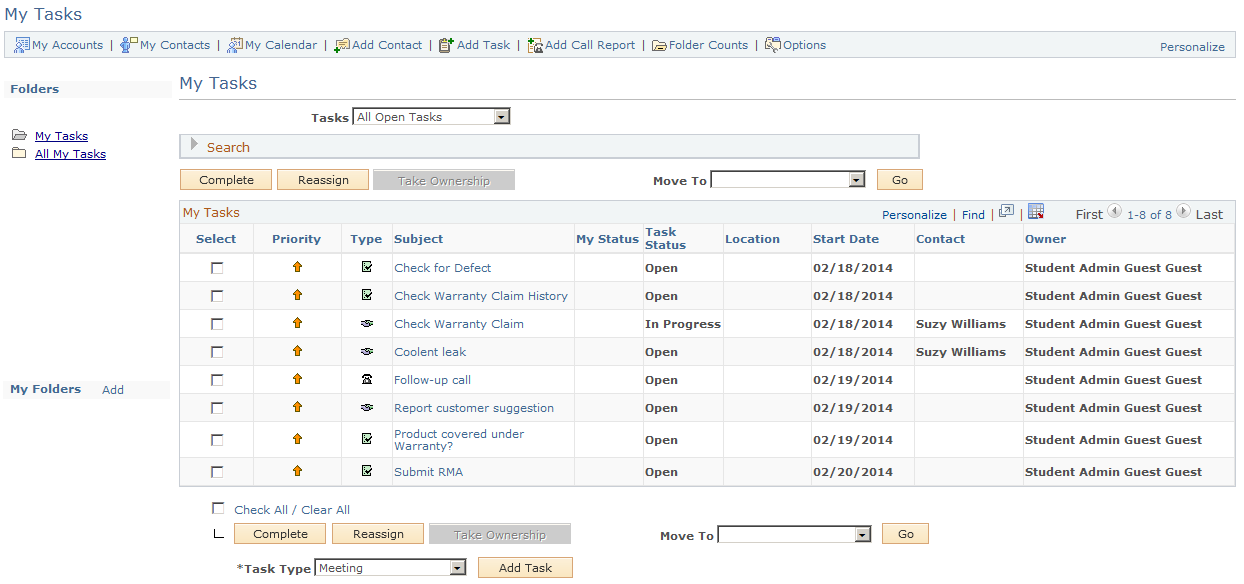
Note: The My Tasks component has its custom setup for populating the grid with tasks and meetings, and it does not support the automatic grid population options that are available in the Configurable Search Setup (RB_FILTER_DEFN) component. The only grid initialization option that the My Tasks component supports is Do not populate the grid, which is also its default option.
When you access the My Tasks page, items of the grid are displayed based on the default filter that appears in the Tasks field. When you select a different filter, the system populates the grid with items that meet the new filter criteria.
Toolbar
Field or Control |
Description |
|---|---|
|
Click to show the number of active tasks in each personal folder. The folder count appears as a number in parentheses after the folder name. Folder count values will only be recalculated when this button is clicked. Folder counts do not appear for the Group, Direct Reports, My Sales Team,or Delegated folders. |
|
Click to access the My Tasks - User Options page, where you can choose the default filter, default folder, and transaction type for the task list, or delegate your tasks. |


Formatting Conventions for Folders
Folder names have these formatting conventions:
Orange highlight indicates the currently selected folder.
Click the Folder Counts toolbar button to display task counts for folders. A number in parentheses after the folder name indicates the total number of active tasks in the folder. Folder counts will only be updated by clicking the Folder Counts toolbar button.
If you move the cursor over the folder name, pop-up text lists the number of unread entries in addition to the total number of entries.
Folders
Field or Control |
Description |
|---|---|
My Tasks |
Click to display task entries owned by or assigned to the user that have not been moved to other folders. You can move task entries into personal folders from the My Tasks view. You can also move tasks from any previously created personal folder back to the My Tasks folder or to another personal folder. |
All My Tasks |
Click to display all task entries from the My Tasks folder and any personal folders that you have created. |
Direct Reports |
Click to display only the task entries of your direct reports (as defined on the worker record). This folder appears only if the current user has direct reports. When you use the direct reports view of your task list, the Direct Report drop-down list box appears so that you can further filter the list to display only entries for a specific person whom you supervise, or for all direct reports at once. |
My Sales Team |
Click to display only the task entries of your sales team. This folder appears only if the current user is a sales manager (as defined by the Territory Tree). When you use this view of the task list, the Team Member drop-down list box appears so that you can further filter the list to display only entries for a specific person on your team, or for all team members at once. |
Group Tasks |
Click to display only task entries that are associated with a provider group to which you belong. This folder appears only if the current user belongs to at least one provider group. When you use the group tasks view of your task list, the Provider Group drop-down list box appears so that you can further filter the task list to display only entries for a specific provider group to which you belong, or for all provider groups at once. |
Delegated |
Click to display only task entries that have been delegated to you. This folder appears only if you have task items delegated to you from other users. When you use the delegated view of your task list, the Delegator drop-down list box appears so that you can further filter the task list to display only entries for a specific person whose tasks have been delegated to you. |
My Folders
Field or Control |
Description |
|---|---|
Add |
Click to access the My Tasks - Add Folders page, where you can name and create a new personal folder. |
Edit |
Click to access the My Tasks - Manage Folders page, where you can rename or delete a personal folder. Note that you cannot delete a folder that contains one or more active (open) tasks. This button only appears if you there is at least one personal folder to manage. |
<Folder Name> |
Click to view the contents of a personal folder. |
My Tasks
The task priority indicator appears as a column on the left of this grid if the default priority is not assigned to the task. The task type icon appears in the column immediately to the left of the subject column.
See Task Priority Page, Task Type Page.
Use the following field to filter which tasks should be included in the search results:
Field or Control |
Description |
|---|---|
Tasks |
Select a filter to view only tasks that meet the filter criteria. The available filters are:
By default, all open tasks, appointments, and meetings appear in the task list. You can click the Options button to select a different default filter. |
The search results (task list) grid displays the relevant tasks that fit the filter criteria for the search that has just been executed, and includes these fields:
Field or Control |
Description |
|---|---|
Priority |
Displays the task priority |
Type |
Displays the task type of the task. |
My Status |
Indicates whether the task is assigned to you and whether you accepted or rejected the task. |
Task Status |
Indicates the task status. |
Contact |
Displays the primary contact for the task or meeting. |
Owner |
Displays the task owner. |
In addition to the search results, the following actions may be performed on any of the search results:
Field or Control |
Description |
|---|---|
Complete |
Click this button to complete the selected task(s). |
Reassign |
Click this button to reassign the selected task(s). This button is enabled in all folders except the Group Tasks folder. Before a Group Task can be reassigned, one of the group members must take ownership. |
Take Ownership |
This button is only enabled when viewing the Group Tasks folder. When clicked, it will set the task owner to the currently logged in user. |
Move To, Go |
Move the selected task(s) to any other personal folder (My Tasks or any user-defined folder). The Move To drop down list and corresponding Go button are only visible when in My Tasks or other personal folders. |
A new task may be created by using the following fields:
Field or Control |
Description |
|---|---|
Task Type |
Select a task type for the task you wish to add. |
Add Task |
Click to add a task of the selected type. |
Search
Expand the Search region of the My Tasks page.
This example illustrates the fields and controls on the My Tasks page [search area].
![My Tasks page [search area]](img/i-42c12a96n-7336.png)
Enter one or more search criteria to filter the results by the criteria entered. To modify the columns that appear in the My Tasks grid, click the Personalize Filter link. On the Personalize Search Settings page, select or clear the check box for the appropriate column.
Field or Control |
Description |
|---|---|
|
Click to display a list of task statuses. Choose one or more statuses to filter the task list by those statuses. |
Show in Results |
Select one or more roles to display only tasks for which you have the selected roles. |
Personalize Filter |
Click to access the Personalize Search Settings page, where you can modify the columns that appear on the My Tasks grid. |

Use the My Tasks - User Options page (RB_TSK_PREF_SEC) to set defaults for tasks that you create and for how the My Tasks list appears.
Navigation:
Click the Options toolbar button in the My Tasks component.
This example illustrates the fields and controls on the My Tasks - User Options page.
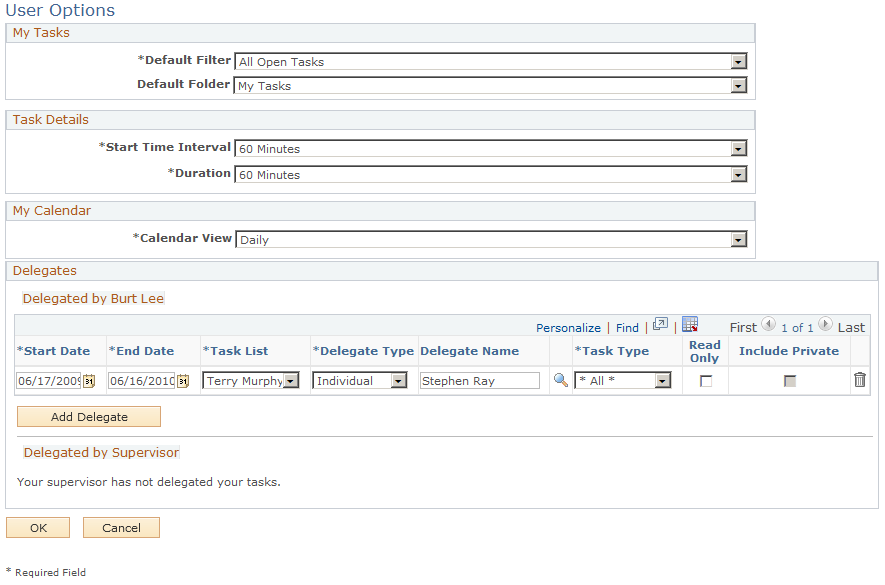
Use this page to personalize how tasks and calendar items appear in the My Tasks component and to set defaults for tasks that you create. The Default Filter option controls which tasks appear in the task list when you first access the component.
Note: You can also set these defaults under
My Tasks
Field or Control |
Description |
|---|---|
Default Filter |
Select the filter to determine the type of transaction that you want to see when you first access your task list for a particular browser session. |
Default Folder |
Select the folder that you want to see when you first access your tasks for a particular browser session. |
Note: Changes to either of these settings will only appear on the My Tasks page after logging out and back into the system.
Delegates
Use the Delegated By [Name] grid to delegate your task entries to another worker or to a provider group for a specified period of time. Supervisors may also delegate the task entries of their direct reports. When tasks are delegated to another worker, he or she will see your tasks in the Delegated folder on his or her My Tasks page.
Field or Control |
Description |
|---|---|
Start Date |
Specify the start date for task delegation. |
End Date |
Specify the end date for task delegation. |
Task List |
Indicate the task list whose items you wish to delegate. Note: This field only appears for supervisors, and allows them to define delegation of their own tasks, the tasks of one of their direct reports, or the tasks of all of their direct reports. |
Delegate Type |
Indicate if you are delegating tasks to a provider group or to an individual. |
Name |
Specify the name of the provider group or of the individual to whom you wish to delegate the tasks. |
Task Type |
Indicate the task type that you wish to delegate. |
Read Only |
Select this option to allow the delegated provider group or individual read-only access to the tasks. Note: A sales manager will have owner access even for tasks delegated to his team members with read-only access. |
Include Private |
Select this option to allow the delegated provider group or individual access to your personal tasks. Note: A supervisor may not delegate the personal tasks of a direct report. |
Use the Delegated By Supervisor grid to view any delegation of your tasks that has been made for you by your supervisor. Workers cannot change these entries: they may only view them.
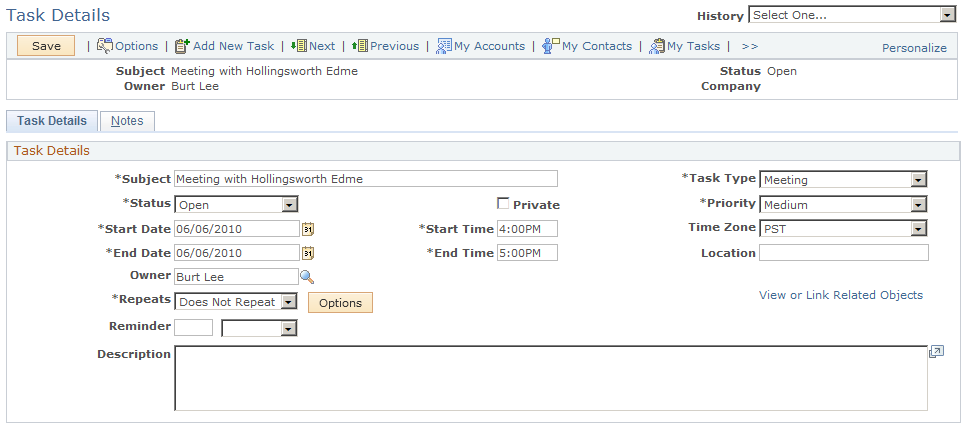
Use the Task Details page (RB_TSK) to create a task or update task details.
Navigation:
Click a listed task on the My Tasks page.
Click the Add Task toolbar button on the My Task page.
Select a task type and click the Add Task button on the My Tasks page.
This example illustrates the fields and controls on the Task Details page (1 of 2).
This example illustrates the fields and controls on the Task Details page (2 of 2).
Task Details
Field or Control |
Description |
|---|---|
Subject |
Enter the meeting subject that appears on the My Tasks list. |
Task Type |
Select a task type if you access this page from the toolbar. If you access this page from the My Tasks page, the system displays the task type you select on the My Tasks page. |
Status |
Select the status of the task from the list of available statuses: Cancelled, Completed, In Progress, and Open. |
Private |
Select to permit only the task owner to access task details. |
Start Date, Start Time, End Date, and End Time |
Enter the starting and ending dates and times of the task. Note: If a task already has a start date and an end date, changing the start date (or start time) will also change the end date (or end time) by an equal amount (to maintain the original duration of the task). You may change this defaulted end date or time value, if desired. |
Provider Group |
Enter the name of the provider group that owns this task. A task must be associated with a provider group or an individual owner (or both). Note: This will only be visible on a task if the corresponding Task Type definition has been configured to display this field. If this field is not visible for a particular task, a value in the Owner field will be required. |
Owner Name |
Enter the name of the individual task owner. The owner might not actually perform the task, but is responsible for task completion. If the task is also associated with a provider group, then only members of that provider group will be available as choices for the owner: otherwise any worker may be selected as an owner. |
Repeats |
Select the reoccurrence frequency for the task. |
Options |
Click to access the Task Repeating Options page (RB_TSK_REPEAT_SEC) configure the settings for the repeating task. |
View or Link Related Objects |
Click to link a company, lead, opportunity, or referral to the task. This link appears only if View or Link Transactions was selected on the Task Type page. Clicking this link accesses the Related Objects for the Task page (RB_TSK_TXNS) where you can search for and select objects to link to the task. Note: If you select a company, lead, opportunity, or referral on the Related Objects for the Task page, the name of that object appears as a link above the View or Link Related Objects link. If you click the link, the system takes you to the page where the object was originally established. If a company has one or multiple contacts, the system still takes you to the Company page. |
Reminder |
If you want to receive a reminder for this task, enter the number of days, hours, or minutes the reminder should send before the task is scheduled to begin. Note: If the reminder time for the newly created task is within an hour from the current time, the task reminder is sent immediately regardless of when the reminder time was set originally. This occurs because the task reminder daemon is programmed to pick up and process reminder emails that are set between an hour before and an hour after the current time. However, if the reminder is set to occur further than an hour from the current time, the daemon sends the reminder as specified. For example, if the current time is 9 am, the task start time is 10 am, and the reminder is set for 10 minutes (09:50 am), the reminder time falls in the time range within which the task reminder daemon picks up and processes reminder emails (8-10 am). In this case, the system sends the reminder email immediately. In another example where the current time is 9 am, the task start time is 11 am, and the reminder is set for 10 minutes (10:50 am). Since the reminder time does not fall in the time range within which reminders are processed immediately (8-10 am), in this case, the system sends the reminder email at the preset reminder time. |
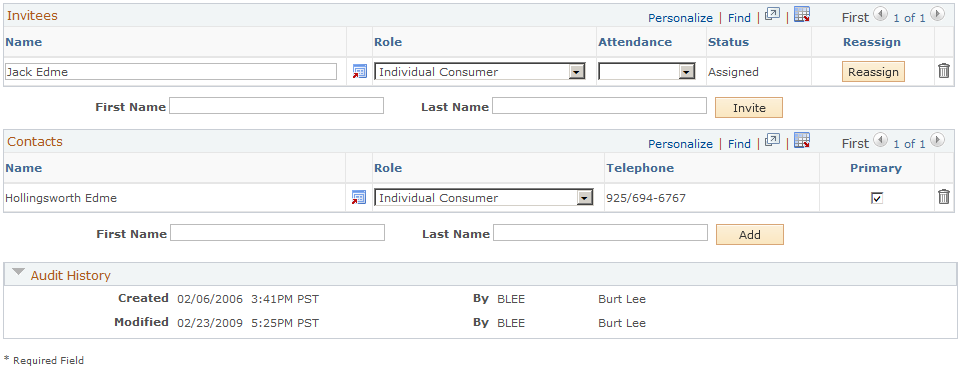
<Invitees / Assignees>
The label of this grid changes depending on the task type. As delivered, the label is Invitees for the Meeting task type and Assigned To for task types Activity, Approval, and Mtg.
The systems displays different information in this section based on how you configured the Task Type page. You can add this grid to add task types or modify the labels using the Task Type page.
Field or Control |
Description |
|---|---|
Display Name |
Enter the name of the person to whom the task is assigned or who is invited to the meeting. |
Reassign |
Click to replace the meeting invitee with another contact. The system sends the new invitee an email. The system removes the task from the original invitee's task list. |
Create |
Click to create the meeting invitee as a contact in the CRM system. For invitees who are not available in CDM, the Create button is presented for you to add the invitee as a contact using Quick Create. Note: If CDM integration is enabled, the duplicate prevention logic is triggered when you click the Create button. The Evaluate Duplicate Person page appears if it finds duplicate entries that resemble the contact you are about to add. You can select an existing match from the list that returns, or choose to create a new person record for that invitee in CDM. |
Role |
Select the person's role. The company name that the person represents appear in the list, as well as other roles the person has, such as Individual Consumer. |
Status |
Indicates the status of the task assignee: Assigned, Accepted, or Declined. |
Attendance |
Select Absent or Attended. This field is available only if you select Record Attendance on the Task Type page. |
Invitation Type |
Select whether the invitation is Mandatory, FYI, or Optional for the invitee. This column appears only if the Show Invitation Type field is selected for this task type on the Task Type page. |
Contacts
Field or Control |
Description |
|---|---|
Primary |
Select to indicate that the contact who is listed in the row is the primary contact for this task. There is only one primary contact for a task, and the primary contact name appears for the task when it is listed on the My Tasks page. |
Adding an Invitee or Contacts
To add a person to either the Invitees grid or the Contacts grid, enter a first and last name below the grid and click the Invite or Add button.
If the first and last name do not uniquely identify a person, the Search For Contact page appears. Select one or more listed persons and click Select.
This example illustrates the fields and controls on the Search For Contact page.
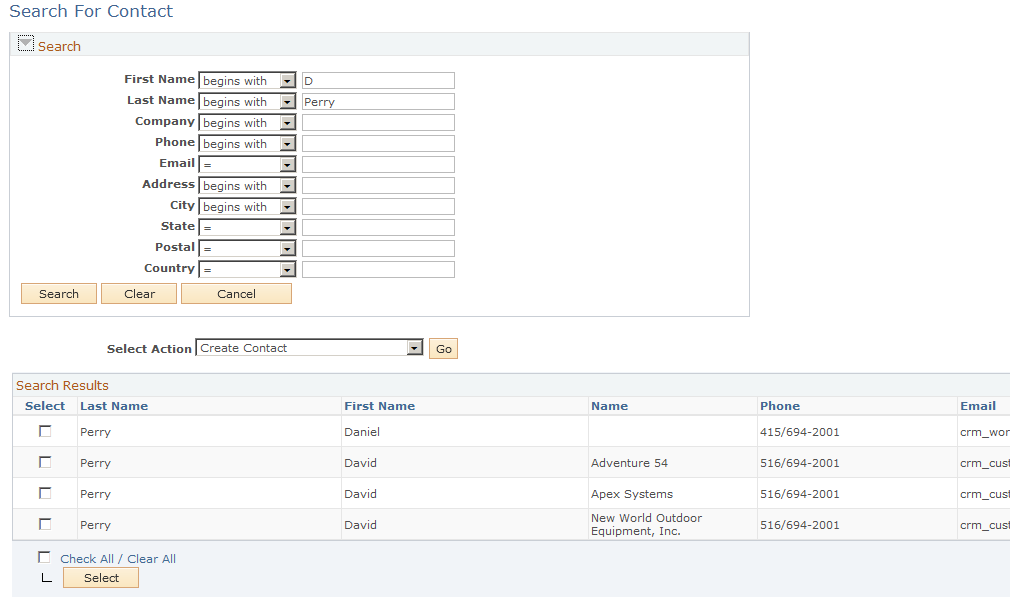
The selected persons are added to the task and you are transferred back to the Task Details page. You can also enter new search criteria or return to the Task Details page without making any selections.
The task owner and assignee can reassign the task by changing the person name in the assignee box.
Use the My Tasks - Notes page (RB_TSK_NOTE) to view or add notes to a task.
Navigation:
Select the Notes tab on the Task Details page.
Use the Related Objects for the Task page (RB_TSK_TXNS) to link related transactions to a task.
Navigation:
Click the View or Link Related Objects link on the Task Details page.
This example illustrates the fields and controls on the Related Objects for the Task page.
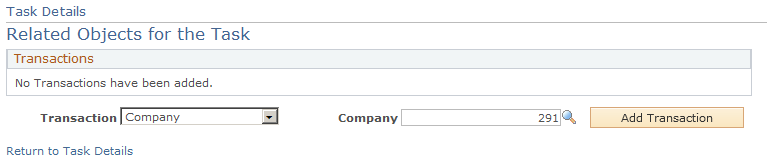
When you select a transaction type, the text that appears next to the Add Transaction button changes to reflect the transaction type.
Field or Control |
Description |
|---|---|
Primary |
Select to designate that this is the primary transaction that is associated with the task. The system displays this task on the Task Details page in the field above the View or Link Related Objects link. |
Transaction |
Select a transaction type. |
Add Transaction |
Select to choose a transaction from a list of transactions for the selected transaction type. |