Defining Worklists
To define worklists, use the Defaults, Worklist Grids, and Group Worklists components.
This section lists prerequisites and discusses how to define personal worklists and define symbolic IDs for group worklists
Note: Each transaction or view by type has its own configurable search definition. Go to
|
Page Name |
Definition Name |
Usage |
|---|---|---|
|
RB_WF_DEFAULTS |
Define symbolic IDs for all PeopleSoft CRM group worklists. |
|
|
RB_WF_WL_GRP |
Define group worklists with notification and queue settings, and identify group members who are permitted to access them. |
|
|
RB_WL_GRID_DFN |
Review system-delivered worklist transaction types. Do not modify any data except the description. |
If you use ERMS and take advantage of the Group Worklist page to define queues and agents for the MultiChannel Console, you must set the queue and agent defaults on the System Installations page of ERMS before you set up the queues.
The system generates a personal worklist for any user that you define. No additional setup is necessary.
See PeopleTools: Security Administration
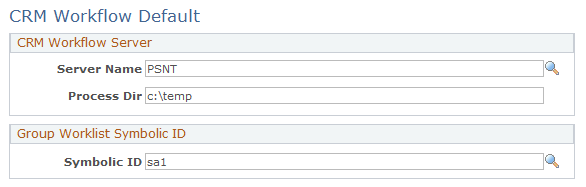
Use the CRM Workflow Default page (RB_WF_DEFAULTS) to define symbolic IDs for all PeopleSoft CRM group worklists.
Navigation:
This example illustrates the fields and controls on the CRM Workflow Default page.
Field or Control |
Description |
|---|---|
Symbolic ID |
Enter a symbolic ID to associate with the user ID that is created for each group worklist that you define. Group worklists are associated with a background user ID, and each user ID must have a symbolic ID. |
Note: The other elements that are on the CRM Workflow Default page are not used for defining group worklists.
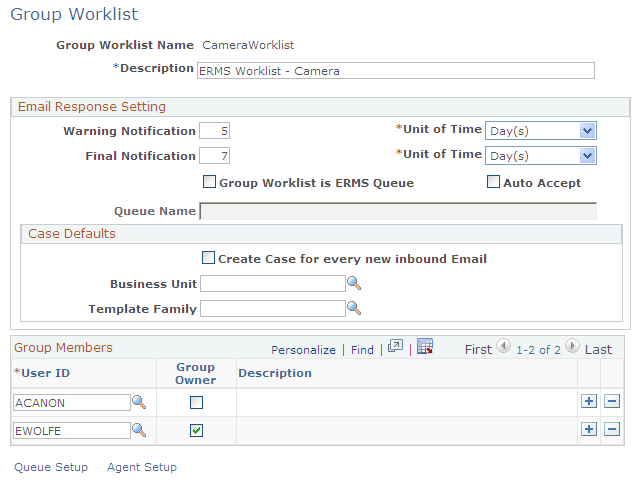
Use the Group Worklist page (RB_WF_WL_GRP) to define group worklists with notification and queue settings, and identify group members who are permitted to access them.
Navigation:
Set Up CRM, Product Related, Multichannel Definitions, Define Servers and Security, Mailbox Details, Associate Rules and Worklist
Click the Details icon for any worklist in the Associated Worklists grid on the Associate Rules and Worklist page.
This example illustrates the fields and controls on the Group Worklist page.
Field or Control |
Description |
|---|---|
Description |
Enter a description. This is the name that appears in the list of group worklists on the My Worklist page. |
Email Response Setting
Use the fields in this group box only if you use Multichannel Communications.
Field or Control |
Description |
|---|---|
Warning Notification, Final Notification, and Unit of Time |
Enter the time after which the system sends notifications if an inbound email that is sent to this worklist is not yet closed. These notifications are sent to the worklist owner. The available units of time for this time period are Minutes, Hours, and Days. Notification deadlines are measured from the time that the email arrives in this worklist. If the email is routed to a different group worklist and then back to this group worklist, the notifications are based on the most recent arrival time. Assignment to an individual worklist does not affect the deadlines. The final notification time is the deadline for responding to and closing the email. The warning notification alerts the mailbox owner or the group owner that the organization is at risk for missing the deadline. Therefore, the warning notification time is shorter than the final notification time. The time period is calculated using a 24-hour clock, without regard to the organization's business hours. |
Group Worklist is ERMS Queue (group worklist is email response management system queue) |
Select to enable the system to create or update a PeopleTools MCF queue that corresponds to this worklist. The queue can be used by either the ERMS or chat feature of PeopleSoft Multichannel Communications. The first time that you save a worklist with this check box is selected, the system creates a queue using the name that you enter in the Queue Name field on this page and using the default real-time event notification (REN) server that you specify on the System Installations page. Note: Names of group worklists defined as ERMS queues cannot end in a number. This is a technical limitation. At save time, the system also creates PeopleTools MCF agent definitions for each user who is in the Group Members grid on this page. The agents become members of the newly created queue automatically. The agents' maximum workload and skill level come from the default values that you enter on the ERMS System Installations page. Subsequent saves create agents and remove agents from the queue as necessary to keep the queue definition synchronized with the worklist definition. If you clear this check box, a system message appears and asks whether you want to remove agents from the queue. Select Yes to disassociate agents from the queue; select No to leave the current agents in the queue. |
Auto Accept |
Select to automatically assign inbound emails in this worklist to the first group member who navigates to the email. To reject the assignment, the user must requeue the email to the same group worklist or route the email to another group worklist. Queues require agents to accept the work that they pick up from the queue. Therefore, if the Group Worklist is ERMS Queue check box is selected, the system selects the Auto Accept check box automatically and makes it read-only. |
Queue Name |
Enter a queue name. When the system creates a PeopleTools MCF queue based on a worklist definition, the queue name comes from this field. (Also, the first 30 characters of the worklist description are saved to the queue description field.) The default value is the worklist name, but worklist names longer than 15 characters are truncated to accommodate the field size for PeopleTools MCF queue names. To ensure that every group worklist definition is associated with a different queue, the system validates that the queue name is unique. |
Case Defaults
The CRM system provides the ability to create cases automatically for all inbound email. This feature is available only with the installation of the ERMS application.
Use this section to enable this feature and specify the business unit and display template family to use for creating cases.
Field or Control |
Description |
|---|---|
Create Case for every new inbound Email |
Select to have the system create a case for each inbound unstructured email that is routed to this group worklist. The system uses the sender of the email as the customer contact of the newly created case. If the email address does not match any of the customer record in the CRM system, one of these two things happens based on the setup of the mailbox to which the inbound email is routed:
If multiple matches are found for the email address, the Select Sender link appears on the case, indicating that the call center agent needs to choose an email sender as the case customer. Click this link to specify a customer for the case, either by picking one from the search result, performing another customer search, or creating a new customer (consumer) using the quick create feature. If this option is enabled, specify the business unit and display template family code used to create cases. |
Business Unit |
Specify the business unit used to create cases for inbound email that are routed to this group worklist. If a business unit is not specified here, the system uses the identified customer of the new case to derive a setID, and uses this setID to get the business unit for case creation from the email business unit mapping of the associated mailbox definition. If customer setID cannot be determined, the default setID and business unit mapping is used. This method applies if the type of the associated mailbox is External or Higher Education. For mailboxes of types Internal and Internal HR, the default business unit specified in the mailbox definition is used for case creation. |
Template Family |
Specify the display template family code that is used to create cases for inbound email that are routed to this group worklist. If a display template family is not specified here, the system uses the business unit that is identified for case creation to derive the display template family to use from the Email Definition page. Depending on the definition, the family used can be different based on mailbox type for the same business unit. |
Group Members
Field or Control |
Description |
|---|---|
User ID |
Enter user IDs for each individual user that is permitted to access this group worklist. The Description column displays each user's name. If this worklist is associated with a provider group, remember to update the group worklist definition when the provider group membership changes. |
Group Owner |
Select this check box for exactly one group member. The selected member is the person with overall responsibility for ERMS entries in the worklist. The system sends this person notifications for each email that is not closed within the warning notification and final notification time frames for this worklist. The worklist owner can take ownership of any assigned email in this worklist. |
Multichannel Communications Links
Use the links on the Group Worklist page only if the Group Worklist is ERMS Queue check box is selected.
Field or Control |
Description |
|---|---|
Queue Setup |
Click to access the queue definition for the current worklist. Use the Queue component to define settings that are beyond the basic default values that the system enters when it creates a new queue based on a PeopleSoft CRM group worklist. |
Agent Setup |
Click to access the Agent component, where you can define agent profile settings beyond the basic default values that the system enters when it creates agent definitions based on a PeopleSoft CRM group worklist. |
Return to Mailbox/Worklist Association Details |
Click to return to the Associate Worklist page. This link appears only if you accessed the Group Worklist page by transferring from the Associate Rules and Worklist page of the Mailbox Details component. |
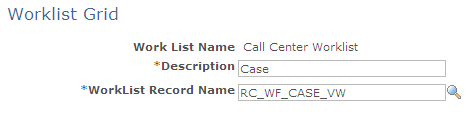
Use the Worklist Grid page (RB_WL_GRID_DFN) to review system-delivered worklist transaction types.
Do not modify any data except the description.
Navigation:
This example illustrates the fields and controls on the Worklist Grid page.
Field or Control |
Description |
|---|---|
Description |
Enter a label for the transaction type. This label appears in the My Worklist page in the View By Type drop-down list box and in the Type column of the grid that displays worklist entries. Note: The system displays the Type column only when View By Type is set to All. |
Worklist Record Name |
Displays the record or view for the worklist entries that belong to this worklist. Note: Do not modify this value. |