
 Understanding PeopleSoft Enterprise Mobile Sales for WAP Phones
This chapter provides an overview of PeopleSoft Enterprise CRM Mobile Sales for Wireless Application Protocol (WAP) Phones and discusses how to:
Sign in to PeopleSoft Enterprise Mobile Sales for WAP Phones.
View or modify Contact information.
Search for companies.
View tasks.
View or modify leads.
View or modify opportunities.
Sign out.
Note. PeopleSoft recommends that the wireless device come equipped with the Openwave microbrowser software version 3.1 or later.
See Also
Understanding PeopleSoft Enterprise Mobile Sales for WAP PhonesIn this section, we discuss:
Navigation.
Display controls and search parameters.
Wireless telephone keypad usage.
NavigationThe following navigational tools within PeopleSoft Enterprise Mobile Sales for WAP Phones help you to move quickly from screen to screen.
|
Links and Numbers |
Appear throughout the application screens. Some devices display links in brackets:[link name]; however, links might not be bracketed in every microbrowser. Use the scroll or arrow key to move the cursor to a link, and click the OK or Yesbutton to access the link. Other devices display a number next to the link. Optionally, you can use the keypad to select the number of the link that you want to access. |
|
More |
Indicates that additional items are available. Click this link for the next set of items to appear. If the phone uses a WAP browser from Openwave then you can use the “9” as a hot key to go to the next page of items. |
|
Sign Off |
Prompts you to confirm that you want to end the PeopleSoft Enterprise Mobile Sales for WAP Phones session. If you click OK, the Sign-in screen appears. |
|
Back |
Usually appears in the bottom right corner of the screen unless overridden by the microbrowser’s character control button in a data entry screen. Also, if you are positioned on a hyperlink the back button may not be available. The Back button returns you to the previous screen. Most phones also have a dedicated (hardwired) back button. Note. Note. The Back button does not appear on some phone browsers if an input field is present. In this case, use the dedicated (hardwired) back button of the browser. |
Display Controls and Search ParametersPeopleSoft Enterprise Mobile Sales for WAP Phones predefines the total allowable number of search items that appear and the total number of rows to return. If the search yields more than 300 results, narrow the search criteria.
If the system can return only one record in response to the request, it displays the record immediately instead of requiring you to select it from a list.
Return codes on the phone generally take the following form: <message> (18050, y)
|
Description |
|
|
<message> |
Description of the situation encountered. |
|
18050 |
PeopleSoft Enterprise Mobile Sales for WAP Phones message set. |
|
Y |
PeopleSoft Enterprise Mobile Sales for WAP Phones message number. |
Note. You can find descriptions of these messages in the Message Catalog. Sign in to PeopleSoft Enterprise CRM with a user ID that is authorized to view the Message Catalog in PeopleTools. You can change the message string.
See Also
PeopleTools PeopleBook: PeopleSoft Integration Tools and Utilities
Wireless Telephone Keypad UsageTo use the PeopleSoft Enterprise Mobile Sales for WAP Phones, you must understand the functionality of the wireless telephone’s keypad.
Note. Because different Web-enabled cellular phones have different keypad designs and microbrowser functionality, we discuss keypad usage in general terms. Consult the device’s documentation for further details.
On most phones, you can enter a letter by pressing the corresponding key until the character appears. For example, to enter the letter “e”, press 3 twice in quick succession. To enter the letter ““z”, press 9 four times in quick succession. Usually, by default, the first letter of a word is capitalized and the letters following are lowercase. When you enter a character using the phone keypad, the character remains highlighted for a moment before the cursor advances automatically to the next space. Continue tapping the key until the character that you want appears. You can wait for the cursor to advance automatically, or press the right arrow key (if available) to advance to the next space.
When presented with an entry field, use the device’s character control button to gain access to additional characters. Some common options include:
|
ALPHA or alpha |
Uppercase or lowercase alphabetic characters. |
|
NUM |
Numeric characters. |
|
SYM |
Sets of special symbols. SMART or smart Uppercase or lowercase alphabetic characters followed by the numerals and special symbols available in a single scroll of each key. |
Note. Screenshots in the documentation might not reflect the application’s exact appearance on the device. This is due to the high number of wireless devices available on the market, and the variety of screen sizes. This documentation shows all selections available on a particular screen. On the actual device, you might have to scroll down to see all available selections.
Signing In to PeopleSoft Enterprise Mobile Sales for WAP PhonesThe sign-in procedure includes application security authentication. PeopleSoft Enterprise Mobile Sales for WAP Phones verifies user information so that sales users see only the leads and opportunities that they have been authorized to see:
Non-sales users can see Contacts, companies, and task information only.
Sales users who have the role of manager can view all the sales-related information for the sales users who report to them.
This section discusses how to:
Sign into PeopleSoft Enterprise Mobile Sales for WAP Phones.
Use the PeopleSoft CRM screen.
Use the Support Menu screen.
Signing in to PeopleSoft Enterprise Mobile Sales for WAP Phones
To sign in to PeopleSoft Enterprise Mobile Sales for WAP Phones:
Enter the predefined URL for PeopleSoft Enterprise Mobile Sales for WAP Phones in the wireless device’s microbrowser to initially access the PeopleSoft Sign-in screen. Once you reach the sign-in screen it is recommended that you bookmark that page to avoid having to enter the URL more than once.
Select LOGIN to confirm that you want to access PeopleSoft Enterprise Mobile Sales for WAP Phones.
(Optional) Select LANG (language) to access the Language Selection screen.
Select the language that you want to define as the preferred language for the Sign-in screen. To return to the Sign-in screen without changing the language, select Link or click the phone’s Back button.
Enter a valid User ID and Password when prompted to do so.
User IDs and passwords are case sensitive.
If an error occurs during the login process, an error message appears. Depending on the error type, you might be prompted to select LOGIN to return to the Sign-in screen, or you might be returned to the Sign-in screen. On most phones, scroll to see the entire error message.
After you successfully sign in, the PeopleSoft CRM screen appears.
Using the PeopleSoft CRM ScreenThe PeopleSoft CRM screen is the main screen in the PeopleSoft Mobile Sales for WAP Phones application.

PeopleSoft CRM screen
Select any one of the following options, and click OK.
|
Contacts |
Select to access the screen where you can view and modify any Contact defined in the PeopleSoft CRM system. |
|
Companies |
Select to access the setID Filter screen, where you can do one of the following:
|
|
Tasks |
Select to view tasks. |
|
Leads |
Select to access the Leads screen, where you can view or modify sales lead information. |
|
Opportunities |
Select to access the Opportunities screen, where you can view or modify sales opportunities. |
|
Sign Out |
Select to sign out. |
Using the Support Menu ScreenYou can access the Support Menu screen from the Mobile Sales screen with the options key on the right (this is usually MENU). The Support Menu provides information that might be useful when contacting PeopleSoft technical support.
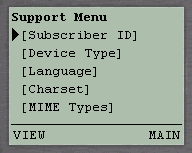
Support Menu screen
Select any one of the following options, and click VIEW to see the associated information:
|
Subscriber ID |
Unique identifier associated with the phone user. This ID helps identify log entries associated with a particular user. |
|
Device Type |
Browser type and version and the WAP gateway type and version. |
|
Language |
Language defined for the phone (not as defined for the application). Phones purchased in different countries might have different languages defined. |
|
Charset (character set) |
Character set used by the phone. This set helps diagnose problems related to the phone’s display of certain characters. |
|
MIME Types (Multipurpose Internet Mail Extensions types) |
MIME types supported by the phone, which should include WML. |
Viewing or Modifying Contact InformationUsers manage Contact information using the Contact List screen, the Contact Detail screen, and the Edit Contact screen.

Contact List screen

Contact Detail screen
Edit Contact screen
To view Contact information:
Select Contacts from the PeopleSoft CRM screen.
The Contact Search screen appears.
Enter the Contact’s full name to retrieve details for this Contact, or enter a partial last name to retrieve a list of matching Contacts.
The Contact List screen displays a list of Contacts that meet the specified search criteria. Select the desired Contact’s name to view the details for that Contact.
Note. If there is only one Contact, the system immediately displays the Contact Detail screen for that Contact.
Select a Contact name from the list of names to view a Contact’s details.
There are several possible views of the Contact Detail screen shown above:
The Contact has multiple associated companies, in which case a Companies link appears.
The destination screen for the Companies link is the Company List screen.
The Contact has a single associated company, in which case the name of the company appears as a link.
Click the link to view the company details.
If the Contact has no associated companies, only the Contact’s business number appears as a link.
If the Contact is not associated with a company and no phone numbers have been assigned, then the only item that appears is the Contact’s name.
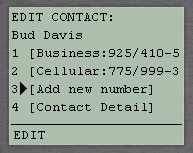
To modify Contact information:
Access the Contact Detail screen as described in the previous steps.
Scroll down (or up) so that the black cursor arrow disappears entirely from the screen, and click the EDIT button.
The LINK button changes to the EDIT button; you are now in edit mode. The Edit Contact screen appears:
|
Business, Cellular, Home, FAX |
Allows you to edit the phone number type, including extension (if desired), and country code. Save the changes. |
|
Add new number |
Allows you to add a new phone number. Select the phone type, enter the information, and save the addition. |
Note. When a phone number is changed or added, it is effective-dated using the current date.
Searching for CompaniesUsers manage company information using the SetID Filter screen, the Company List screen, and the Company Detail screen.
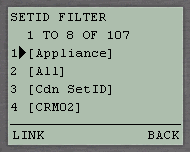
SetID Filter screen
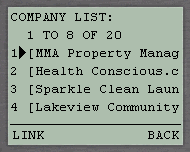
Company List screen
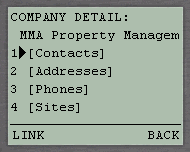
Company Detail screen
To locate company information:
Select Companies from the PeopleSoft CRM screen.
The SetID Filter screen appears. The first selection is always the mobile user’s default setID. The second item is always All and, when selected, enables an enterprise-wide search across all setIDs. The remaining setIDs are sorted in ascending order by the short description.
Select the applicable setID to access the Company Search screen.
Enter the full name of the company to retrieve details for that company, or enter a partial name to retrieve a list of matching companies.
The Company List screen displays a list of companies that meet the specified search criteria.
Note. If there is only one company, the system displays the Company Detail screen for that company.
Select the desired company to view the details for that company.
The following options appear on the Company Detail screen:
|
Contacts |
Takes you to the Contact List screen when multiple Contacts are defined for this company. If only one Contact is defined for the company, this link takes you directly to the Contact Detail screen. |
|
Addresses |
Displays the company nickname. |
|
Main Menu |
Takes you to the PeopleSoft CRM main menu screen. |
Viewing TasksIn PeopleSoft Enterprise CRM, every worker defined in the system is associated with a monthly and daily calendar. Workers and managers can manually update the calendars to reflect daily tasks. In PeopleSoft Enterprise CRM Sales (WAP), system events can automatically update sales Contacts’ calendars to reflect leads and opportunities. Similarly, in PeopleSoft Enterprise CRM FieldService, system events can automatically update technicians’ calendars to reflect service order assignments.
Users manage task information using the Task Calendar screen and the Task Detail screen.
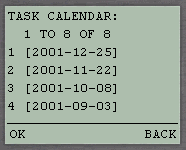
Task Calendar screen
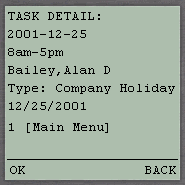
Task Detail screen
To view task information:
Select Tasks from the PeopleSoft CRM screen.
The Task Calendar screen displays all dates for which a task has been defined in the PeopleSoft Enterprise CRM System.
Select a specific date to access the Task Detail screen.
Here you can view the date, Start and End times, Task Owner, Task type, and Task Subject of the task.
Note. The Task Details page has direct links to leads and opportunities if the Task is associated to a leads or opportunity. If the task is not associated to a lead or opportunity, they will not be visible.
Viewing or Modifying LeadsYou can modify lead information such as Type and Status. You can also convert leads to opportunities directly on a mobile phone.
Users manage lead information using the Lead List screen, the Lead Detail screen, and the Edit Lead screen.
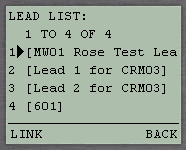
Lead List screen
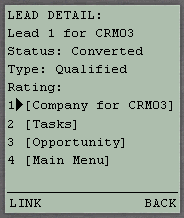
Lead Detail screen
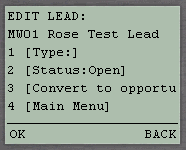
Edit Lead screen
To view leads:
Select Leads from the PeopleSoft CRM screen.
By default the list of leads that appear for each user will be: Leads as Manager, Leads as Owner, Leads as Task Assignee, New Leads as Owner, Team Member Leads, and Team Member Manager Leads. The leads are additionally filtered based on the status field. Only leads with status of Accepted, Deferred, Imported, New, Open, Referred or Working will be displayed in the list. If you would like to modify the search filter for the Lead list transaction, you can use the configurable search tool in the HTML version of the Lead List transaction. To do this, sign-in to the CRM application using the HTML browser and access the Sales->Leads->Lead List transaction. Once you are in Lead List, configure the search the way that you would like it to behave in the WAP client then save the search using the name “WAP.” The next time that you access the Lead option from the WAP Sales main menu, this new saved search filter will be used to retrieve the Lead List.
When you select a lead from the list, the Lead Detail screen appears.
Note. If there is only one lead, you need not select from a list because the Lead Detail screen automatically appears.
Access any related information.
The Lead Detail screen links to the associated Contacts and company. If there are any tasks associated with the lead, a task link appears. If a lead has been converted to an opportunity, then it displays a link to the opportunity.
From the Lead Detail screen, you can view lead details such as Status, Type, and Rating.
To modify lead information or convert a lead to an opportunity:
Access the Lead Detail screen as described in the previous steps.
Scroll down (or up) so that the black cursor arrow disappears entirely from the screen, and click the EDIT button.
The LINK button changes to an EDIT button; you are now in edit mode. The Edit Lead screen appears:
|
Type |
Allows you to edit the lead type. |
|
Status |
Allows you to change the status of the lead. |
|
Convert to opportunity |
Converts this lead to an opportunity. |
|
Main Menu |
Return to PeopleSoft CRM screen |
See Also
Using Leads and Opportunities in Mobile Sales
Viewing or Modifying OpportunitiesYou can view or modify sales opportunities by accessing the Opportunities link from the PeopleSoft CRM screen.
By default the list of opportunities that appear for each user will be: Opportunities as Manager, Opportunities as Owner, Opportunities as Task Assignee, New Opportunities as Owner, Team Member Opportunities, and Team Member Manager Opportunities. The opportunities are additionally filtered based on the status field. Only opportunities with status of Open will be displayed in the list. Opportunities with a status of Closed Lost, Closed Won or Inactive will be filtered out. If you would like to modify a search filter for the Opportunity list transaction you can use the configurable search tool in the HTML version of the Opportunity List transaction. To do this, sign-in to the CRM application using a HTML browser and access the Sales->Opportunities->Opportunities List transaction. Once you are in there, configure the search the way that you would like it to behave in the WAP client then save the search using the name “WAP.” The next time that you access the Opportunities option from the WAP Sales main menu, this new saved search filter will be used to retrieve the Opportunity List.
Note. Opportunities has an anchor to any associated Contacts and company. If there are any tasks associated with the opportunity, a task link appears. If the opportunity is converted from a lead, the opportunity has a link to the lead.
Users manage opportunity information using the Opportunity List screen, the Opportunity Detail screen, and the Edit Opportunity screen.
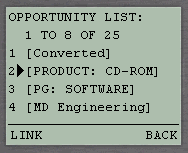
Opportunity List screen
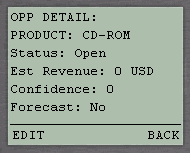
Opportunity Detail screen
Edit Opportunity screen
To view or modify sales opportunities:
Select Opportunities from the PeopleSoft CRM screen.
The Opportunity List screen appears.
Note. If there is only one opportunity, you need not select from a list because the Opportunity Detail screen automatically appears.
Select an opportunity to view or modify details.
To modify an opportunity:
Access the Opportunity Detail screen as described in the previous steps.
Scroll down (or up) so that the black cursor arrow disappears entirely from the screen, and click the EDIT button.
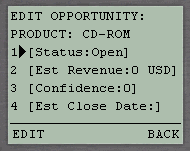
The LINK button changes to an EDIT button; you are now in edit mode. The Edit Opportunity screen appears:
|
Status |
Shows whether the opportunity is Open, Closed, Closed-Won, or Closed-Lost. If you change the status to Closed-Won you will be prompted to enter the actual close date and the actual revenue. If you change the status to Closed-Lost , you will be prompted for the actual close date and you will be asked to select a fallout reason from a list. |
|
Est Revenue (Estimated Revenue) |
Estimated revenue for the opportunity. |
|
Confidence |
Confidence from 0% to 100%. |
|
Est Close Date (Estimated Close Date) |
Estimated closing date. |
|
Forecast |
Include in Forecast? Values are: Yes or No. |
|
Forecast Type |
Forecast type that indicates the degree of likelihood in closing the deal. Values include: Committed or Stretch. |
|
Main Menu |
Return to PeopleSoft CRM screen. |
See Also
Using Leads and Opportunities in Mobile Sales
Signing OutClick the Sign Out link on the PeopleSoft CRM screen to access the Sign Out screen, where you are prompted to confirm whether you want to sign out. Click Yes to sign out; click No to remain connected.

Sign Out screen