
 Understanding Geographical Information Systems
This chapter provides an overview of geographical information systems, Environmental Systems Research Institute (ESRI) integration, ESRI processes, and discusses how to:
Set up transactions and transaction connectors.
Set up relationships and transaction modifiers.
Set up integration flags.
Set up ESRI integration.
Access the Map Dashboard.
View the Map Dashboard.
View geocode errors.
Understanding Geographical Information SystemsESRI is a geographical information system (GIS) and mapping software solution. Using ESRI's mapping and GIS software you can spatially enable the data. The GIS can be an effective way to explain events, predict outcomes, or plan strategies.
The cornerstone of GIS is location information. Addresses are actually the most common form of location information. An address specifies a location in much the same way as a geographic coordinate does. But, addresses are merely text strings containing a house number, street name, direction, and postal code. The GIS needs a mechanism to calculate their geographic location coordinates, such as, latitude and longitude, before you can display them on a map.
Use address geocoding to display tabular data containing addresses as points on a map.
Use geocodes and ESRI mapping functionality to generate incident-related maps that are tailored to your business needs. For example, using this functionality, you can show:
Incidents or cases of the same type on a map.
All types of incidents in a given area.
Note. For information on installing the ESRI software, refer to the installation documentation that was provided by ESRI when you purchased the ESRI software. PeopleSoft does not provided this documentation.
Understanding ESRI Integration. Setting up ESRI integration is a two-step process. You will initially set up Integration Broker for geocode, map extent, and map integrations. Then you will set up the integration with ESRI for map and query definitions.
Note. PeopleSoft CRM integrates with ArcIMS 4.0. ArcIMS provides the foundation for distributing high-end geographic information systems (GIS) and mapping services using the internet. ArcIMS software enables users to integrate local data sources with internet data sources for display, query, and analysis in an easy-to-use Web browser.
This graphic illustrates the steps that you will follow to set up Integration Broker for the ESRI integration:
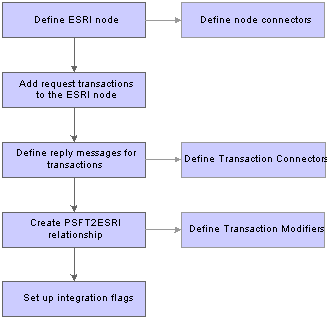
Integration Broker setup
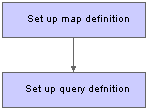
This graphic illustrates the steps you will follow to set up the ESRI integration:
Understanding ESRI ProcessesOnce ESRI is installed and you have set up the integrations, there are three processes that take place on an ongoing basis: geocode retrieval, updating map service information, and map generation.
This section discusses the processes and defines the enterprise integration points (EIP) for each.
Geocode AddressesPeopleSoft CRM stores geocodes for all consumer and company addresses, case addresses or locations, and service order addresses or locations. You can enter either an absolute address, which requires address and the postal code, or an intersection, which requires two cross streets and an optional postal code.
Geocoding is available for US addresses only.
Note. The Geocode Integration Flag on the Installation Options page must be turned on to enable geocode address functionality.
You have two options for obtaining geocode addresses:
Synchronous, realtime connection with ESRI.
Scheduled batch job that runs periodically.
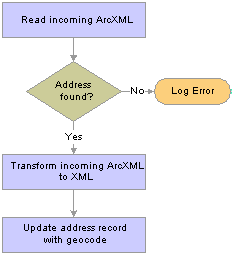
You can obtain geocodes from ESRI in synchronous realtime. When you create or modify an address, the system calls ESRI to get the geocode. If the geocode is found, the system updates the address record with the geocode. If no geocode is found, the system logs an error.
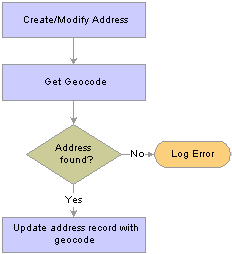
Request process flow for synchronous geocode addresses
Geocodes for addresses can be obtained by a scheduled job that runs periodically. When you first set up the system, use this method to retrieve geocodes for addresses. You can also run this process periodically to pick up any addresses that do not have geocodes. The address record is updated with geocodes obtained from the ESRI system. The system transforms the address or intersection information from XML to ArcXML and sends it to ESRI. This graphic illustrates the outbound process flow for obtaining geocode addresses using a batch process:
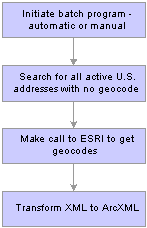
Request process flow for batch geocode addresses
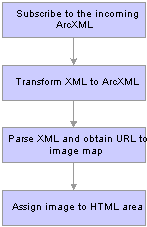
ESRI publishes the geocode for the address or intersection. If no geocode is found, an error is logged. If a corresponding geocode is found, the PeopleSoft system transforms the incoming ArcXML sent by ESRI to XML. The address record is updated with the geocode. This graphic illustrates the inbound process flow for geocode retrieval.
Reply process flow for geocode addresses
The RBG_GEO_CODE_US channel is used for the PeopleSoft ESRI integration. This table lists the EIPs for geocode retrieval:
|
EIP Name |
Description |
Message Name |
Direction of Integration |
Technology |
|
Address information |
RBG_SYNC_ADDRESS_US_MSG |
CRM —> ESRI |
Integration Broker |
|
|
Geocode for the requested address |
RBG_SYNC_GEO_CODE_US_MSG |
ESRI —> CRM |
Integration Broker |
Map Service InformationEach map that is available in the system is called a map service. You can use one map or a number of different maps, depending on your business needs. For example, suppose that you need to access a city map, a state map, and a map of the United States. There is no restriction to the number of map services to which you can subscribe.
In addition to setting up the map services to which you have subscribed, ESRI defines the minimum and maximum extents to be used when zooming in and out on the Map Dashboard.
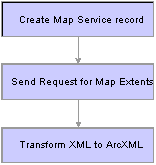
You create the map service record in the Map Definition component. PeopleSoft transforms the XML to ArcXML and sends the map service information to ESRI. This graphic illustrates the outbound process flow for map service information.
Request map service information process flow
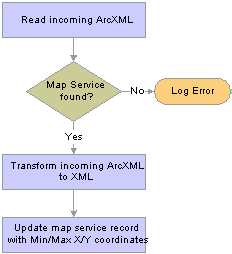
ESRI sends the map service information and PeopleSoft reads the incoming ArcXML. If the map service is found, PeopleSoft transforms the ArcXML to XML and updates the map service record with the minimum and maximum extents. The minimum and maximum X and Y coordinates appear on the Map Definition page. This graphic illustrates the inbound process flow for updating the map service record:
Reply map service information process flow
The RBG_GEO_CODE_US channel is used for the PeopleSoft ESRI integration. This table lists the EIPs for map service information:
|
EIP Name |
Description |
Message Name |
Direction of Integration |
Technology |
|
Service map information to obtain map coordinates from ESRI |
RBG_MAP_EXT_REQ_MSG |
CRM —> ESRI |
Integration Broker |
|
|
Minimum/Maximum X/Y coordinates of the service map |
RBG_MAP_EXT_REP_MSG |
ESRI —> CRM |
Integration Broker |
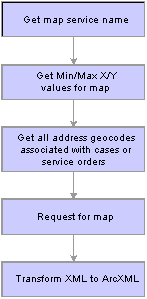
Map GenerationThis integration is used to send a list of geocodes from either a case or service order search. A request XML is sent to the ESRI system to generate a map with geocodes that appear as dots. PeopleSoft gets the map service name, the minimum and maximum extents for the map, and all address geocodes associated with cases or service orders. PeopleSoft sends the message in ArcXML. This graphic illustrates the outbound process flow for generating the map:
Request map generation process flow
The ESRI system responds with a URL to the image map based on the map service and geocodes. The map appears on the PIA page. This graphic illustrates the outbound process flow for generating the map:
Reply map generation process flow
The RBG_GEO_CODE_US channel is used for the PeopleSoft ESRI integration. This table lists the EIPs for map generation:
|
EIP Name |
Description |
Message Name |
Direction of Integration |
Technology |
|
Service map information and list of geocodes to be displayed on the map |
RBG_MAP_REQ_MSG |
CRM —> ESRI |
Integration Broker |
|
|
URL to the generated image map |
RBG_MAP_RES_MSG |
ESRI —> CRM |
Integration Broker |
Setting Up the Transactions and Transaction ConnectorsPeopleSoft CRM uses Integration Broker to send and receive messages for the ESRI integration. Before setting up the integrations for the geocode, map extent, and map integrations, read the PeopleSoft Integration Broker PeopleBook. This section does not provide details on Integration Broker; instead, it provides directions for setting up the geocode, map extent, and map integrations.
This section discusses how to:
Define the ESRI node.
Create transactions.
Create transaction connectors.
See Also
PeopleSoft Integration Broker PeopleBook
Pages Used to Set Up the Connectors
|
Page Name |
Object Name |
Navigation |
Usage |
|
PeopleTools, Integration Broker, Node Definitions, Node Definitions |
Define the ESRI node. |
||
|
PeopleTools, Integration Broker, Node Definition, Transactions |
Add transactions to the ESRI node. |
||
|
Define the request messages for the transactions. |
||
|
Click the Edit link next to an existing transaction on the Transactions page, and then select the Messages tab. |
Define the reply messages for the transactions. |
||
|
Click the Edit link next to the appropriate transaction on the Transactions page. The system displays the Transaction (Detail) page. Select the Connectors tab. |
Define node connectors for the ESRI transactions. |
Defining the ESRI NodeAccess the ESRI Node Definitions page.
See Also
PeopleSoft Integration Broker PeopleBook
Creating Transactions Access the Transactions and Messages pages.
In the default ESRI node that you defined, you need to create a total of six transactions:
Three outbound synchronous transactions for the geocode, map extent, and map integrations,
Three outbound synchronous transactions that contain the transformed outbound message and transformed inbound reply message for the geocode, map extent, and map integrations
To add the outbound synchronous transaction for geocodes:.
Click the Add Transaction button on the Transactions page.
Select Outbound Synchronous as the transaction type on the Node Transactions page.
Select RBG_SYNC_ADDRESS_US_MSG as the request message.
Select VERSION_1 as the request message version.
Click Add.
On the Transaction (Detail) page, select Implicit as the routing type.
Select the Messages tab.
Select RBG_SYNC_GEO_CODE_US as the response message name.
Select VERSION_1.
Click the Return to Transaction List link.
To add the outbound synchronous transaction to contain the transformed outbound and inbound reply message for geocodes:.
Click the Add Transaction button on the Transactions page.
Select Outbound Synchronous as the transaction type on the Node Transactions page.
Select ESRI_ADDRESS_US_MSG as the request message.
Select VERSION_1 as the request message version.
Click Add.
Select Implicit as the routing type on the Transaction (Detail) page.
Select Override Connector.
Verify the gateway ID is LOCAL and the connector is HTTPTARGET.
Select the Messages tab.
Select ESRI_GEO_CODE_US_MSG as the response message name.
Select VERSION_1.
Click the Return to Transaction List link.
To add the outbound synchronous transaction for map extents:
Click the Add Transaction button on the Transactions page.
Select Outbound Synchronous as the transaction type on the Node Transactions page.
Select RBG_MAP_EXT_REQ_MSG as the request message.
Select VERSION_1 as the request message version.
Click Add.
Select Implicit as the routing type on the Transaction (Detail) page.
Select the Messages tab.
Select RBG_MAP_EXT_REPLY_MSG as the response message name.
Select VERSION_1.
Click the Return to Transaction List link.
To add the outbound synchronous transaction to contain the transformed outbound and inbound reply message for map extents:.
Click the Add Transaction button on the Transactions page.
Select Outbound Synchronous as the transaction type on the Node Transactions page.
Select ESRI_MAP_EXT_REQ_MSG as the request message.
Select VERSION_1 as the request message version.
Click Add.
Select Implicit as the routing type on the Transaction (Detail) page.
Select to override connector.
Verify that the gateway ID is LOCAL and the connector is HTTPTARGET.
Select the Messages tab.
Select ESRI_MAP_EXT_REPLY_MSG as the response message name.
Select VERSION_1.
Click the Return to Transaction List link.
To add the outbound synchronous transaction for map integration:.
Click the Add Transaction button on the Transactions page.
Select Outbound Synchronous as the transaction type on the Node Transactions page.
Select RBG_MAP_REQ_MSG as the request message.
Select VERSION_1 as the request message version.
Click Add.
Select Implicit as the routing type on the Transaction (Detail) page.
Select the Messages tab.
Select RBG_MAP_REPLY_MSG as the response message name.
Select VERSION_1.
Click the Return to Transaction List link.
To add the outbound synchronous transaction to contain the transformed outbound and inbound reply message for map integration:.
Click the Add Transaction button on the Transactions page.
Select Outbound Synchronous as the transaction type on the Node Transactions page.
Select ESRI_MAP_REQ_MSG as the request message.
Select VERSION_1 as the request message version.
Click Add.
On the Transaction (Detail) page, select Implicit as the routing type.
Select to override connector.
Verify that the gateway ID is LOCAL and the connector is HTTPTARGET.
Select the Messages tab.
Select ESRI_MAP_REPLY_MSG as the response message name.
Select VERSION_1.
Click the Return to Transaction List link.
See Also
PeopleSoft Integration Broker PeopleBook
Creating Transaction ConnectorsAccess the Connectors page.
To define the transaction connector for map extent integration:
Click the Edit link beside the ESRI_MAP_EXT_REQ_MSG request message on the Transactions page.
Select the Connectors tab.
Enter this URL as the value for the PRIMARYURL property:
http://<EsriServer>/servlet/com.esri.esrimap.Esrimap?ServiceName=<Service Name>
Substitute the map service defined on ESRI for the <Service Name> parameter in this URL and the name of the server for <EsriServer>.
To define the transaction connector for map integration:
Click the Edit link beside the ESRI_MAP_REQ_MSG request message on the Transactions page.
Select the Connectors tab.
Enter this URL as the value for the PRIMARYURL property:
http://<EsriServer>/servlet/com.esri.esrimap.Esrimap?ServiceName=<Service Name>
Substitute the map service defined on ESRI for the <Service Name> parameter in this URL and the name of the server for <EsriServer>.
To define the transaction connector for geocode integration:
Click the Edit link beside the ESRI_ADDRESS_US_MSG request message on the Transactions page.
Select the Connectors tab.
Enter this URL as the value for the PRIMARYURL property: http://<EsriServer>/servlet/com.esri.esrimap.Esrimap?ServiceName=<Service Name>&CustomService=Geocode
Substitute the map service defined on ESRI for the <Service Name> parameter in this URL and the name of the server for <EsriServer>.
See Also
PeopleSoft Integration Broker PeopleBook
Setting Up Relationships and Transaction ModifiersTo implement ESRI, you must also create a relationship called PSFT2ESRI that defines the source and destination node used for transformation. You must also create transaction modifiers to define the initial request message, the result request message, and the transformation request and response, which is an application engine program.
Pages Used to Set Up Relationships and Transaction Modifiers
|
Page Name |
Object Name |
Navigation |
Usage |
|
PeopleTools, Integration Broker, Relationships, Relationships |
Use this page to create the PSFT2ESRI relationship. |
||
|
PeopleTools, Integration Broker, Relationships, Transaction Modifiers |
Add transaction modifiers. |
||
|
Click the Add Transaction Modifier button on the Transaction Modifiers page. |
Create relationship between transaction modifiers. |
Creating the RelationshipAccess the Relationships page.
To create the PSFT2ESRI relationship:
Create a relationship definition with the relationship ID of PSFT2ESRI.
Enter a description.
Change the relationship status to Active.
Enter the default node in both the Node Name definition fields.
Creating Transaction ModifiersAccess the Transaction Modifiers page.
You will create transaction modifiers for the geocode, map extent, and map integrations.
To add the transaction modifier for geocode integration:
Click the Add Transaction Modifier button on the Transaction Modifiers page.
The Relationship Transactions - Add a New Value page appears.
Create the transaction modifier for geocode integration using the data in this table:
|
Field |
Value |
|
Relationship ID |
PSFT2ESRI |
|
Effective Date |
Select an effective date. |
|
Initial Node |
ESRI or the default node |
|
Request Message Name |
RBG_SYNC_ADDRESS_US_MSG |
|
Source Request Message Version |
VERSION_1 |
|
Transaction Type |
OS |
|
Result Node |
ESRI or the default node |
|
Request Message Name |
ESRI_ADDRESS_US_MSG |
|
Target Request Message Version |
VERSION_1 |
Enter the sequence number 10 on the Relationships - Transaction Modifiers page.
Select OS as the transaction type in the Result section of the page.
Select RBG_ADDR_XSL as the request in the Transformations region of the page.
Select RBG_GEO_XSL as the response in the Transformations region of the page.
To add the transaction modifier for map extent integration:
Click the Add Transaction Modifier button on the Transaction Modifiers page.
The Relationship Transactions - Add a New Value page appears.
Create the transaction modifier for geocode integration using the data in this chart:
|
Field |
Value |
|
Relationship ID |
PSFT2ESRI |
|
Effective Date |
Select an effective date. |
|
Initial Node |
ESRI |
|
Request Message Name |
RBG_MAP_EXT_REQ_MSG |
|
Source Request Message Version |
VERSION_1 |
|
Transaction Type |
OS |
|
Result Node |
ESRI |
|
Request Message Name |
ESRI_MAP_EXT_REQ_MSG |
|
Target Request Message Version |
VERSION_1 |
On the Relationships - Transaction Modifiers page, enter the sequence number 20.
Select OS as the transaction type in the Result region of the page.
Select RBG_OEXT_XSL as the request in the Transformations region of the page.
Select RBG_IEXT_XSL as the response in the Transformations region of the page.
To add the transaction modifier for map integration:
Click the Add Transaction Modifier button on the Transaction Modifiers page.
The Relationship Transactions - Add a New Value page appears.
Create the transaction modifier for map integration using the data in this table:
|
Field |
Value |
|
Relationship ID |
PSFT2ESRI |
|
Effective Date |
Select an effective date. |
|
Initial Node |
ESRI |
|
Request Message Name |
RBG_MAP_REQ_MSG |
|
Source Request Message Version |
VERSION_1 |
|
Transaction Type |
OS |
|
Result Node |
ESRI |
|
Request Message Name |
ESRI_MAP_REQ_MSG |
|
Target Request Message Version |
VERSION_1 |
Enter the sequence number 30 on the Relationships - Transaction Modifiers page.
Select OS as the transaction type in the Results region of the page.
Select RBG_OMAP_XSL as the request in the Transformations region of the page.
Select RBG_IMAP_XSL as the response in the Transformations region of the page.
Setting Up Integration FlagsThree integration flags must be selected for the ESRI integration to work effectively. To implement ESRI, select integration flags for the geocode, map extent, and map integrations.
This section discusses how to:
Select the geocode integration flag.
Select the map extent and map integration flags.
Pages Used to Set Up Integration Flags
|
Page Name |
Object Name |
Navigation |
Usage |
|
Set Up CRM, Install, Installation Options, General Options |
Select the flag for geocode integration. |
||
|
Set Up CRM, Common Definitions, Integration Rules, Map Services, Map Services |
Select the flags for map extent and map integration. |
Selecting the Geocode Integration FlagAccess the Installation Options - General Options page.
Select the Geo Code Integration check box.
Selecting the Map Extent and Map Integration FlagsAccess the Map Services page.
Select the Enable Map Extent Integration and Enable Map Integration check boxes.
Setting Up ESRI IntegrationTo set up ESRI Integration, use the Map Setup (RBG_MAP_SETUP) component.
To set up ESRI integration, define the ESRI map services to which you subscribe. You can define one or more map services to be used in PeopleSoft Customer Relationship Management (PeopleSoft CRM). The map services that you define appear as options on the case and service order components. On the Query Definition page, you define the PeopleSoft components that support map-related queries.
This section discusses how to:
Set up map services.
Set up query definition.
Pages Used to Set Up ESRI Integration
|
Page Name |
Object Name |
Navigation |
Usage |
|
Set Up CRM, Common Definitions, Integration Rules, Map Services, Map Services |
Define the GIS vendor and the map services that you are using. |
||
|
Set Up CRM, Common Definitions, Integration Rules, Map Services, Query Definition |
Define the components used for map-related queries. As delivered, map-related queries are enabled for case and service order. |
Setting Up Map ServicesAccess the Map Services page.
Note. The previous section includes an example of the Map Services page.
|
Market |
Displays market defaults from the search page. |
|
GIS Vendor Name (geographical information system vendor name) |
Enter the name of the GIS vendor. |
|
Description |
Enter a description of the service defined on this page. |
|
Enable Map Extent Integration |
Select to enable map extent integration. Map extent information determines the boundaries for zooms and pans. You must select to enable the Get Map Service Extents button in the Services group box. |
|
Enable Map Integration |
Select to enable the publishing of maps to the PeopleSoft system. |
Services
|
Map Service |
Enter each map service that is to be used. The user can select the appropriate map service from the Map Dashboard search. Map services are set up on the ESRI site. |
|
Description |
Enter a description of the map service. |
|
Request Message |
Enter the message to be sent to ESRI to request the service. |
|
Active Map Service |
Select to make the map service active. |
|
Default Map Service |
Select to use the map service as the default. |
|
Get Map Service Extents |
Click to get the extents for the map service that you are defining. This sends a request to ESRI for the map service extent data and populates the map extent information on the page. The Get Map Service Extents button only works if you have selected Enable Map Extent Integration. |
|
Map Minimum X (minimum X coordinate), Map Maximum X (maximum X coordinate), Map Minimum Y (minimum Y coordinate), and Map Maximum Y (maximum Y coordinate) |
After you request the map service extents, the system populates the minimums and maximums for the X and Y coordinates. This data establishes the boundaries for zooms and pans. Latitude and longitude appears in degrees. |
Setting Up Query DefinitionAccess the Query Definition page.
|
Query Name |
Enter a name for the query. The query name is selected on the Map Dashboard search page. |
|
Component Interface Name |
Enter the component interface that provides access to the component. |
|
Component Name |
Enter the name of the component on which you want to perform the query. PeopleSoft delivers PeopleSoft CRM set up to query on cases and service orders. |
|
Base Record |
Enter the name of the base record for the component. |
|
Active Query |
Select to enable the query definition. |
|
Default Query |
Select to use this query as the default. |
Copy Fields
In the Copy Fields group box, define the fields that are to appear in the case or service order-related information grid that appears under the map on the Map Dashboard. For example, in a service order-related query, you may want to display the business unit, service order ID, consumer name, city, postal code, state, service order status, and service order priority. Each of these rows corresponds to a point shown on the map.
|
From Record |
Select the record name from which to retrieve the data. |
|
From Field |
Select the field name from which to retrieve the data. |
|
To Record |
Select the record name in the destination table. |
|
To Field |
Select the field name in the destination table. |
|
Active |
Select to enable the copying of the specified fields. |
Accessing the Map Dashboard Using the Map Dashboard search page, you can create customized searches to display the data. You can access the Map Dashboard search page from the agent view, navigation bar, Case page, or Service Order page.
Pages Used to Access the Map Dashboard
|
Page Name |
Object Name |
Navigation |
Usage |
|
From the left navigation, click the Map Dashboard link on the menu. |
Define the criteria for the search. You can search on one or more fields to define the results. |
||
|
Click the button on the Case page or the link on the Service Order page to go directly to the Map Dashboard. The system carries forward all of the values that you defined in the Query Definition setup. |
Accessing the Map DashboardAccess the Map Dashboard - Query page.
|
Search |
Select Case or Service Order.. |
|
Map Service |
The map service appears by default to the map that you defined on the Map Definition page. You can select from a list of available map services. The map services are configured on the ESRI site. |
|
Use Saved Search |
Select a saved search from the list. |
|
Map It |
Click the Map It button to submit the search and generate the map. |
|
Save Search Criteria |
Click the link to save the search criteria. |
|
Personalize Search |
Click the link to display a list of search fields. You can choose the fields to display on the search page. |
Viewing the Map DashboardThe Map Dashboard presents a graphical and tabular representation of the search results.
Page Used to View the Map Dashboard
|
Page Name |
Object Name |
Navigation |
Usage |
|
Click Map It on the Map Dashboard - Query page. |
Use this page to view the map and tabular data generated by the search. |
Viewing the Map DashboardAccess the Map Dashboard - Map page.
Use the directional arrows and zoom in and zoom out buttons to navigate to the areas on the map that you want to view.
Viewing Case-Related Information on the Map DashboardAccess the Map Dashboard - Cases page.
The Cases grid displays details of the case-related information that appear on the map. Click the Case ID link to navigate to the case details.
Viewing Service Order-Related Information on the Map DashboardAccess the Map Dashboard - Service Orders page.
The Service Orders grid displays details of the service order-related information that appear on the map. Click the Service Order ID link to navigate to the service order details.
Viewing Geocode ErrorsIf the ESRI system cannot return a valid geocode for the address that is published, an error log is created.
Page Used to View Geocode Errors
|
Page Name |
Object Name |
Navigation |
Usage |
|
Customers CRM, Geocode Error Log, Geocode Error Log |
View addresses that do not generate valid geocodes. |
Viewing Geocode ErrorsAccess the Geocode Error Log page.
This page displays addresses that do not generate valid geocodes